Browse Author

Chris Wright

snom M9r Repeater Compatibility

After a few enquiries recently regarding repeater compatibility with the snom M9r, we thought it a good idea to test this for ourselves.

I can now confirm that the RTX 4002 DECT repeater IS compatible with the M9r, providing that the snom phone is on the latest firmware version (9.6.2-a)*.

Follow the steps below to get your repeater and M9R paired:

1). Set the repeater in registration mode. Insert
the repeaters power plug for 1-5 seconds then remove it. Insert it once more and leave it powered on. The LED on the repeater flashes slowly after the start.

2) Set the base station in registration mode. Log in to the Web UI by typing the IP address of the M9R into your web browser

3) The LED on the front of the repeater should now be flashing quickly. If the LED flashes very quickly without
interruptions go to step 5. If the LED flashes very quickly with brief interruptions go to step
4.

4) Registration of the handset:
If the base PIN has been changed, it must
be set to “0000”. You must repeat the registration procedure even if the mobile unit used was already registered at the base station, Now the LED should flash very quickly without interruptions.

5) Assign a repeater number:
You must now assign a repeater number to the repeater (selection: 2-7, for up to 6 repeaters). Please note that each number can only be assigned once, when using more than one repeater. These numbers are independent of
the DECT handset extension numbers.

Using the DECT handset, key in the repeater number followed by the * key – E.g. 2*. Press the green dial button, the repeater will flash the corresponding number of times to show its repeater number, then the LED will stay solid. Press the * key again to confirm and then the Red dial button to end the process.

The repeater will now be paired successfully with the M9R.

* More information on the firmware update procedure can be found on the snom wiki.

How to: 2N Door Entry and Cisco UC540

One of our customers recently had a problem with an analogue version of the 2N Helios Force door entry unit that they had connected up to a Cisco UC540 system.

Calls were initiated with no problems but the system was not sending disconnect tones to the door entry unit, meaning that the call wasn’t ended until the button was pressed for a second time.

The solution ended up being quite simple! You need to change the analogue port settings in the UC540 to a managed user extension rather than a standard analogue port. The system should now disconnect the call properly when the call is hung up.

For more information on the 2N range, please visit our website.
If you have already purchased a 2N unit from us and need some help please email the support team at support@provu.co.uk

How to: Connect a Plantronics CS540 with a Yealink Phone

This is a step-by-step guide of how to successfully connect a Plantronics CS540 to a Yealink SIP phone (Compatible with T26P, T28P, T38G).

You should have:
– Plantronics CS540 Headset
– Yealink Handset with EHS capabilities
– Yealink EHS36 adapter.

(For a full list of headset and phone compatibility please view our headset compatibility chart)

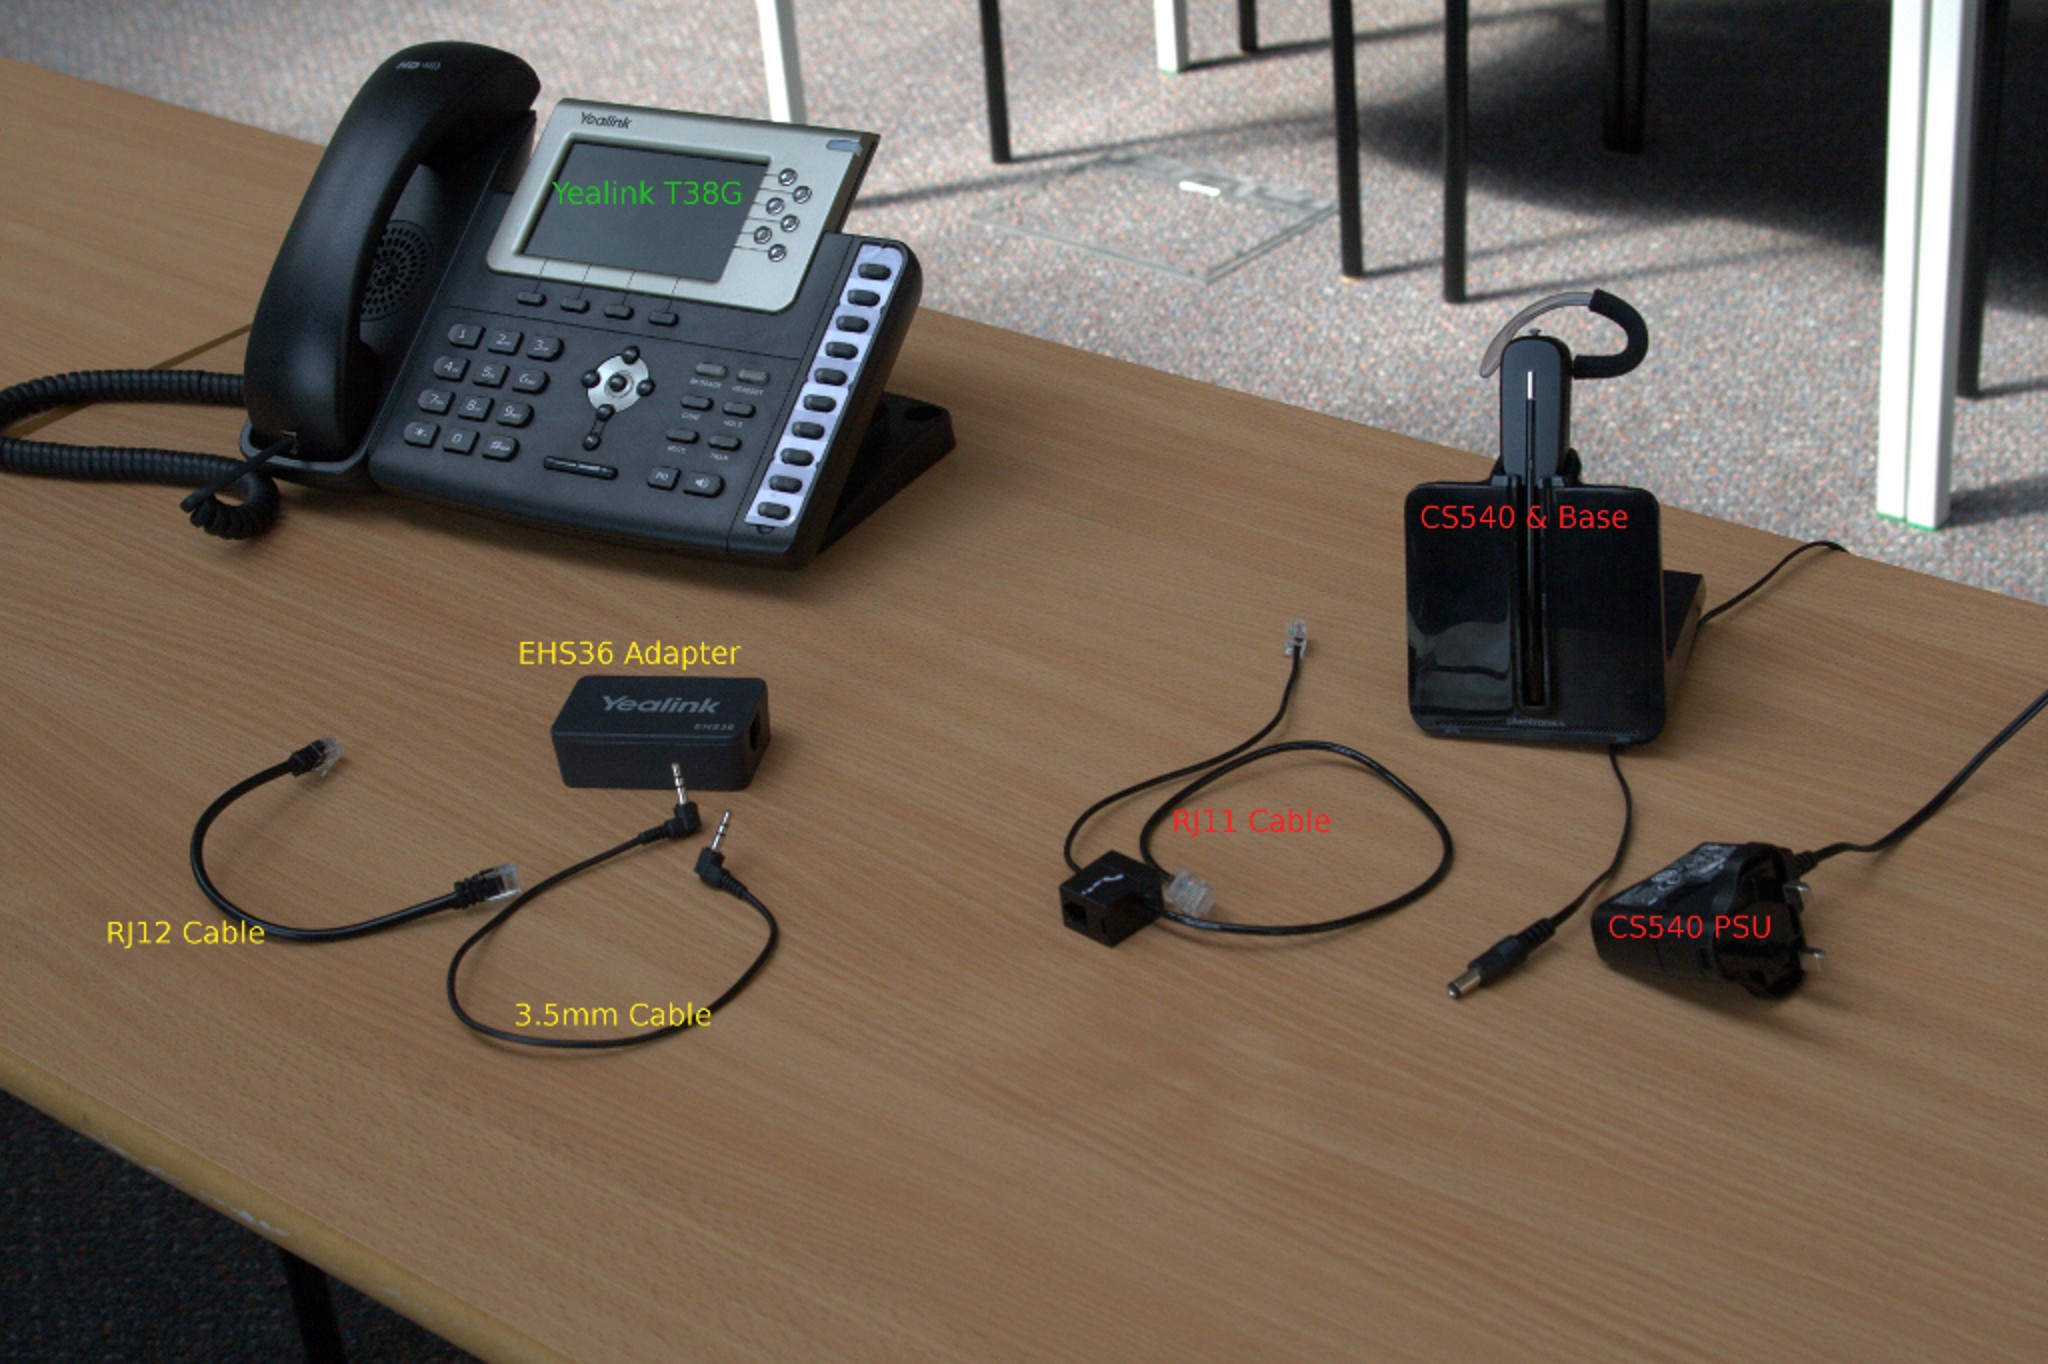
The image below shows the contents of each box that will be required for this setup. They have been labelled for ease of idenitification and grouped according to which box you will find them in -see the key below.

Green – Yealink T38G Box
Yellow – Yealink EHS36 Box
Red – Plantronics CS540 Box

Step 1:
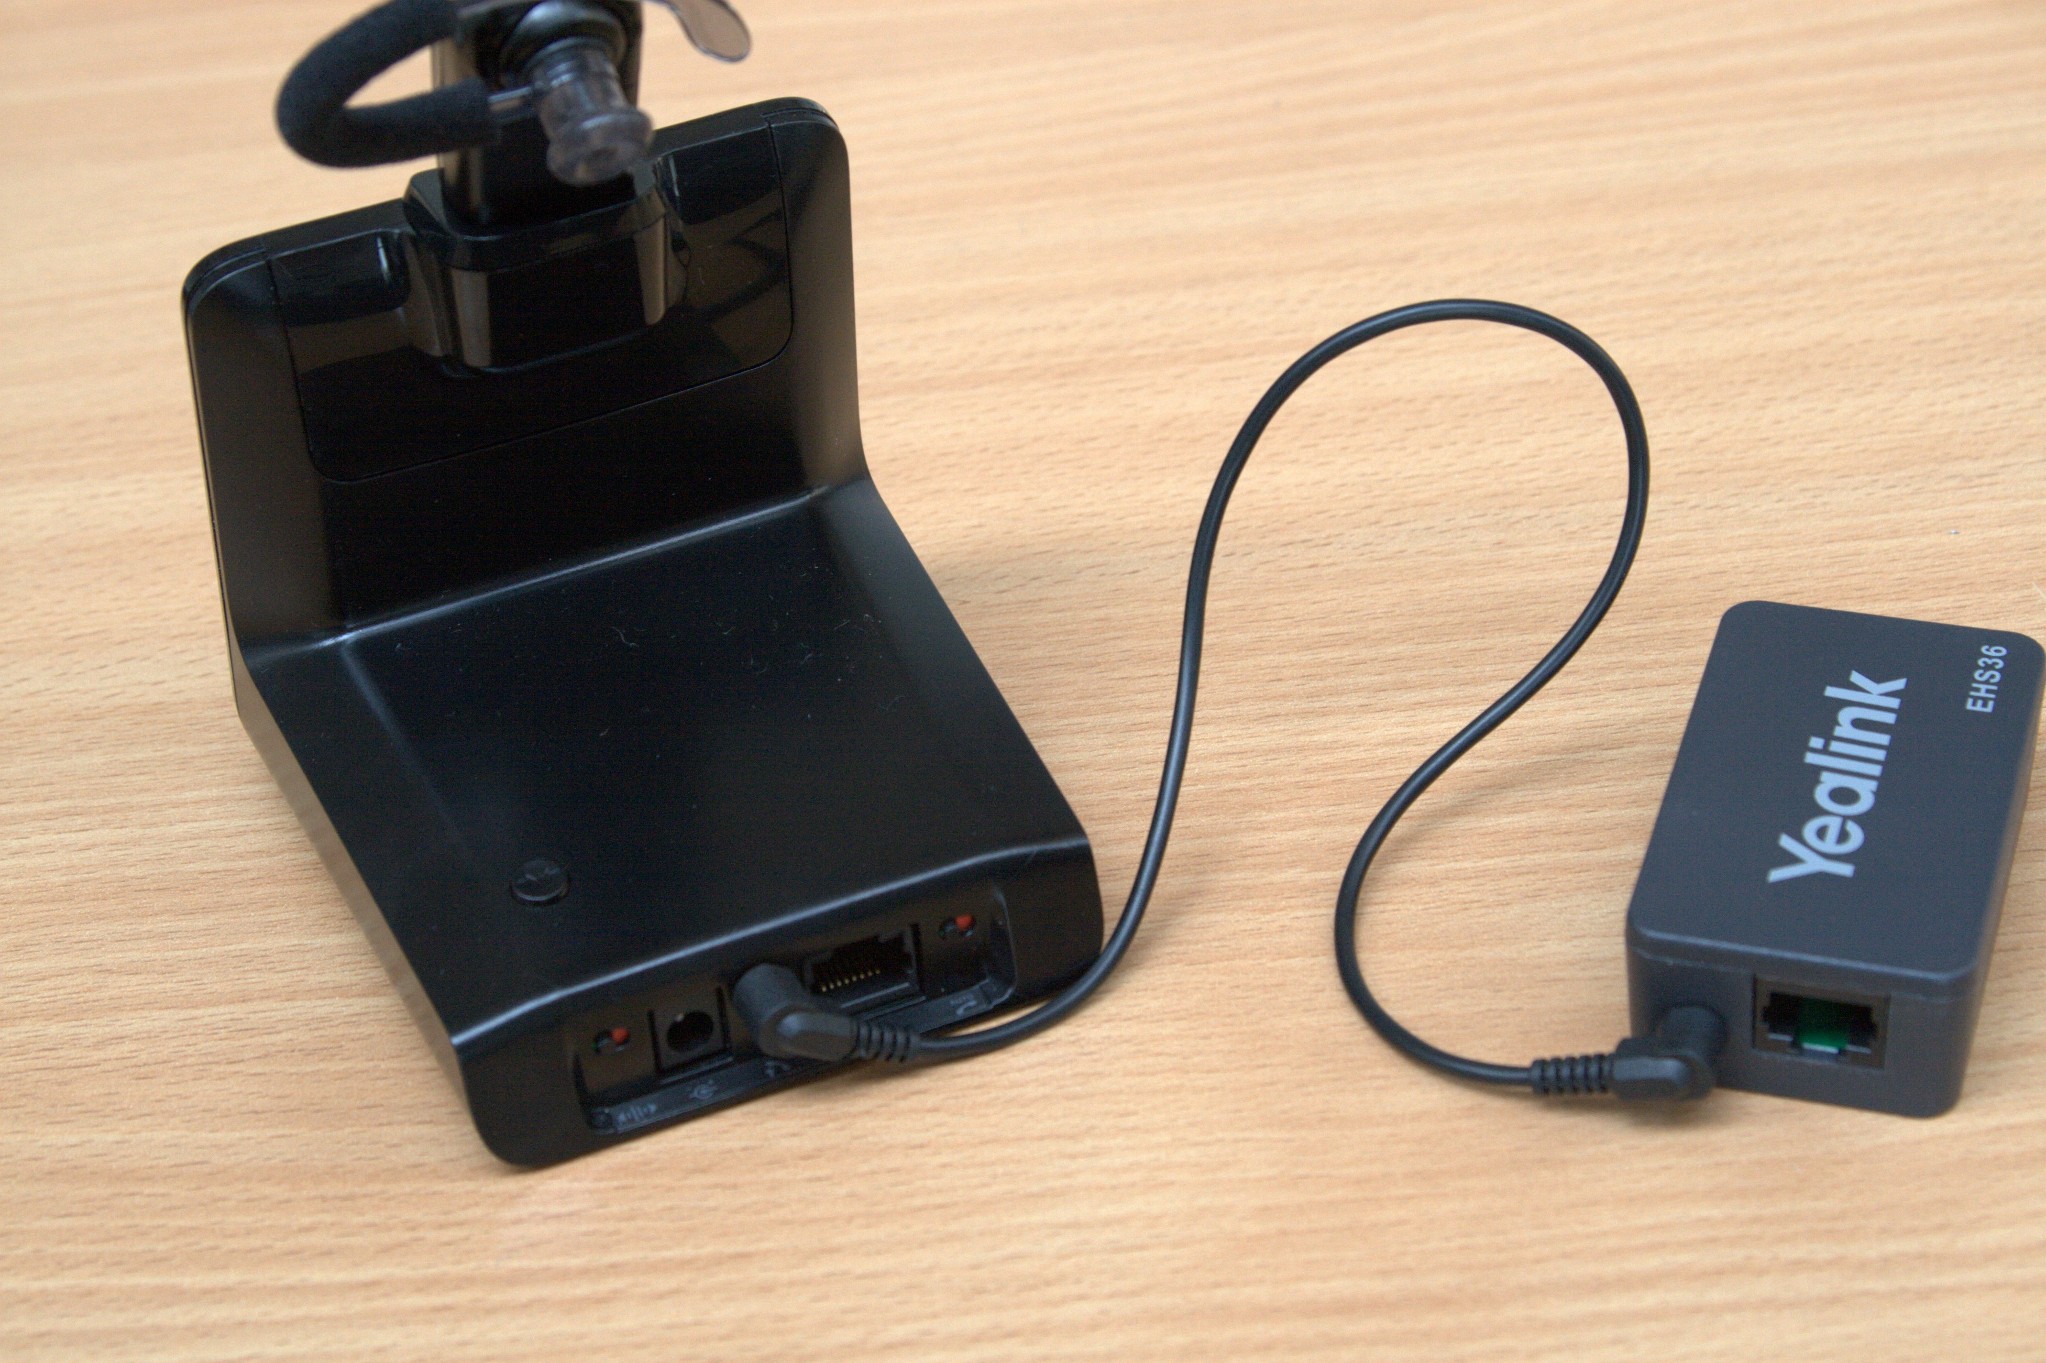
Once you have the correct parts ready, the next step is to connect the 3.5mm cable from the Plantronics base unit, to the EHS36 box. You can’t really go wrong here as they will only fit into one slot on each unit, but the picture below highlights where to connect them.

Step 2:
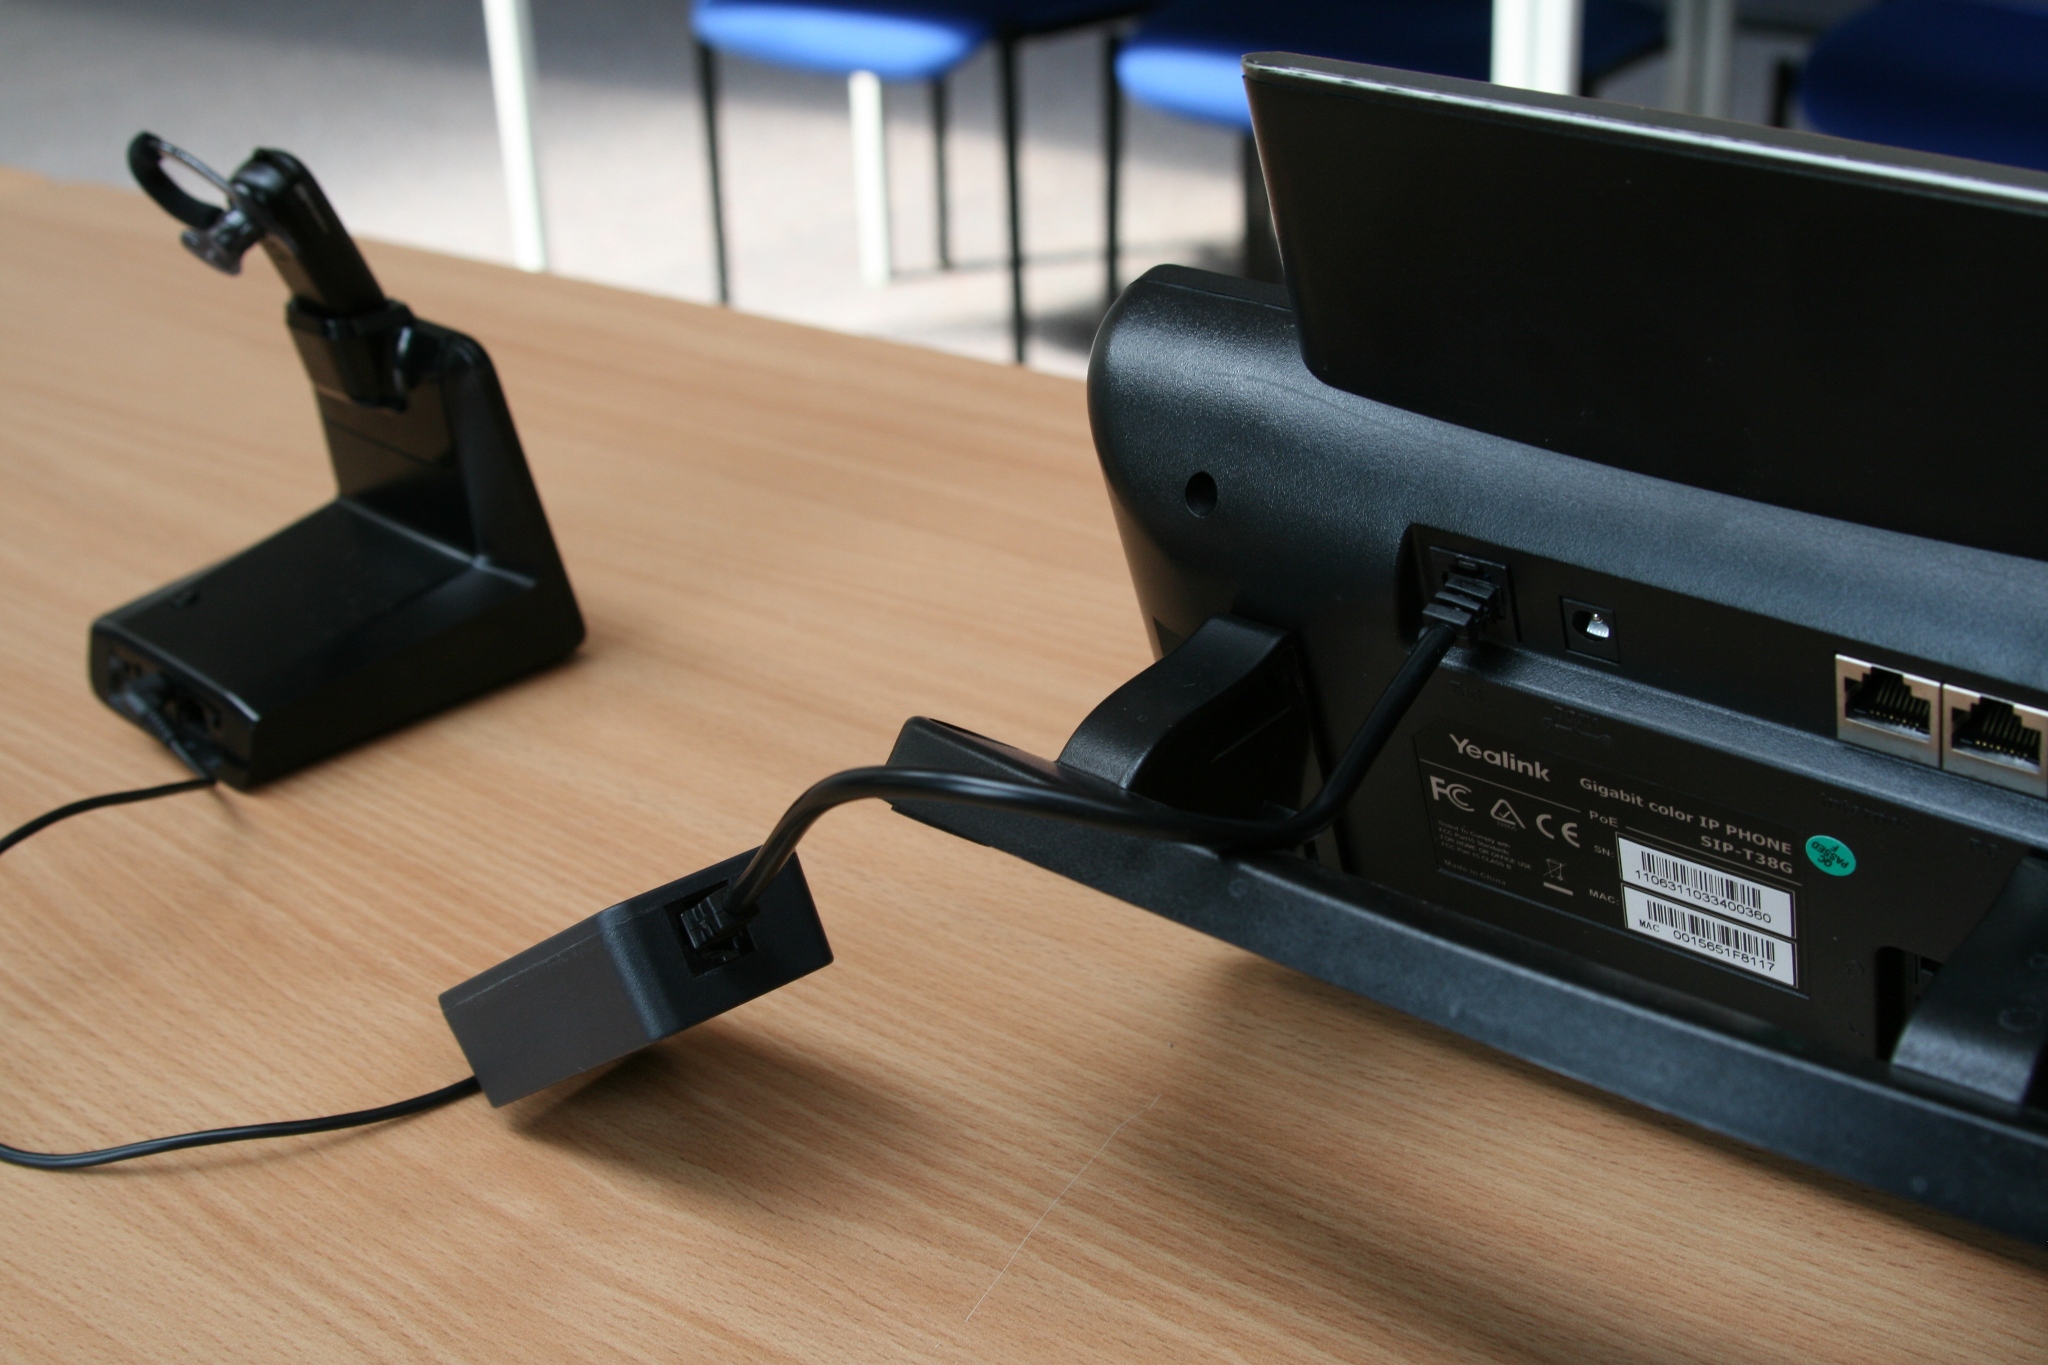
Connect the RJ12 cable from the EHS36 box to the EXT port on the back of the T38G. This port should be clearly labelled on the phone. See the picture below for illustration.

Step 3:
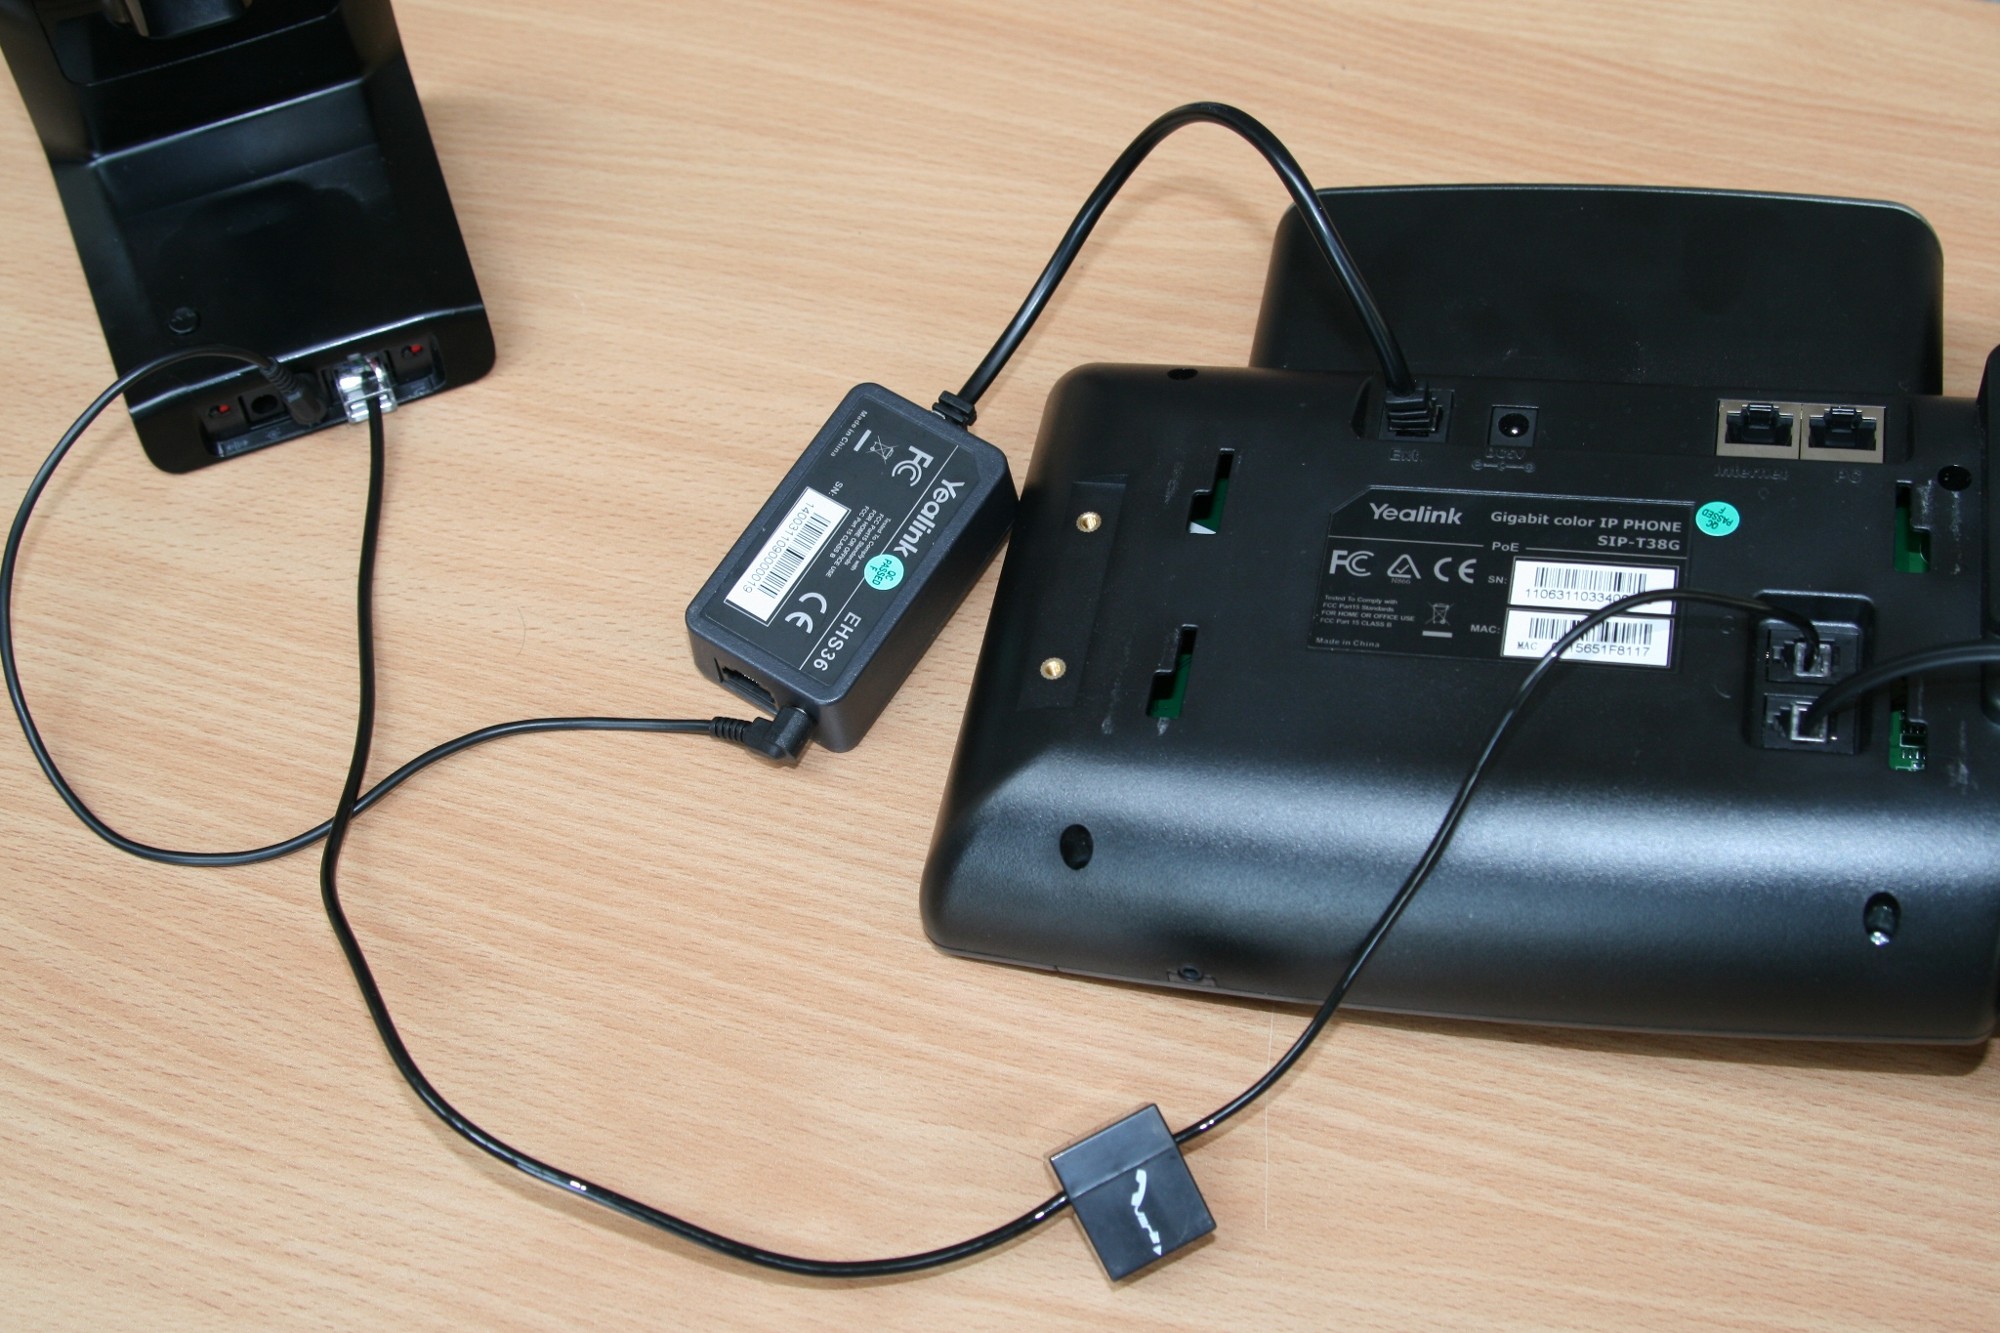
Connect the Plantronics RJ11 cable from the base unit to the Headset port on the back of the T38G. This port is labelled with a small headset icon, it is located next to the Receiver port, please make sure these are put into the correct slots. Again, the picture below shows how they should be connected.

That’s it! Power up the phone and the Plantronics base if you have not done so already. If this is a new purchase please allow a short time for the headset to charge before use. To charge simply place it onto the base in the very obvious slot.

If you have any problems after following this guide, please email support@provu.co.uk with details of your issue and a member of the technical team will be happy to advise.

How to: Panasonic Repeater Pairing

This is a short guide on how to pair up a Panasonic repeater (KX-A405) to a Panasonic DECT base. This guide assumes that you have plugged in your DECT base and registered the handset to it – if you have not yet done this please do so now, consult the user manual for the base if you require help.

The base must be on firmware 22.58 or greater. Older firmwares do NOT include repeater functionality

Step 1: DO NOT PLUG IN THE REPEATER YET.

In the handset menu select IP service (toolbox icon). Select Call Features then Repeater Mode. Set this setting to ON.

Step 2:
Press and hold the ALL button on the base for 4 seconds (or until the status light blinks red). On the TGP500 this button is on the side, on the TGP550 it is on the front.

Step 3:
Once the status light is blinking red, you can now plug in the repeater. Make sure that the repeater is within range of the base (around 1 metre away is best) – you can reposition the repeater to its final location once it is paired.

The repeater should now automatically pair with the base. Once both of the LEDs are lit green the process is complete. Please note this may take a few seconds.

** If the LEDs do not light green – consult Page 10 of this manual to diagnose the problem.**

That’s it! The repeater is now paired to the base. You can now press the ALL button once to take the base out of registration mode.

If you are one of our customer’s and are having trouble with this please send an email to support@provu.co.uk or call us on 01484840048 and a member of the technical team will be able to help.

  • 1
  • 2