Browse Author

Paul Hayes

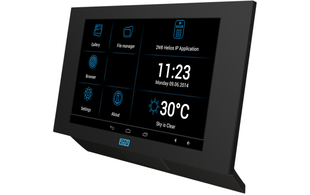
New firmware for the 2n Indoor Touch unit

2n have recently released firmware version 2.0 for the Indoor Touch communicator system.

We have been testing this all week and are happy with it. What we like best about it are:

  • Addition of a web interface for remote management, simpler management & diagnostics
  • Fix for IP stack (caused units to lose IP address in some circumstances)
  • Video-voicemail system built-in for when you are not available to answer the door

Full release notes and a download for this firmware can be found on the Indoor Touch product page

LDAP phonebook on Panasonic HDV phones

How To Setup LDAP/Active Directory phonebook on a Panasonic HDV (130,230,330) SIP phone

LDAP (Lightweight Directory Access Protocol) is commonly used with SIP phones to store contact lists or phonebooks. Many modern SIP phones can connect to an LDAP server and it is my recommended method of implementing a shared phonebook (simply because of cross-device support).

I will assume you already have a working LDAP server set up. On a Microsoft server, LDAP is called Active Directory. OpenLDAP is commonly used on open source based systems. Both work the same from the phone’s point of view.

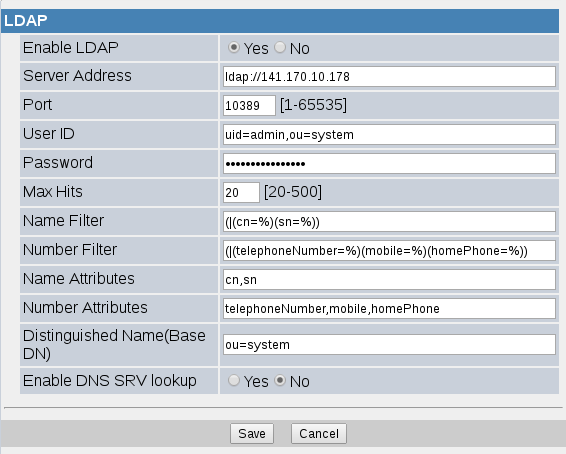
Here is a screenshot of some example settings from a HDV330 phone.

These settings are fairly standard in SIP phones (or anything that is doing LDAP searching). Without going in to too much detail, key points are:

  • Server Address: this has to include the protocol name ‘ldap://’ at the start. Or ldaps:// for ldap over ssl
  • Port: normally 389 for ldap
  • User ID: you have to specify a username & password. The phone will not connect anonymously. The user id has to be the full DN of the user. Exactly what this is depends on how your ldap server is setup
  • Name/Number Filters: these settings contain the searches that will be performed depending on whether a name lookup (the user typed in letters) or a number lookup (the user typed in a number). What goes in here depends on your ldap server set up
  • Name/Number Attributes: these are the attributes within your ldap database that you are using to store names and telephone numbers in
  • Base DN: where to start the search in your ldap directory (ldap is hierarchical so objects above this base will not be seen by the phone)
  • DNS SRV: this is used for service discovery, if you don’t know what it is then leave it set to No!
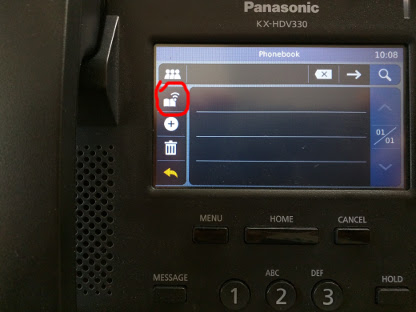
  • Note – you must specify a username & password, these phones will not bind anonymously. I wouldn’t recommend running an ldap server like that anyway as you are leaving yourself open to getting all your contact’s information stolen!Now on the phone itself, find the phonebook option and select it. You will probably be shown the internal phonebook by default, press the option to switch to ‘shared phonebook’. On a HDV330 you press the button circled in red in this photo:
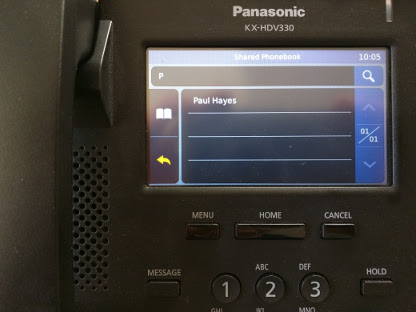
  • Then you can use the search box to type in a name, matching entries will be displayed:On phones with programmable keys, you can configure a key for shared phone book. Set the key type as ‘phonebook’, set the parameter to ‘2’ (for shared phonebook) and give it a label if required.

Gigaset N510IP PRO firmware release

Gigaset have released a new firmware update for the N510IP-PRO DECT base station.

A summary of the most interesting features is:

  • Support for new handsets such as R650H-PRO
  • Over-the-air software updates for newer PRO handsets (previously this was only ever possible using a USB cable and special software and generally was never carried out)
  • Distinctive ringing using Alert-Info headers
  • LDAP directory works during a call for easier transfers


Full information including upgrade instructions are on the Gigaset Pro wiki

Snom BBC News story

A story was published on the BBC News website today regarding a vulnerability in snom phones that could allow someone to eavesdrop on you.

http://www.bbc.co.uk/news/technology-35579273

If you read this story earlier today, you should re-read it as it has been substantially edited in the last hour or so.

I would just like to reassure customers that this is not news to either ourselves or snom. It is just a case of setting decent passwords on the phone and using up to date firmware. Devices must be set up correctly to operate in a secure fashion, snom phones actually do more to remind you to do this than any other phone – they have messages on the LCD screens and web interfaces.

Also, ProVu advise customers on security best-practices and we can provision a sensible set of default settings to your IP phones.

Snom publish a best-practices guide here:

http://wiki.snom.com/FAQ/How_do_I_secure_my_phone

The gist of this is to use recent firmware, set a strong HTTP password and leave hidden-tags turned on.

This advice pretty much fits with any SIP phone (indeed, any device you connect to your network).

It’s a shame snom have been singled out here because they do more than many to secure their phones.

Paul.

Sangoma Vega SNMP traps

Sending SNMP traps from a Sangoma Vega gateway

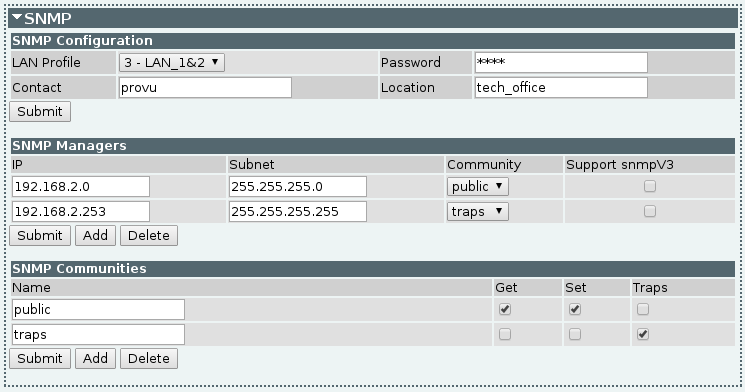
Here is an example of the configuration required on a Vega gateway (100G/200G in this case). This will allow snmpget queries from any device on the 192.168.2.0/24 network and will send snmptraps to 192.168.2.253:

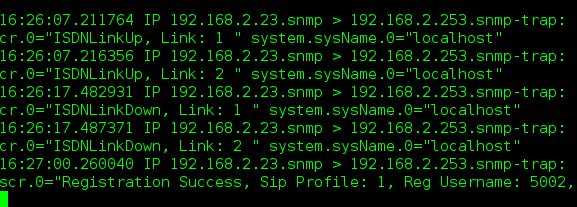
Traps such as ISDNLinkUp, ISDNLinkDown, SIP Registration Success/Failure will then be sent:

Documentation from Sangoma:

Yealink “ghost” phone calls

Occasionally we get support calls from people reporting “ghost” calls on a Yealink phone.

Fortunately the problem is easier to fix than calling the Ghostbusters in.

It’s caused by potential hackers trying to gain access to public SIP phone systems by scanning IP addresses for anything that responds to SIP calls. Usually using a tool called sipvicious.

Whilst they can’t really do anything bad with your Yealink phone, these calls are a nuisance.

To stop them, make sure you are on a fairly recent firmware version. v73 from www.yealink.co.uk or newer is recommended.

Then change two settings in the web interface:

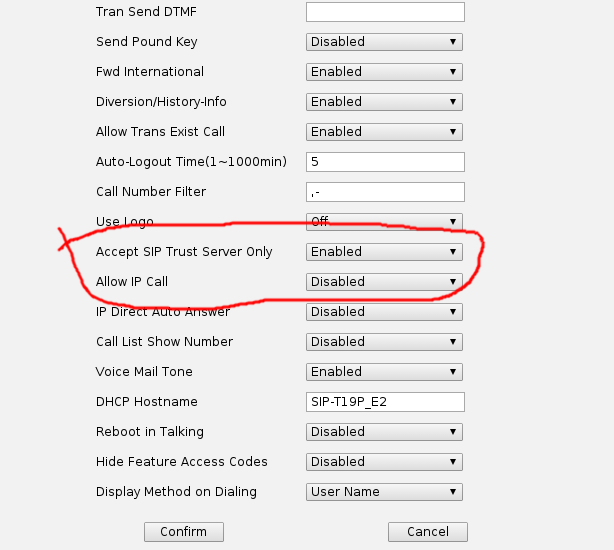
    • Allow Direct IP Call – this means the phone will respond to calls coming in to it from any IP address, to any number. Sometimes used for internal intercom systems or basic phone testing without using a PBX. Set it to disabled. This setting is found in the “Features” setting tab, “General Information” page.


    • Accept SIP Trust Server Only – this is whether the phone accepts calls to the correct phone number but from a different place than it is Registered to. Sometimes needed for certain SIP providers but you want to set this to enabled wherever possible so the phone only accepts calls from your service provider. This setting is found either in the “Features” tab, “General Information” page or the “Account” tab depending on the phone model or firmware version.


On v80 firmware these are both in the same place:

Features > General Information

Using secure SIP and RTP with SARK PBX and Snom or Yealink phones

This involves two levels of encryption. The first is SIPS/TLS which is encryption of SIP signalling between the SARK PBX and your IP phone. It works in much the same way as HTTPS certificates do.

You can either purchase a certificate from a trusted source or generate your own self signed certificates. I’ll use self-signed certificates here because they are free and do the job for what I wanted.

The second part of encrypting your phone calls is the actual audio stream itself, the RTP. We can use SRTP, this is simply a case of turning it on but there’s no real point to doing this without firstly configuring SIPS/TLS because the keys used in SRTP encryption are passed in the SIP messages.

For me, there’s two reasons for doing all this.

The most obvious one is security, encrypting your phone calls means that anyone who is able to sniff your network traffic cannot extract your phone calls. For most people this is pretty unlikely but could happen all the same.

Perhaps of much more use is for remote or home workers and this is what made me get this working with SARK. One of the biggest problems in the world of VoIP is SIP-ALGs on routers making incorrect alterations to SIP packets. If your SIP packets are encrypted then any router they pass through cannot possibly make any alterations to them!

The steps to getting this working are (basically the same process on a SARK PBX as on any Asterisk PBX).

1) Generate self-signed certificates (commands issued at the Linux command prompt on SARK):

  • cd /etc/asterisk
  • mkdir ssl
  • cd ssl
  • echo 00 > file.srl
  • openssl req -out ca.pem -new -x509 -days 365
  • openssl genrsa -out server.key 2048
  • openssl req -key server.key -new -out server.req -days 365
  • openssl x509 -req -in server.req -CA ca.pem -CAkey privkey.pem -CAserial file.srl -out server.pem -days 365

2) Configure Asterisk:

Edit the file ‘sark_sip_header.conf’ either from the command line or in Asterisk File Edit in the SARK web interface. Add the following:

tlsenable=yes
tlsbindaddr=xx.xx.xx.xx
tlscafile=/etc/asterisk/ssl/ca.pem
tlsprivatekey=/etc/asterisk/ssl/server.key
tlscertfile=/etc/asterisk/ssl/server.pem
tlsclientmethod=tlsv1
tlscipher=ALL
tlsdontverifyserver=yes

Replacing xx.xx.xx.xx with your system’s own IP address. The last line isn’t essential for us but means if Asterisk is connecting as a client to a TLS server (so you’d need a SIP service provider who does TLS), whether to verify their certificate or not. If you do verify their certificate then they cannot be using self-signed certificates.

3) Configure extensions:

You can specify which extensions will use TLS & SRTP (and any you don’t, stay using unencrypted SIP & RTP).

In the SARK web interface, edit the extension and go to the “asterisk” tab. Add these lines:

transport=tls
port=5061
encryption=yes

This will turn on both TLS and SRTP for that single extension.

It’s important to note that once you’ve applied this, the phone MUST use it and trying to Register without encryption will now fail.

4) Configure the firewall:

By default SARK PBX only allow in SIP over UDP but TLS uses TCP. You need to add a rule in the ‘firewall’ section of the SARK web interface to allow TCP port 5061 (SIPS/TLS uses 5061 by default). Note, you don’t need to allow RTP over TCP, SRTP still uses UDP normally.

5) Configure the phones:

This assumes you already have a phone configured and working using normal SIP, this is how to convert them to use SIPS/TLS & SRTP.

Snom phones (note, you’ll probably need a fairly recent firmware version)

  • In identity #, add an outbound proxy such as “sip.mydomain.com:5061;transport=tls”. Where sip.mydomain.com is your SARK PBX’s hostname or IP address. You could also set up the correct DNS-SRV records for this (hint, _sips._tcp) but I’ll not go in to that here.
  • In the RTP tab, turn on RTP Encryption, set SRTP Auth-tag to AES-80 and RTP/SAVP to Mandatory

Then when making or receiving a call, look out for the little “lock” symbol on the phone screen to signify SIPS/TLS & SRTP are both in use in the call in progress.

Yealink phones (I used v72 firmware, older may work too)

  • In Account #, Register tab, set Transport to TLS, set Server Host Port to 5061.
  • In the Advanced tab, set RTP Encryption(SRTP) to ‘Compulsory’

Much like Snom, the phone will also display a “lock” symbol on the screen during a call with SIPS/TLS & SRTP in use.

One last thing to note, both Snom and Yealink phones do not verify server certificates by default. This means that there is no protection against a man-in-the-middle attack (someone else pretending to be your SIP server). You can turn on certificate verification on either phone but you MUST also do one of the following in order for SIPS/TLS to continue to work:

  • Purchase a certificate from a trusted source, much like you would if setting up a HTTPS website. Please speak to us first so we can advise you on the best place to buy as the phones have a limited number of CAs built into them in comparison to a web browser.
  • Continue with your self-signed certificate but load the CA it was signed against into the phone. This is the “ca.pem” file generated earlier on. It is safe to distribute this to your phones, it cannot be used to be generate more certificates without the key (which you need to keep safe).

Any questions to paul@provu.co.uk
Which analogue gateway do I need? FXO or FXS

In the analogue telephony world there are two types of interface, FXO and FXS. What these mean is a cause of much confusion.

In summary:


    • FXO stands for Foreign eXchange Office. An example of an FXO device is an analogue telephone such as you might have on your desk or at home for making calls on. It is a device that accepts battery voltage (around 50 volts in the UK)


    • FXS stands for Foreign eXchange Station. An example of an FXS is a BT line on your wall that you plug your analogue telephone into. It is a device that provides battery voltage


Right away this naming seems backwards. Surely the telephone is better described as a “station” and the line as an “office”. I do agree, it is confusing but this is how it has been for much longer than I have been alive for.


Essentially, the naming is supposed to indicate what interface the device accepts rather than describing the device itself.

When it comes to choosing a VoIP gateway it is very important to select the correct interface. The wrong type will not work, no settings can control this, they are electrically different (one generates voltage, one accepts voltage).

Here is a diagram of a simple analogue telephone system (PBX) showing the interface names and how they are connected (click the image for a larger size):

As you can see, an FXS always plugs into an FXO and vice-versa. You cannot connect FXS to FXS or FXO to FXO. The same applies when you are replacing either phones or the lines with VoIP gateways.

The final diagram shows both types of endpoints replaced with VoIP gateways. In reality you wouldn’t replace both like this but the diagram serves to show what you need in either situation. If you are wanting to replace your analogue telephones with VoIP telephones, look at the left side of the diagram. If you are looking to replace your analogue lines with a VoIP service, look at the right side of the diagram:

One last (yet very important) note. I’ve shown Sangoma Vega gateways here, we sell these particular ones because they perform very well with BT analogue telephony in the UK. This isn’t true of all analogue-VoIP gateways, many designed outside the UK are made with the assumption that an analogue phone line in the UK is much the same as a “Bell” line in the USA. This isn’t the case, BT (and GPO before that) use their own standards defined many years ago. Although Sangoma is a Canadian company, the Vega gateway business was originally called Vegastream which was a company based in the UK. The old Vegastream office and most of their staff now form the UK Sangoma office and team of staff. So these gateways are developed in the UK by people who understand UK telecoms (as well as telecoms around the globe).

See our range of Sangoma gateways here: ProVu website – voice gateways

If in doubt about choosing a gateway, please phone our sales team on 01484 840048 or email contact@provu.co.uk. We will be able to tell you what you need for any job you are quoting for.

Further reading:


Paul Hayes paul@provu.co.uk

Vega ISDN gateway Caller ID formatting using Type-Of-Number

Background

When you receive an inbound call from an ISDN line (BRI or PRI), the calling party number (caller ID) arrives in a non-country specific format and it is up to your phone system or gateway to format it correctly for the area it is located in.

In the UK this means caller IDs for national numbers will be missing the leading zero and caller IDs for international numbers will be missing a leading double zero.

E.G. where you expect: 07123456789 you’ll get 7123456789

Within the ISDN q.931 signalling when a call comes in, there is an element for passing information on the type of the number.


An ISDN PBX will generally put a zero onto the start of national numbers and double zero onto the start of international numbers in the UK.

The problem is, in SIP there is no such header as type-of-number. The caller-id will just be presented as passed. Meaning you’ll see caller-ids on phones with missing zeros.

Solution

To fix this problem, a Vega gateway can add in the national & international prefixes on to caller-ids.

The settings can be found in the web interface or from the command line.

At the command line interface, for the UK you’ll want to set:

_advanced.sip.international_prefix=00

_advanced.sip.national_prefix=0

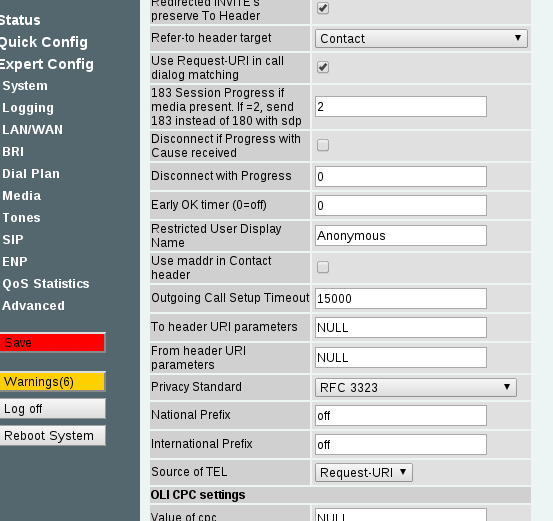
In the web interface, these settings are in the Expert section, SIP page and SIP-Advanced link near the bottom:

They are:

    • National Prefix – set to 0


    • International Prefix – set to 00


Then the Caller-ID presented on SIP calls should be correct.

Note, more information on this can be found on page 171 of the Sangoma Vega admin guide:

Vega Admin Guide R88 v1.1

Technicolor TG582 router refresh

The Technicolor TG582 ADSL router that we have sold for a few years has just undergone a slight refresh.

https://www.provu.co.uk/technicolor-tg582.html

The old part code TG582NPRO is now out of stock.

The new part code is TG582N_SB.

This new model is identical in every way except it doesn’t have a USB port on the side any more.

The USB port could be used for:

    • 3G modem for backup
    • USB printer server
    • simple NAS with a USB hard drive

So be aware, you wont be able to do these things with the new version but everything else remains the same.

Our pre-configuration service for these routers remains unchanged as well.

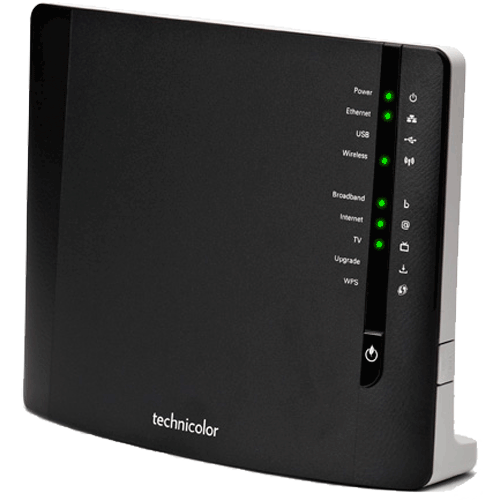
We are also in the process of testing the TG589VN router which is a more powerful Technicolor router we think will be good for those using Fibre-to-the-cabinet services where the throughput of the TG582 isn’t up to the job. We should be launching this product soon. Worth noting that it does have a USB port on it.

TG589VN: