Browse Author

Paul Hayes

Wireless Headsets with Polycom phones

There is a very useful PDF guide on setting up Plantronics, Jabra and Sennheiser wireless EHS headsets with Polycom phones here:

Polycom PDF

You need to have bought the relevant EHS cable for Polycom phones and the headset you are using. We can source these cables, please give our sales people a call.

Two things I noticed when testing:

  • If you have a Polycom IP321 or IP331 phone then you need an rj9-2.5mm jack convertor (when using a Sennheiser headset at least). We can sell you this, part code is RJ9-2.5MM-5PK. This goes between the rj9 connector on the EHS adaptor and the 2.5mm jack headset port on the phone.
  • The PDF tells you to go into these menus on the phone:

    Menu > Settings > Basic > Preferences > Headset > Analog Headset

    On the phone I used which was on 4.1.0 firmware the actual menu sequence was:

    Menu > Settings > Basic > Preferences > Headset > Hookswitch Mode

    • Make sure to pay attention to the headset mode settings on the headset itself by turning the dial(s) or DIP switch as per the Polycom PDF.

2n M2M – IoT (Internet of Trees)

Here in the ProVu technical office things are starting to get festive.

Our trusty old Christmas tree has gone up.

With so much in the news this year about the boom we are going to see in IoT & M2M, we thought we’d better smart-enable our Christmas tree to keep up with the times.

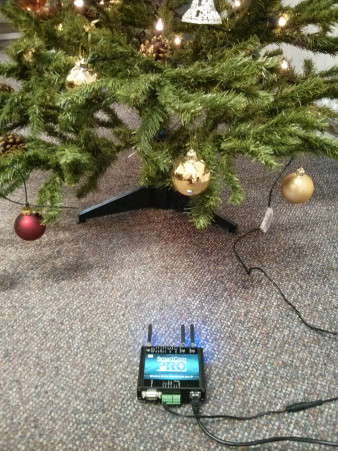
I’d been testing the 2n Smartcom Pro recently, so I used that:

This allows me to convert non-IP devices (and our old Christmas tree is definitely not an IP device) into IP-enabled devices I can access over my network.

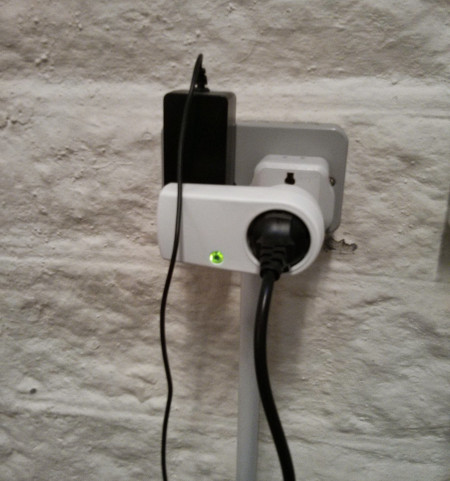
To actually control the tree’s lights, I used a Zigbee power switch since the Smartcom Pro has a Zigbee interface (amongst others):

This set up allows me to use “AT” style commands over a telnet connection from any computer on our network to the Smartcom to turn the Christmas tree lights off and on. That works OK but is rather cumbersome so to finish this off I wrote a quick Python script which connects to the Smartcom and allows me to type in simple commands to control our tree.

Here is a short video of it in action:

What’s the point you might ask? Well there isn’t a great deal of point to this other than a bit of fun. However, one of the biggest causes of fires around Christmas time is tree lights being left on unattended (so I’m lead to believe) so ensuring these are automatically turned off when everyone has left the office is a good idea!

Cheers,
Paul.

Yealink Provisioning Server Maintenance for Thursday 27 November 2014

On Thursday 27th November 2014 at 14:00 GMT we will be performing an upgrade of our Yealink provisioning service.

We don’t envisage this causing any appreciable downtime. Just please be aware that if you are deploying phones at this time there may be a delay in provisioning.

The good news is that once this has been done, we will be able to offer an extra layer of security using HTTPS client certificates in Yealink phones that support this.

Regards,
The ProVu Technical Team.

New Online Sark Training Course

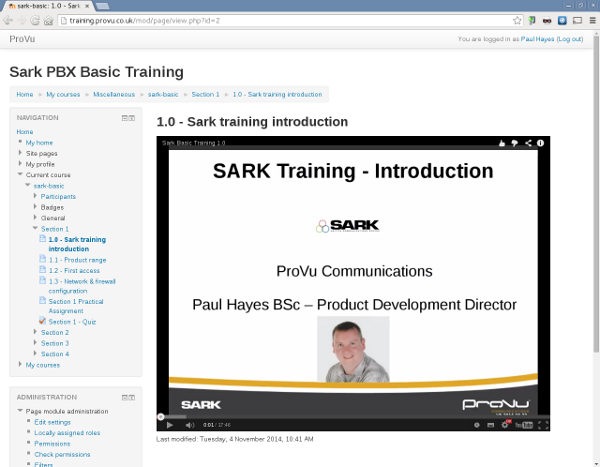
ProVu are pleased to announce the launch of an online training course for Sark PBX resellers and installers.

Online training is a new endeavour for us but we believe it will soon be an important part of our customer support package for the following reasons:

  • there’s no need to resellers to take a day (or more) out of their office
  • it can be completed in your own time over as long a period as you want
  • it is always available as a reference tool, even after completing the courses
  • training materials can be skipped if some parts are too easy or re-read/re-watched if some parts are difficult
  • no need to wait for a scheduled training day – online training is available as soon as you want it
  • no travel expenses!

This training course consists of a series of videos followed by a practical exercise and finally a multiple-choice quiz. There are four sections structured like this in the whole course.

The training is intended for technical support staff, installers and systems integrators. If you are interested in sales training then please get in touch and we’ll organise this for you.

We believe the best way of learning is by doing so this is still very much a practical training course and you will need a SARK200 PBX and some phones just like the on-site training we have held in the past.

We are likely to be running some deals along the lines of free training with purchase of a not-for-resale Sark PBX.

The online training will also be available at no extra cost to anyone who has completed one of our Sark training days in the past. Please email us to gain access.

If you are interested in our online training please email Contact or phone us on 01484 840048.

We will be releasing more online training courses in the near future so please keep an eye on our Blog and website.

Upgrading Sangoma Vega firmware from the command line

It is possible to upgrade the firmware on a Sangoma Vega gateway from the command line.

You can connect to it using telnet, ssh or a serial console cable. Note – the console cable is the same as a Cisco console cable.

To upgrade firmware you will need a tftp server running on the network local to the Vega gateway.

A free tftp server for a Windows PC is Pumpkin.

In Linux/Unix(/OSx??) install tftpd.

Place the firmware file into the root folder of the tftp server. Get the firmware from the Sangoma wiki.

The filename will be something like “VEGA_R100S043.bin” depending on which gateway it’s for and what the version of firmware is. Note that Vega 100/200/400 gateways use different firmware than Vega 100G/200G/400G.

Connect to the command line of the Vega gateway.

You need to tell the Vega where your tftp server is. They will usually look at DHCP Option 66 but in many cases you’ll need to manually tell it using this command:

    set .tftp.ip="xxx.xxx.xxx.xxx"

With the correct IP address! Then:

    apply

and if you want the setting to survive a reboot:

    save

To do the actual firmware upgrade:

    upgrade
download enable
download firmware _filename_
reboot system

Where _filename_ is the entire file name of the firmware file in the tftp server root folder. E.G. VEGA_R100S043.bin

Changing music on hold on a sark pbx (including sark200)

If you want to change the music-on-hold that comes as standard on a SARK PBX, the main stumbling block is getting the audio file(s) in the correct format.

There are several you can use, the best is a wave file with the following format audio:

RIFF (little-endian) data, WAVE audio, Microsoft PCM, 16 bit, mono 8000 Hz

This should work on any SARK PBX, including the SARK200.

It is also possible to use MP3 but you may need to also install MP3 decoding software and it will put a small amount of extra load on to the system.

A number of free tools can be used to convert your audio files into this format such as “sox” or “audacity”.

The simplest way of replacing the existing MoH on SARK is to connect to it using ssh/scp (or WinSCP if using Windows) and go into the folder:

/usr/share/asterisk/moh

Then delete or move any audio files in there and copy your new file(s) in to there.

Note – if you have an older sark system then the location will be /var/lib/asterisk/moh

Then reload Asterisk by clicking on the “commit” button in the web interface or using the command “moh reload” at the Asterisk CLI.

One last thing, you cannot use copyrighted music unless you have a PRS license. So make sure you are using music with no copyright (there are a couple of online libraries for this) or music you’ve had professionally produced.

SARK PBX Firewall manual control

The firewall used on modern SARK PBX is a freely available firewall called ‘shorewall’. It also uses an automatic intrusion detection system which blocks IP addresses on the fly.

This system can sometimes block things you don’t want blocking – the most common one is a password typed into a SIP phone incorrectly getting blocked out.

There are a few simple commands that can be used to check for and fix this. These need to be ran from the SARK command line. So you can either ssh/putty into it or connect a monitor & keyboard (sark850+ only).

To check the list of IP addresses that have been auto-blocked:

  shorewall show dynamic

To unblock an IP:

  shorewall allow xxx.xxx.xxx.xxx

Replacing the xs with the IP to unblock.

Also if you want to actually manually block an IP yourself then you can do:

  shorewall drop xxx.xxx.xxx.xxx

Note: some early sark200s had a slightly different firewall configuration. In case the above doesn’t work and you’ve had your sark200 since the early days, this should work to unblock an IP:

  iptables -D fail2ban-ASTERISK -s xxx.xxx.xxx.xxx -j DROP

No ringback from a Vega gateway connected to an ISDN phone system

I’ve come across this issue a few times, it seems very confusing but is an easy fix.

The scenario is:

– ISDN PBX connected to a Vega 100/200/400 gateway using a SIP provider for inbound & outbound calls.

– When ringing an inbound number that comes in over SIP, through the gateway and to the ISDN PBX, the call works fine but no ring-back is heard.

The reason:

The ISDN system is sending a progress indicator message to the gateway tell it that it will send in-band media. The Vega gateway translates this into a “183 Session Progress” message which would be the SIP equivalent.

However, the PBX then clearly isn’t actually sending any audio so the caller just hears silence till the call is answered by someone.

I suspect that the reason this problem doesn’t occur on a real ISDN line is that BT et al. just ignore these messages and generate ringing whether the PBX said it was going to send it’s own or not.

So the fix is to force the Vega gateway to always send a “180 Ringing” message no matter what the ISDN side says. This tells the SIP server upstream to generate it’s own Ringing rather than expect to get some audio from the gateway.

In the Vega web interface:

  • go to Expert Config
  • click on SIP
  • scroll right to the bottom and click Advanced SIP
  • find the setting called “183 Session Progress if media present. If =2, send 183 instead of 180 with sdp”
  • change it to 1 (a number one) instead of the default value of 2

Apply the changes and save the config.

That should work around the issue.

SIP Registration Expiry

How Registration expiry and Re-Registering works seems to be one of the most mis-understood concepts in SIP.

Registration Expiry

A SIP UAC (such as your SIP telephone) sends a Registration request to a SIP UAS (such as your PBX or hosted platform).

This Registration request has an Expires header in it (which can be an individual header or a tag in the Contact header). The value used is nearly always a configurable setting in the UAC itself.

The UAS responds to the Registration request accordingly (usually there is a process of Authentication that goes on which I wont go into here). At the end, if the Registration is accepted, the UAS will send an OK message to the UAC which contains the actual Registration expiry time (again, either an individual Expires header or as a tag in the Contact header).

The important thing to note is that it is the UAS which decides what the expiry will be, not the UAC which is where most people go wrong. The assumption is often that if you set an expiry of 600 seconds in the UAC settings then that’s what gets used. Not necessarily the case, the UAS has the final say.

Often a SIP PBX will have settings to control minimum & maximum permissible values for the Registration Expiry. Then a UAC is allowed to use any value inside this range. Outside the range, the UAS decides what gets used. Sometimes there is a default expiry to use when a UAC selects something outside of the permissible range.

Re-Registering

Once a UAC is Registered, it has to decide when to re-Register. The Expiry is not a timer to start re-Registering, it’s the time when the UAS will assume the UAC isn’t there any more. Think of it as a Re-Registration deadline.

So, a UAC must have completed it’s re-Registration before this Expiry time or calls will stop working. There is no definitive strategy for doing this in SIP, it seems to be up to the UAC manufacturers to decide what they think is best.

Some halve the Expiry and then start to Re-Register from that point onwards, so with an Expiry of 180 seconds, you’ll start to see more Register messages after 90 seconds. This gives more than enough time for the Re-Registration to complete before the previous Registration expires.

Other UACs choose different times either based on some percentage of the Expiry, a set number of seconds before Expiry etc…etc…

Due to this second misunderstanding, many people think that they can alleviate Registration problems by setting a very low Expiry. In reality this nearly always makes it much worse as the UAC now has less time to actually get Re-Registered.

Generally, I wouldn’t set Registration Expiry to less than 600 seconds. There can be some circumstances when it makes sense to use a lower setting (e.g. a mobile roaming handset moving from network to network regularly might need a shorter Expiry) but in general it should be avoided.

Trying to use a very short Re-Registration timer for overcome NAT mapping issues (where a NAT router is destroying NAT mappings too quickly), isn’t the correct way of doing it. Any decent UAC will have a NAT keep-alive setting somewhere (or often this happens automatically). Then the UAC will send out a SIP Options message or sometimes just a blank packet on port 5060 to keep a NAT mapping open. Use this as very short Expiry will often cause others problems as described above.