Browse Tag

Panasonic

Configuring the 2N Helios IP Uni with Panasonic KX-HDV130 with peer-to-peer dialling

We have recently been testing the 2N Helios IP Uni with the Panasonic KX-HDV130 entry level handset via peer-to-peer calling. After some very straight forward testing, we managed to get it working. You may use this scenario if you don’t want to involve an IP PBX.

Please note that this guide applies to the 2N IP range.

2N Helios IP Uni Configuration:

You will need to web browse to the IP address of the 2N Helios IP Uni which can be done by powering the unit via a Cat5e cable, then pressing the button on the unit five times once you have heard the initial startup tone. Then unit should then speak out the IP address of the unit to you.

Once you have obtained the IP address of the device, you will need to web browse to the IP address of the device e.g. ‘192.168.x.xx’. The default username is ‘Admin’ and the default password is ‘2N’. It is highly recommended that you change the default password before you start using the device.

Once you have logged into the web interface of the IP Uni, you will need to navigate to ‘Directory’ (blue tab), then make sure that the ‘Position Enabled’ field has a check in the box, then enter a relevant name in the ‘Name’ field under ‘User Basic Information’. Finally, you will need to enter the IP address of the Panasonic KX-HDV130. You can find out the IP address of the KX-HDV130 by navigating to ‘Menu’, ‘System Settings’, ‘Status’, ‘IPv4 Settings’, then ‘IP Address’ on the phone. The IP address should then be displayed on screen e.g. ‘192.168.x.xx’. The IP address should look something similar to ‘192.168.x.xx’ which needs to be inputted into the ‘Phone Number’ field under ‘User Phone Numbers’. It is important to make sure that you have included ‘sip:’ before inputting the IP address e.g. ‘sip:192.168.x.xx’. You will then need to apply the changes to the unit by clicking the ‘Apply’ button located at the bottom right hand side of the interface.

Please note that if you would like the ability to dial the extension number registered to the IP Uni, you will need to navigate to ‘Services’ (purple tab), then ‘Calls’ which is located at the top of the interface, then set ‘Call Answering Mode (SIP1)’ to ‘Automatic’ using the drop down list. You can then go ahead and apply the changes by clicking the ‘Apply’ button. You should now be able to dial ‘200’ from the KX-HDV130 and the Uni will automatically answer the call.

Panasonic KX-HDV130 Configuration:

You will need to start by finding out the IP address of the phone by navigating to ‘Menu’, ‘System Settings’, ‘Status’, ‘IPv4 Settings’, then ‘IP Address’. The IP address should then be displayed on screen e.g. ‘192.168.x.xx’.

You will then need to enable access to the web interface before you can web browse to the phone which can be done by navigating to ‘Menu’, ‘Basic Settings’, ‘Other Option’, ‘Embedded Web’ and then changing this setting to ‘On’. You can then go ahead and web browse to the phones IP address via a web browser of your choice e.g. Google Chrome.

When you browse to the IP address of the phone, you should be prompted to enter a username and a password. The default username is ‘admin’ and the default password is ‘adminpass’. Again, it is highly recommended that you change the default password before using the device.

You will need to click onto the ‘VoIP’ tab located at the top of the web interface, then click onto ‘Line 1’ which is located on the left hand sidebar under ‘SIP Settings’. Enter ‘200’ in the ‘Phone Number’ field, then the IP address of the IP Uni under ‘Registrar Server Address’. You will also need to enter the IP address of the IP Uni under the ‘Outbound Proxy Server Address’ and the ‘Service Domain’ fields. For the last two steps of the configuration for the KX-HDV130, enter ‘200’ in the ‘Authentication ID’ field and leave the ‘Authentication Password’ field blank.

That’s the end of the main configuration process for the 2N Helios IP Uni and the Panasonic KX-HDV130.

If you have any questions, please send them to matthew@provu.co.uk

Come and Join us at the 2016 Convergence Summit South!

css16-email-banner

It’s approaching that time of year again! With less than 4 weeks to go until the 2016 Convergence Summit South, we wanted to give you a sneak peek of who will be joining us and what you can expect to see on our stand.

This year we have doubled the size of our stand, allowing us to exhibit even more new, exciting products across a wider selection of our vendor partners. Joining us on stand 74 will be representatives from: 2N, Cisco, Gigaset, Panasonic, Sangoma and Snom.

To be there, simply register for your free visitor pass below:

Register now to attend the show

We look forward to seeing you there!

ProSys firmware provisioning

It has always been possible to manage firmware upgrades using our online phone management portal, ProSys. Support staff can do this very quickly by selecting from a drop-down box of available firmware on the portal.

What happens if you want a newer firmware, or just one which isn’t listed in the drop-down (yet!)?

Well, fortunately, it is possible to provide a custom setting in most cases to allow you to select the firmware you wish to provision to a device.

Proceed with caution…

You can use the “Quick entry” to add configuration settings to an individual device.
This allows you to add (key, value) pairs to the provisioning settings, giving you the power to provision firmware directly.

key value
Gigaset SYMB_ITEM_BS_IP_Data1.aucS_SPECIAL_DATA_SRV http://p.gigaset.me.uk/profiles/n510_238/42/fw238.bin
Panasonic FIRM_FILE_PATH http://pana.provu.co.uk/fw/TGP5xx-DECT-22.88_HW1.fw
snom firmware http://snom.provu.co.uk/sw/snom300-8.7.5.44-SIP-f.bin
Yealink firmware.url http://yealink.provu.co.uk/fw/T41/36.80.23.1.rom

Warning: If you are not sure you are doing this correctly, then stop! Speak to our technical team (support@provu.co.uk), we are happy to help.

As always, feedback is welcome, so please do get in touch.

LDAP phonebook on Panasonic HDV phones

How To Setup LDAP/Active Directory phonebook on a Panasonic HDV (130,230,330) SIP phone

LDAP (Lightweight Directory Access Protocol) is commonly used with SIP phones to store contact lists or phonebooks. Many modern SIP phones can connect to an LDAP server and it is my recommended method of implementing a shared phonebook (simply because of cross-device support).

I will assume you already have a working LDAP server set up. On a Microsoft server, LDAP is called Active Directory. OpenLDAP is commonly used on open source based systems. Both work the same from the phone’s point of view.

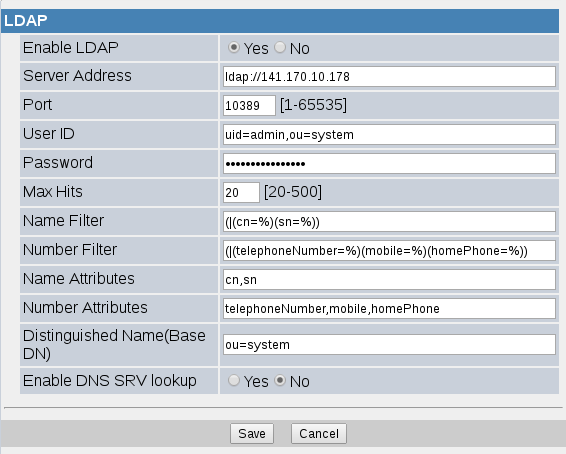
Here is a screenshot of some example settings from a HDV330 phone.

These settings are fairly standard in SIP phones (or anything that is doing LDAP searching). Without going in to too much detail, key points are:

  • Server Address: this has to include the protocol name ‘ldap://’ at the start. Or ldaps:// for ldap over ssl
  • Port: normally 389 for ldap
  • User ID: you have to specify a username & password. The phone will not connect anonymously. The user id has to be the full DN of the user. Exactly what this is depends on how your ldap server is setup
  • Name/Number Filters: these settings contain the searches that will be performed depending on whether a name lookup (the user typed in letters) or a number lookup (the user typed in a number). What goes in here depends on your ldap server set up
  • Name/Number Attributes: these are the attributes within your ldap database that you are using to store names and telephone numbers in
  • Base DN: where to start the search in your ldap directory (ldap is hierarchical so objects above this base will not be seen by the phone)
  • DNS SRV: this is used for service discovery, if you don’t know what it is then leave it set to No!
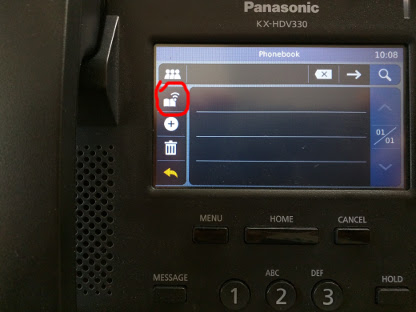
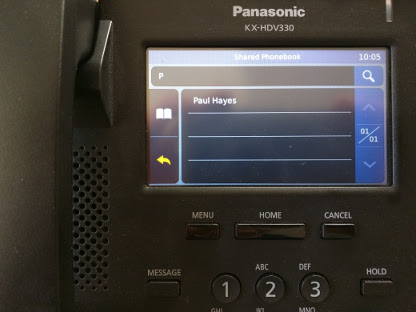
  • Note – you must specify a username & password, these phones will not bind anonymously. I wouldn’t recommend running an ldap server like that anyway as you are leaving yourself open to getting all your contact’s information stolen!Now on the phone itself, find the phonebook option and select it. You will probably be shown the internal phonebook by default, press the option to switch to ‘shared phonebook’. On a HDV330 you press the button circled in red in this photo:
  • Then you can use the search box to type in a name, matching entries will be displayed:On phones with programmable keys, you can configure a key for shared phone book. Set the key type as ‘phonebook’, set the parameter to ‘2’ (for shared phonebook) and give it a label if required.
Panasonic TGP600, all the benefits of the TGP500 plus more!

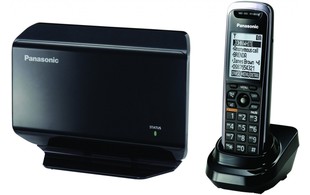
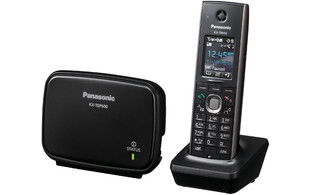
Back in June 2015 we launched the Panasonic KX-TGP600 DECT phone system. Replacing the popular KX-TGP500, this new DECT base and handset expands on the great features of its predecessor and offers a host of additional benefits.


KX-TGP500 KX-TGP600
Support for up to 6 handsets Support for up to 8 handsets
Register up to 8 SIP accounts Register up to 8 SIP accounts
Up to 3 simultaneous calls Up to 8 simultaneous calls
100 contacts phone book memory 500 contacts phone book memory
Compatible with up to 2 KX-A405 DECT Repeaters Compatible with up to 6 KX-A406 DECT Repeaters

Presenting the same features as the KX-TGP500, the KX-TGP600 offers a more powerful solution and with the additional option to use the KX-TPA65 DECT desk phone users can enjoy the full features of a desk phone without the presence of a wired LAN. The KX-TGP600 offers the ideal solution for both business and home use.

Pricing and stock information is available on our reseller portal, ProSys. If you do not have access to ProSys and would like to register for an account, please complete our ProSys account request form.

ProVu launch the new Panasonic HDV Series

We are delighted to announce the launch of the new Panasonic HDV series of IP desk phones. Featuring an option of entry, mid or executive class of phone, the series offers attractive design and advance functionality at an affordable price. Available in black and white, users are able to select the colour to suit their working environment and personal preference.

KX-HDV130 KX-HDV230 KX-HDV330
2 SIP accounts 6 SIP accounts 12 SIP accounts
2.3″ (132×64 pixel) LCD display 2.3″ (132×64 pixel) LCD display 4.3″ colour TFT with touch screen display
2 x 10/100 ports Dual Gigabit ports Dual Gigabit ports
24 memory keys 24 memory keys
Optional KX-HDV20 keypad Optional KX-HDV20 keypad
EHS Support EHS & Bluetooth Support
RRP £49.00 RRP £115.00 RRP £176.00

Please see ProSys for pricing and stock information. If you do not have a reseller account and would like to register, please complete our reseller account form.

Panasonic – TPA60/TGP600 How to transfer calls and switch between two simultaneous calls

This blog post will instruct you how to perform an attended transfer and switch between two calls on a TPA60 with the TGP600 base station.

What is an attended transfer? An attended transfer is where you speak to the person receiving the transfer before transferring the call.

To perform an attended transfer and switch between two calls follow the steps below:

    • Answer the call.


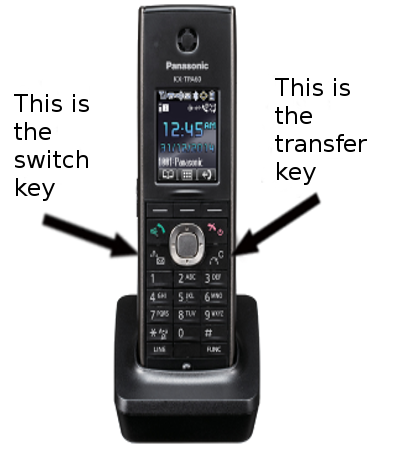
    • When you are ready to transfer the call press the transfer key, this will place the call on hold.


    • Enter the extension number of the person you want to transfer the call to and press the button labelled ‘call’ on the display.


    • When you want to switch between the two calls press the switch key.


    • When you are ready to connect the calls, hangup the DECT handset and the transfer will be completed.


ProVu and Panasonic Host SIP Demonstration Workshop

Earlier this week we teamed up with Panasonic to offer resellers a free SIP Demonstration Workshop.

Resellers were invited to Panasonic’s purpose-built Solutions Centre, in Bracknell where they were introduced to Panasonic’s existing and future SIP range and given the opportunity to get hands on with the products.

The event turned out to be a great success, with over 30 resellers joining us. We would like to thank everyone who joined us – we hope you enjoyed the day!

Panasonic TGP600 Application Scenarios

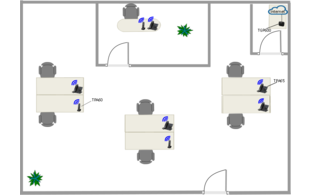
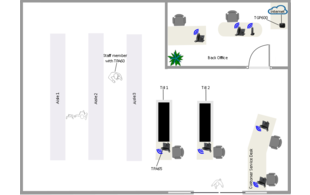
With its revolutionary capabilities, Panasonic’s TGP600 is a great solution for creating VoIP enabled environments without the wires. Capable of supporting up to 8 phones and 8 simultaneous calls, the TGP600 provides a great option for small office and retail environments. To help illustrate some potential uses, we have created two application scenario documents:

With a mixture of normal cordless handsets (TPA60) and cordless desktop phones(TPA65), the TGP600 is ideal for both staff on the move as well as desk placed staff.

If you would like to speak to a member of the ProVu team please call: 01484 840048 or email: contact@provu.co.uk.

Panasonic SIP Demonstration Workshop, Tuesday 3rd November

We are teaming up with Panasonic to host a SIP Demonstration Workshop, taking place on Tuesday 3rd November, at Panasonic’s Solutions Centre, in Bracknell.

All attendees will receive a complimentary KX-TGP600 DECT Base and Handset (RRP: £94.00 + VAT) and will have the chance to learn about Panasonic’s existing and upcoming SIP products.

This event is free to attend, lunch and drinks will be provided. We look forward to welcoming as many of you as possible, please register below to attend this event.

Pre-Register now to attend the workshop

If you have any questions or would like to speak to a member of the ProVu team, you can call: 01484 840048 or email: contact@provu.co.uk.