Browse Author

Matt

Sennheiser Circle Series

Are you looking for reasonably priced headsets that are robust and feature noise cancelling microphones? Take a look at the Sennheiser Circle series.

The Circle series of headsets feature noise cancelling microphones which help to reduce the background noise that can sometimes interfere with the caller’s audio quality.

The Circle series is listed as a robust headset range, which means that it is brilliant for use in the office.

When Sennheiser visited our office, we performed some stress testing with one of the Circle series headsets, – this involved some serious tugging of the cable by one of our members of staff. The cable took a fair bit of abuse before finally snapping making it ideal for office use where it is likely that the cable may end up getting trapped or run over by chair wheels.

The Sennheiser Circle series headsets work with most of the desk phones that we distribute They can be connected simply by a bottom cable . Visit our headset compatibility chart to find out which cable you require.

Why choose the Sennheiser MB 660?

Having been selected as part of Sennheiser’s Selective Distribution System last year, we’ve been testing some of the headsets functionalities. As a self-confessed headset enthusiast, I couldn’t wait to get my hands on the MB 660 UC Premium headset!

What is the MB 660?

This is a binaural headset that has pillow-soft leather ear cushions. As a high-end headset, it features Sennheiser advanced technology.

I was tasked with testing this headset and decided to specifically look at the NoiseGard feature and I can say that it is great!

What is NoiseGard?

This feature constantly monitors background noise which seamlessly adjusts the level of noise reduction in the headset. There is a switch on the headset that allows you to toggle the NoiseGard level – There’s a major difference between the NoiseGard being disabled and enabled. This feature blocks out a lot of background noise, allowing you to concentrate on your work.

Another feature I tested on the MB 660 was TalkThrough, this is another feature that allows you to listen to your colleagues without having to take your headset off.

TalkThrough is easy to use all you have to do is double tap the outside of the right ear cup and it is enabled – You can then talk to your colleagues and be able to hear them clearly. As soon as you are done, you can then double-tap the ear cup again to turn TalkThrough off.

I think that this is a fantastic quality headset. This headset is very comfortable to wear, great for calls and has amazing sound quality!

The MB 660 is not only suitable for use in the office but is also good for listening to music whilst at home or out and about.

CounterPath “How To” Guides

CounterPath’s Bria Stretto softphone solution is a provisionable version of the Bria 4 and Bria 5 retail client. One of the biggest features of Stretto is that you are able to log in to a cloud based portal and create and manage your clients from there without the need to log in to the clients device and input the configuration there and then.

The following guides below will walk you through the steps of creating a user, downloading the Bria Stretto client and troubleshooting if problems occur.

Creating a User Using CounterPath CCS (Bria Stretto):

If you are interested in finding out how to create a user using CounterPath’s Stretto provisioning platform, please visit the following link below to a video that shows how to do this:

Creating a User (PDF)

Downloading and Installing Bria Stretto for Windows:

If you are wanting to use the Bria Stretto application on a Windows desktop device, please visit the following link below:

Downloading and Installing Bria Stretto for Windows (PDF)

Uploading Device Logs:

If you are experiencing any technical difficulties whilst using Bria Stretto, you can upload the device logs from your device that will be sent across to CounterPath’s Stretto provisioning portal. The logs can then be downloaded on the portal and analysed.

To find out how to upload the device logs on a Windows desktop device, please visit the following link below to find out how to do this:

Uploading Device Logs (PDF)

If you have any questions, please feel free to send an email to the below address:

Matthew Heaney – matthew@provu.co.uk

Sangoma PBXact UC – User Control Panel (UCP)

Are you interested in finding out more about how the User Control Panel (UCP) works on a Sangoma PBXact UC system? Please see the following guide below on how to set this up and have this up and running in minutes:

This guide shows you how to create a user and set up UCP for an extension that already exists. If you would like to find out how to create an extension, please refer to the following link:

https://blog.provu.co.uk/sangoma-pbxact-uc-creating-an-extension/

Please note, if you have already created an extension on a PBXact UC system, you may already have a user created in the ‘User Manager’ section.
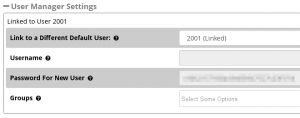
The screenshot to the right shows the ‘User Manager Settings’ section on the screen where you create an extension:

Step 1:

You will need to start by web browsing to the IP address of your PBXact system using a web browser of your choice. Once you have browsed to the PBXact UC system, you should see the homepage with the following options to choose from.

You will need to select ‘PBX Administration’ which is the first option on the left hand side of the interface.

Step 2:

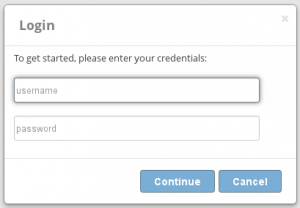
You should now see a screen prompting you to enter a username and password. If you don’t know the username and password, you may need to consult an administrator.

Step 3:

Providing you have entered the correct username and password, you should see a system overview of the PBXact UC system.
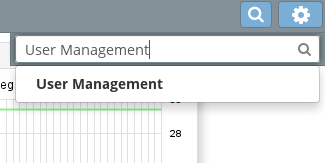
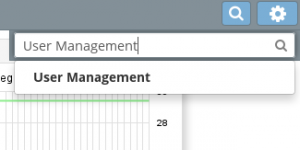
Using the search bar at the top right hand side of the interface, you will need to search of ‘User Management’. Please see the screenshot below that shows this:

Step 4:

Once you have opened the ‘User Manager’, you will need to click on ‘Add’.

Step 5:

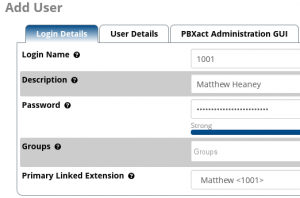
You should now see the options for creating a new user. You will then need to input a login name, description for the user, a secure password and also link the extension to an extension already created on the PBXact UC system.
Step 6:
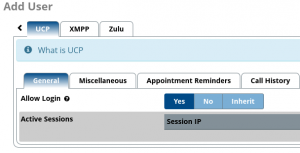
For this step, you will need to scroll along the tabs using the arrow keys located near the top right hand side of the interface. You should then see some further options on the tabs including ‘UCP’.
Please click onto the ‘UCP’ tab which should display the following screen.

You will need to ensure that you change the ‘Allow Login’ to ‘Yes’ in order to log into the User Control Panel once the user has been created on the system.

Step 7:

Under the ‘UCP’ section, you should also see some additional options. Please see the screenshot below that show some of the other settings.

You may want to enable a user to be able to make calls via the User Control Panel. To do this, y
ou will need to navigate to ‘Miscellaneous’, then select ‘Yes’ under the option ‘Enable Originating Calls’.

Please note that there are other options that can be configured through these settings such as enabling conferences, voicemail settings and other options.

Step 8:

Once you have finished enabling the settings that you would like to be enabled for the user, you can go ahead and submit the changes by pressing the ‘Submit’ button located near the bottom right hand side of the screen.
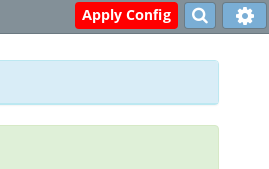

You should now be taken back to the ‘User Manager’ home screen, which should display the option to ‘Apply Config’ at the top right hand side of the screen.

This is the end of the configuration process for enabling ‘UCP’ for a user. Please see the following steps below for logging into the ‘User Control Panel’:

Step 9 (Logging In):

If you are still logged into the PBXact UC system, you should see an option for ‘UCP’ using the tabs at the top of the screen.

Clicking onto the ‘UCP’ tab should open the ‘User Control Panel’ in a separate tab as shown in the screenshot below:

The login page for the ‘User Control Panel’ should now be displayed prompting you to enter a username and a password.
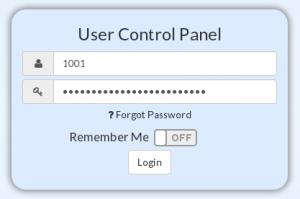
You will need to enter the user extension number and the password that was set on the fifth step of the configuration above and hit ‘Login’.

Providing you have entered the correct username and password, you should see the following screen or similar screen as shown below:

Please note that the options shown on the sidebar on the left hand side of the screen may vary depending on the settings that have been enabled/disabled.

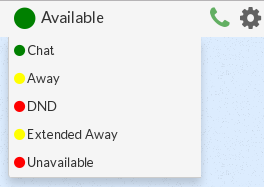
You should be able to change settings such as presence for the extension you are logged in as by selecting the icon shown in the screenshot below:
 

Jablocom Essence – Headset Compatibility

Did you know that you can use a headset with the Jablocom Essence phone? We have performed testing using an Eartec 308 monaural headset with a EAR-QD002P which is the compatible bottom cable for the headset with the Essence. Please see the following guide below to find out how to connect and use the headset:

Step 1:

You will need to disconnect the handset curly cable from the phone which is located at the back of the phone.

Step 2:

Connect the EAR-QD002P bottom cable into the RJ9 port where you originally disconnected the handset curly cable from.

Step 3:

You will need to ensure that the Essence is turned on and then navigate to the menu by pressing the key labelled ‘OPTIONS’ on the phone keypad.

Step 4:

Using the arrow keys, scroll down to ‘Settings’, then press the green button to proceed to the next menu.

Step 5:

You will then need to select ‘Phone’ which should be the first option in the menu, then scroll down to ‘Headset active’ option and press the green button.

When an incoming call is received on the phone, you can now press the green button to answer the call on the headset.

Sangoma PBXact UC – Enabling Phone Apps

Sangoma’s PBXact UC systems enable you to remotely manage deployed phones from your computer, but did you know there’s also a range of Apps available, designed to enhance the capabilities of Sangoma IP phones? We’ve put the following step-by-step guide together to enable you to discover how you can start utilising the great features available.

Please note that this guide shows you how to enable Phone Apps, it doesn’t show the process of creating an extension. If you would like to find out how to create an extension, please see our earlier blog post on how to create an extension using PBXact

Step 1:
You will need to start by web browsing to the IP address of your Sangoma PBXact UC system. If you don’t already know the IP address of the PBXact UC system, you may need to log into your router to view a list of active network devices.

Step 2:
Once you have browsed to the IP address of your PBXact UC system, you should see the following options:


You will need to go ahead and select the ‘PBX Admini
stration’ option. You should then be prompted to enter a username and password in order to login to the main interface of the system.

If you don’t know the username and password, you may need to consult an administrator or relevant person to help you with this.

Step 3:
Providing you have entered the correct username and password, you should now see the homepage showing the ‘System Overview’, ‘PBXact Statistics’, ‘Uptime’ and options at the top of the page.

You can either hover over ‘Modules’ located at the top of the screen in ‘Advanced Mode’ and select ‘User Management’, or use the magnifying glass on the right hand side and search for ‘User Management’ and select the option when it appears below the search field.

Step 4:
You should now see the ‘User Manager’ screen which may list users below if you already have users registered on the system.
Your screen should look like the screenshot to the right.

Step 5:
Please note that this step will involve creating a new user. You will need to click on the ‘Add’ button as shown in the screenshot above.


This should then take you to the screenshot shown above. You will then need to enter a ‘Login Name’, ‘Password’ and if you are linking this to an extension that already exists on the system, you will need to select the ‘Primary Linked Extension’ which should display a drop down list of extensions. Please note that extensions already assigned to other users will not be displayed in the drop down list.

Step 6:
Using the navigation bar under ‘Add User’, you will need to navigate to the ‘Phone Apps’ section, as can be seen below.

When you navigate to ‘Phone Apps’, you should see the ‘General’ section underneath and a section called ‘Allow Access’. You will need to change this option to ‘Yes’. This allows access to the Phone Apps for the user you are editing.

Step 7:
Depending on which Phone Apps you would like to set up for the user, you will need to navigate across the different tabs and enable the applications that you would like to assign to that particular user.

If you want to enable access to call queues, you will need to navigate to ‘Queues’ and change ‘Enable Queue Access’ to ‘Yes’. If you would also like to setup queue agent access, you will need to change ‘Enable Queue Agent Access’ to ‘Yes’. You will then also need to select the queues from a list under ‘Allowed Queues’. Please see the following screenshot below that shows this:


As you can see from the screenshot above, there is ‘TestQueue <6000>’ is shown in the list under ‘Allowed Queues’. Please note that you must have created a queue before hand in order for it to be shown in the list.

Step 8:
You may want to enable the login and logout feature for that user so that they can log out of the Sangoma IP phone once they have finished using it. In order to do this, you will need to navigate to ‘Other Apps’ and change ‘Enabled Login/Logout Access’ to ‘Yes’. Please see below a screenshot that shows this:

You may also want to allow Do Not Disturb (DND) depending if this is required or not. You can simply change the options that you would like to enable to ‘Yes’. Please note that additional configuration may be required when enabling certain Phone Apps.

Step 9:
Once you have finished configuring the user with Phone Apps, you can go ahead and submit your changes by pressing the ‘Submit’ button located near the bottom right hand side of the page.

You should then be taken back to the ‘User Manager’ section which shows you a list of users. You will then need to click ‘Apply Config’ which should be displayed near the top right hand side of the page. This writes the changes made to the PBXact UC system.

That’s the end of the configuration process.

Providing you have a valid extension and user set up, you should now be able to see the Phone Apps on the phone once provisioned/configured correctly.

Configure Door Release Button on Grandstream GXV3275 to work with 2N Helios IP Force

Did you know that you can configure a programmable key on the Grandstream GXV3275 that will allow you to unlock the door via a peer-to-peer call from the 2N Helios IP Force to the Grandstream GXV3275 from the press of a button? Please see the following guide below in order to find out how to do this:

Step 1:
The first step is to start by web browsing to the IP address of the Grandstream GXV3275 using a web browser of your choice e.g. Google Chrome, Firefox.

Step 2:
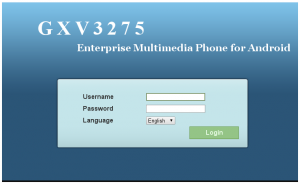
Providing you have entered the correct IP address, you should see the following page prompting you to login to the web interface of the phone:

If you don’t know the username and password to login, you may need to consult an IT administrator.

Step 3:
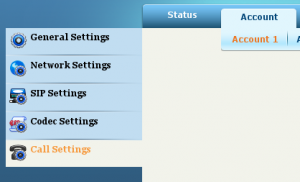
Providing you have entered the correct username and password, you should see a few different settings to choose from. You will need to navigate to ‘Account’ using the top navigation bar, then ‘Call Settings’ using the navigation bar to the left hand side.

Step 4:
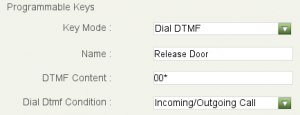
You will need to scroll down to the ‘Programmable Keys’ section which can be found near the bottom of the interface. You will need to set ‘Key Mode’ to ‘Dial DTMF’ using the drop down list.

Step 5:
For ‘Name’, you will need to enter a suitable name that will be displayed on the door release button on the phone.

Step 6:
For ‘DTMF Content’, you will need to enter the code that is set under ‘Switch Codes’ on the web interface of the 2N Helios IP Force. The default switch code that is set on the IP Force is ’00’.

Step 7:
Because the Grandstream GXV3275 and IP Force are peer-to-peer calling, you won’t need to worry about the ‘Dial DTMF Condition’. The default option should be set to ‘Incoming/Outgoing Call’. You can go ahead and leave that as the selected option.

Step 8:
Once you have configured all of the above options, you can go ahead and hit the ‘Save’ button at the bottom of the page. You should then be taken to the top of the page prompted to apply the configuration changes.

Firmware/System Version Used:

Grandstream GXV3275 Android Phone: System Version: 1.0.3.144

2N Helios IP Force: Firmware: 2.18.1.27.8

Provision Sangoma S700 IP Phone using Sangoma portal

You may or may not be aware that you can provision your Sangoma phones using the re-direction service which is available via the Sangoma portal. If you are interested in finding out how to provision your Sangoma phones, please follow the guide below:

Step 1:

You will need to start by navigating to the Sangoma portal which can be accessed by visiting the following link listed below:

https://portal.sangoma.com/

Please note, if you do not already have an account for the Sangoma portal, you will need to sign up for one. This can be done by accessing the following link listed below:

https://portal.sangoma.com/index.php/login/register

Please note that the registration link above will also list some important information regarding the Sangoma portal.

Step 2:

Once you have logged into the Sangoma portal, you should see the welcome page and also a navigation bar on the left hand side. Using the navigation bar, you will need to click onto ‘Products’ which should display a sub list with an option for ‘Sangoma Phones’. You will then need to click onto ‘Sangoma Phones’ which should display another sub list, where you can select ‘Register’.

Step 3:

You should now see a screen for registering a Sangoma phone. For this part you will need to find out the MAC address of the phone that you are wanting to register.

If you are able to web browse to the IP address of the Sangoma phone, this could be the easiest way as you can simply copy and paste the MAC address onto the Sangoma portal.

If you don’t know the IP address of the phone, you can obtain this by either web browsing to the IP address of the router and then looking for devices on the network, or, if you have the phone in front of you, you can obtain the IP address by pressing the tick button located at the centre of the arrow navigation keys, and then by pressing the tick button again on the ‘Information’ tab. You should then see the information page displaying the IP address under ‘IPV4’.

Step 4:

Once you have obtained the IP address, you will need to browse to that IP address using a web browser. By default, you will be prompted to enter a username and password before you can access the interface of the phone. The default username and password is ‘admin’. Please ensure that you change the default password for security reasons.

Once you have logged into the web interface, you should see the status page that displays a variety of information about the phone. You should see the MAC address under the ‘Network’ section. You will need to copy the MAC address, then navigate back to the Sangoma portal and paste it into the registration field.

Step 5:

Once you have pasted the MAC address into the registration field, you will need to press the submit button located next to the MAC address field. Providing the MAC address you have entered is valid and doesn’t already exist on the system already, you should see a message appear in green to show that your phone has been successfully registered.

Step 6:

You may see some phone details including the MAC address, manufacture date and more listed on the screen. You should see a ‘General Information’ section which will ask for the company name to assign the phone to. You will need to ensure that the correct company name is selected. You can then enter a description in the box below such as ‘Sangoma S700 IP Phone’ depending on the phone you are registering.

Step 7:

Below the description box, there should be a check box to ‘Enable Redirection’. You will need to check this box and some options should be displayed below. The ‘Redirection Type’ should be set to ‘IP/FQDN’. The ‘IP/FQDN protocol’ should be set to ‘http://’. The ‘IP/FQDN address should be blank by default. You will need to enter the IP address of the Sangoma PBXact UC system in this field followed by the provisioning port number e.g. ‘192.168.1.60:83’. Please ensure that you don’t include ‘http://’ at the beginning of the ‘IP/FQDN address’ field as the protocol option above should already be set.

Once the above options have been set correctly and the relevant information has been filled in, you can then go ahead and submit the changes using the ‘Submit’ button at the bottom of the page.

You page should then reload and display a green box stating that the changes have been updated. You will then need to reboot the phone in order for the provisioning process to start. You may want to factory reset your Sangoma phone if you want to overwrite the existing configuration.

Sangoma PBXact UC – Creating an extension

Are you interested in learning how to create an extension on a Sangoma PBXact UC system? We’ve put together a step-by-step guide below outlining how to do this. Please note that this guide doesn’t show you how to provision your Sangoma phone.

Step 1:

You will need to start by web browsing to the IP address of your Sangoma PBXact UC system. If you don’t already know the IP address of your PBXact system, you may be able to find this by web browsing to the IP address of the router and viewing a list of devices on the network.

Step 2:

Once you have web browsed to the IP address of your PBXact system, a menu screen should appear with a few different options to choose from. Please see the following screenshot that shows these options:

You will need to click onto ‘PBX Administration’ which is the first option on the left. You should then be prompted to enter a username and a password before you can access the administration page.

Step 3:

Once you have logged into the PBXact system, please ensure that ‘Advanced Mode’ is on. You can find out if this is enabled if the second tab on the top says ‘Basic Mode’.

Step 4:

You will need to hover over ‘Modules’ using the navigation bar at the top of the screen, then click on ‘Extensions’. Please note that it may be easier to use the search function using the magnifying glass on the top right hand side. You should now see a list of the extensions that have been created on the PBXact system if any extensions exist.

Step 5:

The next step is to click on ‘Add Extension’, then click on ‘Add New Chan_SIP Extension’. You should then be able to see a different screen asking for information for the extension you are creating.

Step 6:

Under ‘User Extension’ you will need to enter the extension number that you would like to create.

Step 7:

Under ‘Display Name’, you will enter the name that you would like to be displayed when that extensions calls another extension. You would ideally use the name of the person that the extension is going to be assigned to.

Step 8:

You should see a section for ‘User Manager Settings’ which lists some options for creating a user for the extension.

If the extension you are creating is to be linked to an already existing user, you can select the drop down list for the option ‘Link to a Default User’ and select the user from the list.

If you are creating a new extension for a new user, then you will need to leave the ‘Link to a Default User’ option as ‘Create New User’. By default, the user will be given a username automatically, but if you want to specify a username, you can select the check box ‘Use Custom Username’ under the option ‘Username’ and input a custom username.

You should also see the password listed below for the new user that is generated automatically. Again, you can change the password by deleting the one that has been generated and by typing in a new password.

Step 9:

You will need to navigate to the ‘Other’ tab and input more information to the fields under ‘Endpoint’. Providing it is a Sangoma phone that you are registering, you will need to select ‘Sangoma’ from the drop down list under ‘Brand’.

Step 10:

You will also need the MAC address of the phone which you will need to input under the ‘MAC’ field.

Step 11:

The ‘Template’ option should automatically select ‘sangoma_default’ after selecting the ‘Brand’ as ‘Sangoma’.

Step 12:

You will also need to ensure that the ‘Model’ is selected to the correct phone model e.g. ‘S700’.

Step 13:

Before you can proceed creating the new extension, you must ensure that you navigate to ‘Other’ using the tabs near the top of the page, then navigate to ‘User Password’ under ‘XactView Settings’ and input a password. You cannot create the new extension without inputting a user password first.

Step 14:

You can now go ahead and create the extension using the ‘Submit’ button located at the bottom of the page.

If you have followed the steps above, you should now have a new extension created and also configured to work with the phone that you are wanting to use providing you have entered the correct information in the ‘Endpoint’ section. Again, please note that your phone won’t call home to the PBXact system unless you re-direct the phone to do this. You can do this by using the Sangoma portal. Please see the following link below for the Sangoma portal:

https://portal.sangoma.com/

Configuring the 2N Helios IP Uni with Panasonic KX-HDV130 with peer-to-peer dialling

We have recently been testing the 2N Helios IP Uni with the Panasonic KX-HDV130 entry level handset via peer-to-peer calling. After some very straight forward testing, we managed to get it working. You may use this scenario if you don’t want to involve an IP PBX.

Please note that this guide applies to the 2N IP range.

2N Helios IP Uni Configuration:

You will need to web browse to the IP address of the 2N Helios IP Uni which can be done by powering the unit via a Cat5e cable, then pressing the button on the unit five times once you have heard the initial startup tone. Then unit should then speak out the IP address of the unit to you.

Once you have obtained the IP address of the device, you will need to web browse to the IP address of the device e.g. ‘192.168.x.xx’. The default username is ‘Admin’ and the default password is ‘2N’. It is highly recommended that you change the default password before you start using the device.

Once you have logged into the web interface of the IP Uni, you will need to navigate to ‘Directory’ (blue tab), then make sure that the ‘Position Enabled’ field has a check in the box, then enter a relevant name in the ‘Name’ field under ‘User Basic Information’. Finally, you will need to enter the IP address of the Panasonic KX-HDV130. You can find out the IP address of the KX-HDV130 by navigating to ‘Menu’, ‘System Settings’, ‘Status’, ‘IPv4 Settings’, then ‘IP Address’ on the phone. The IP address should then be displayed on screen e.g. ‘192.168.x.xx’. The IP address should look something similar to ‘192.168.x.xx’ which needs to be inputted into the ‘Phone Number’ field under ‘User Phone Numbers’. It is important to make sure that you have included ‘sip:’ before inputting the IP address e.g. ‘sip:192.168.x.xx’. You will then need to apply the changes to the unit by clicking the ‘Apply’ button located at the bottom right hand side of the interface.

Please note that if you would like the ability to dial the extension number registered to the IP Uni, you will need to navigate to ‘Services’ (purple tab), then ‘Calls’ which is located at the top of the interface, then set ‘Call Answering Mode (SIP1)’ to ‘Automatic’ using the drop down list. You can then go ahead and apply the changes by clicking the ‘Apply’ button. You should now be able to dial ‘200’ from the KX-HDV130 and the Uni will automatically answer the call.

Panasonic KX-HDV130 Configuration:

You will need to start by finding out the IP address of the phone by navigating to ‘Menu’, ‘System Settings’, ‘Status’, ‘IPv4 Settings’, then ‘IP Address’. The IP address should then be displayed on screen e.g. ‘192.168.x.xx’.

You will then need to enable access to the web interface before you can web browse to the phone which can be done by navigating to ‘Menu’, ‘Basic Settings’, ‘Other Option’, ‘Embedded Web’ and then changing this setting to ‘On’. You can then go ahead and web browse to the phones IP address via a web browser of your choice e.g. Google Chrome.

When you browse to the IP address of the phone, you should be prompted to enter a username and a password. The default username is ‘admin’ and the default password is ‘adminpass’. Again, it is highly recommended that you change the default password before using the device.

You will need to click onto the ‘VoIP’ tab located at the top of the web interface, then click onto ‘Line 1’ which is located on the left hand sidebar under ‘SIP Settings’. Enter ‘200’ in the ‘Phone Number’ field, then the IP address of the IP Uni under ‘Registrar Server Address’. You will also need to enter the IP address of the IP Uni under the ‘Outbound Proxy Server Address’ and the ‘Service Domain’ fields. For the last two steps of the configuration for the KX-HDV130, enter ‘200’ in the ‘Authentication ID’ field and leave the ‘Authentication Password’ field blank.

That’s the end of the main configuration process for the 2N Helios IP Uni and the Panasonic KX-HDV130.

If you have any questions, please send them to matthew@provu.co.uk

  • 1
  • 2