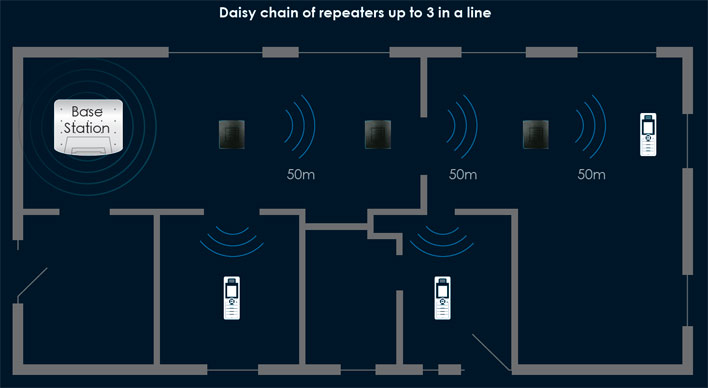
Yealink W52P & RTX 4002P – Setting up Daisy Chain
*RTX4022P can not be set up in Daisy Chain with 3rd party devices such as Gigaset and Yealink*
* Requires RTX PC Software *
* Maximum of 3 Repeaters in a Daisy Chain *
1) Enable Repeater mode on the W52P:
– Press OK on the W52H ‘handset’ and then go to settings. Choose “System Settings” and then select “Repeater Mode”.
2) Pair the first RTX repeater in the chain to the base:
– Plug in the RTX repeater for 1-5 seconds (We count to 3) and then unplug it.
– Plug it in again and leave it. The LED indicator on the RTX repeater will then flash slowly (This means the repeater is ready for manual registration).
– Press the paging key on the W52P base until the “Handset” LED light on the base starts flashing.
– The LED on the RTX repeater will now change to flash faster than it did before.
3) Assign a repeater number to the RTX repeater from 2 to 7, for up to 6 repeaters. (The W52P takes repeater number 1)
– Dial #*9 on the W52H ‘Handset’, it will stay on this call for the duration of this procedure. The LED on the repeater will be lit solid.
– Press a number between 2 and 7. The LED indicator on the repeater will flash a corresponding number of times and then stay solid.
– Accept the registration by pressing the * key and end the call on the W52H ‘Handset’.
4) Configure the repeater:
– Connect this repeater to the RTX USB cable, power supply and your PC.
– Load the RTX software on the supplied CD.
– Select the COM port the USB cable is connected to.
– Press the “load” button.
– Write down the “RFPI” number from the “Repeater” section.
– Disconnect this repeater but do not close the software.
4.1) Configure the next repeaters
– Connect the next repeater that will be used in the daisy chain.
– Type the “RFPI” number you have written down into the “RFPI” box in the “Network Device” section.
– Tick the “Ignore Hop Control” box and optionally the “Monitor Beep” if you want that on (useful for testing).
– Increment the “RPN” number in the “Repeater” section. This need to go up by one for each repeater in this chain.
– Press “Save”.
– If this isn’t the last repeater in the chain, click “Load” and write down the “RFPI” number from the “Repeater” section (This will then be used by the next repeater in the chain in it’s “Network Device” section).
– Pair this repeater to the base by following the procedure in steps 2) & 3).
* Repeat step 4.1) for each repeater in this chain.
* Repeat steps 2) to 4.1) for each chain.


