Browse Author

Luke Warby

Bria Enterprise – iOS Version 14 (503/408 – Registration Error)

Please note this does not affect android devices.

We have been getting a few reports of users who have been using the Bria Enterprise application without any issues. However, once the iOS device is upgraded to version 14, users have been experiencing 503 and 408 errors relating to the SIP account registering.

This appears to be due to an iOS setting and not the Bria application. If you are experiencing this issue please check that ‘Local Network’ has been enabled. This can be checked on the iOS device by going to:

Settings > Privacy > Local Network > Enable

If you are still experiencing issues after enabling this setting. Please proceed to generate an application support log as shown in this blog post.

Generating Yealink Support Logs for Provisioning/Redirection Issues

If you contact the support team regarding an issue with your Yealink device and it was purchased with provisioning or redirection and this does not appear to be working it maybe due to an external factor that we have no control over, such as:

DNS related issues
Local Provisioning (DHCP Option 66, PnP)
Firewall
Incorrect Time/Date on the device

In order for us to try and determine if there is an external factor involved we may ask you to provide some support logs from the device. These need to be captured in a specific sequence.

Generating the Support Logs

1) Web browse to the IP address of the device and login. After accessing the web user interface go to ‘Settings‘ > ‘Configuration‘.

On the Configuration page there will be a section called ‘Local Log‘. You will need to change the ‘Local Log‘ settings to match the image below:

Remember to press ‘Confirm’ at the bottom of the page after making the changes!

2) After changing the settings above, reboot the device and wait for around 2-3 minutes and come back to ‘Configuration‘ page. Once on the configuration page the ‘sys.log‘ and ‘boot.log‘ needs to be exported from the device.

You can export the files by selecting the log type from the ‘Export Local Log‘ field and pressing the ‘Export‘ button. (A popup should appear asking where you want to save them)

Make sure you export both the ‘sys.log‘ and ‘boot.log

3) After you have exported the logs. Send them to the support engineer you have been dealing with or to support@provu.co.uk

4) After you have sent the log files over to us, change the ‘Local Log’ settings back to match the image below:

Using Draytek Router with Virgin Media

If your service provider is Virgin Media and you are wanting to use a Draytek router to perform as it is designed to do and route your network traffic you can’t connect it straight to the outlet installed by Virgin Media. The Draytek router needs to be connected to the hub provided by Virgin Media.

It’s not as simple as connecting the units together and away you go, you need to make sure the following prerequisites have been done. Then you can follow the pairing steps at the bottom of this post.

Prerequisites

Configured Virgin media hub to operate in modem mode
Configured Draytek Router to operate in Ethernet WAN

To configure the Draytek router to operate in Ethernet WAN mode follow the steps below:

*If your Draytek Router does not have a dedicated WAN port it is possible on some models to configure LAN port 4 to behave as an Ethernet WAN port. 

1) Web browse to the Draytek and go to ‘WAN‘ > ‘General Setup‘.

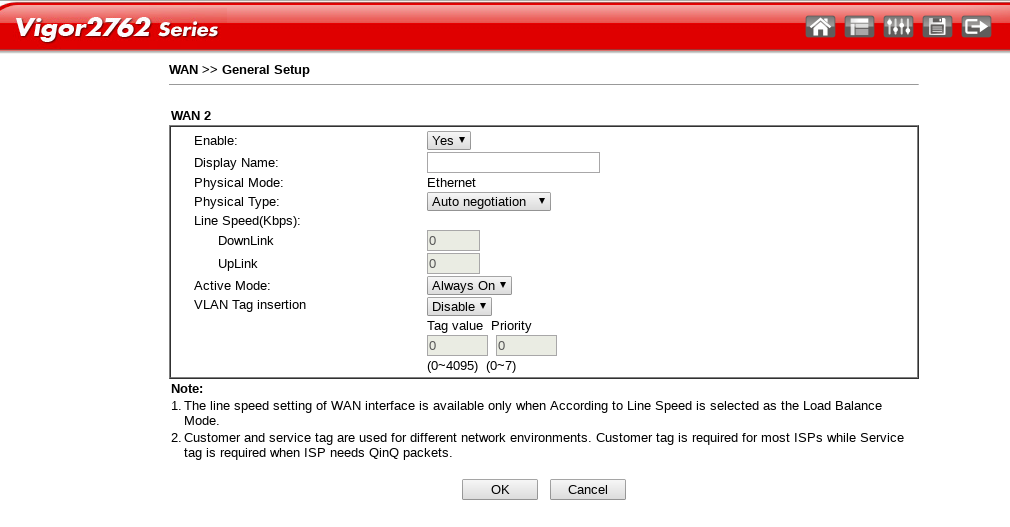
2) Once the general setup page loads click the ‘WAN2‘ index and it should take you to the page below. Once on the page below set ‘Enable‘ to ‘Yes‘ and ‘Active Mode‘ to ‘Always On‘ and press ‘OK‘.

 3) After turning on Ethernet WAN and have waited for the unit to reboot go to ‘WAN‘ > ‘Internet Access‘. Once on the Internet Access page below change the ‘Access Mode‘ to ‘Static or Dynamic IP‘ and then click the ‘Details Page‘ button.


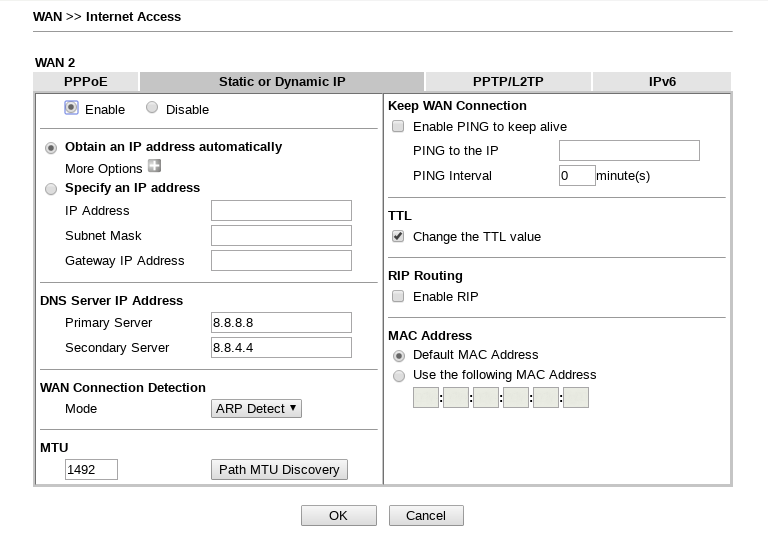
4) After clicking the ‘Details Page‘ button it’ll take you to the page below. Here you need to make sure it is set to ‘Obtain an IP address automatically‘ and also make sure the ‘Enable‘ radial button is selected and press ‘OK‘. The router may reboot to apply the changes. 

Pairing the Virgin Media Hub and Draytek Router 

Now you’ve configured the Virgin Media Hub to operate in modem mode and the Draytek to operate in Ethernet WAN mode they need to be paired via the following steps. If you don’t follow the steps below you may find the Draytek does not obtain an IP address from the hub.

1 – Power off the Virgin media hub and Draytek router.
2 – Connect the Draytek’s WAN port to any Virgin media hub port
3 – Power on the Draytek router and let it settle.
4 – Power on the Virgin media hub in modem mode and it should find the 3rd party router and assign an IP address.

Cisco CP Range – Generating Support Logs (PRT File)

Part 1 – Configure the unit to start logging in ‘DEBUG’ mode and replicate the issue

  1. Login to the web user interface and select the ‘admin‘ user. After selecting the ‘admin‘ user go in to advanced mode by pressing ‘advanced‘ on the top right of the screen.
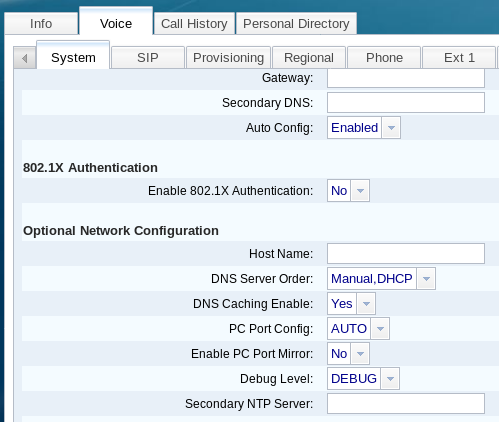
  2.  Once ‘advanced‘ mode is applied press the ‘voice‘ tab and also the ‘system‘ tab. Once on the ‘system‘ page scroll down until you get to ‘Optional Network Configuration‘ and in the drop down box next to ‘Debug Level‘ set this to ‘DEBUG‘ and press ‘Submit All Changes‘. 
  3. Now that the phone is logging everything in ‘DEBUG‘ mode you need to replicate the issue.

Part 2 – Generating the log

Now the you’ve replicated the issue we need to export the log.

To do this follow the steps below:

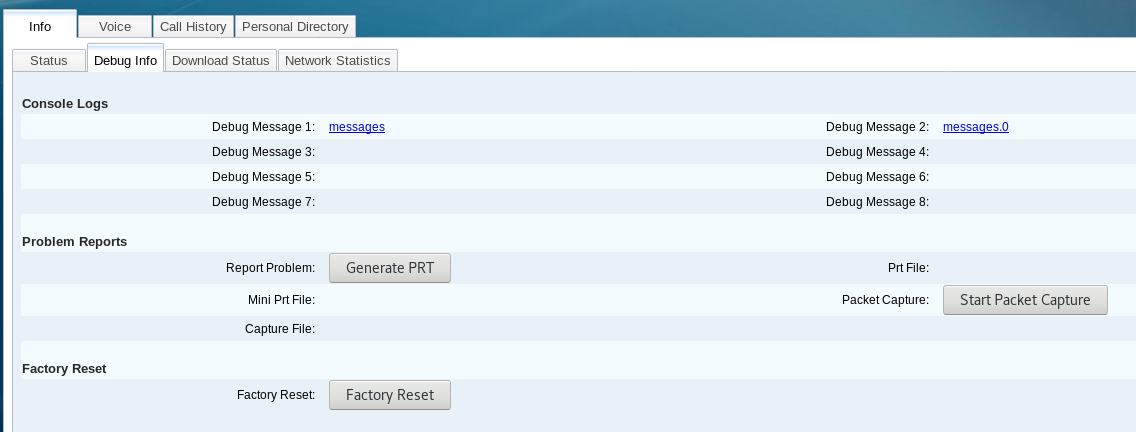
  1. Login to the web user interface as before using ‘admin‘ and ‘advanced‘ mode. Once logged in select the ‘info‘ tab and also the ‘Debug Info‘ tab.  Once you are on this page press the ‘Generate PRT‘ button.
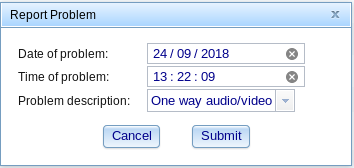
  2. Once you press the button you will get a popup box asking you to enter the date and time of the problem as well as selecting a description. If your problem isn’t listed select ‘Other‘ and press ‘Submit‘.
  3. After pressing ‘Submit‘ and allowing the phone to generate the file you should get another popup notification saying the PRT file has been generated and can be access from the phone directly. Press ‘OK‘ and download the file by clicking on the PRT file link across from the ‘Generate PRT‘ button. 

Bria Stretto – Generating Support Logs for an Apple Device

Note: Although this guide was created for Bria Stretto, it is still applicable to Bria Enterprise.

If you have contacted our support team regarding an issue with CounterPath’s Bria Stretto application we may require some logs from your application that you will need to generate.

This blog post should act as a rough guide on how to obtain the log as it may vary slightly depending on the application version and also the make and model of your device.

Step 1 – Open the Bria Stretto application and replicate the fault

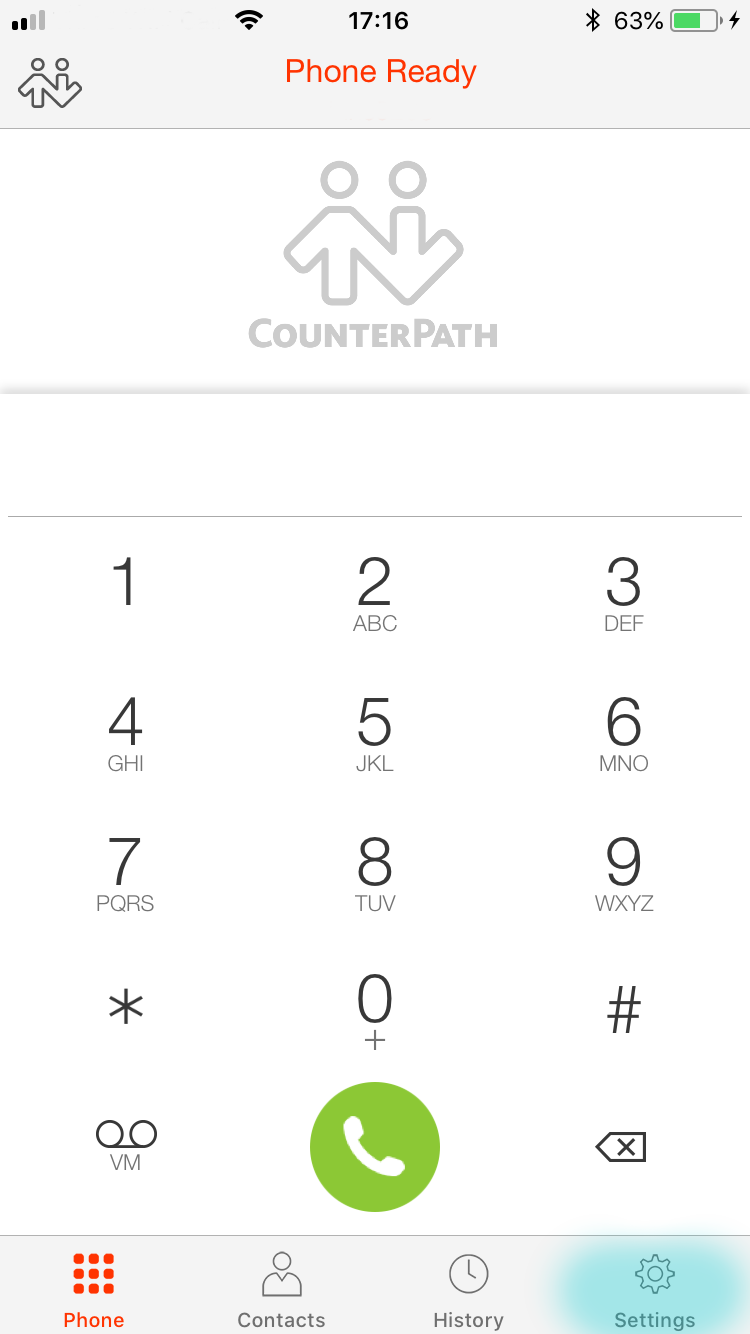
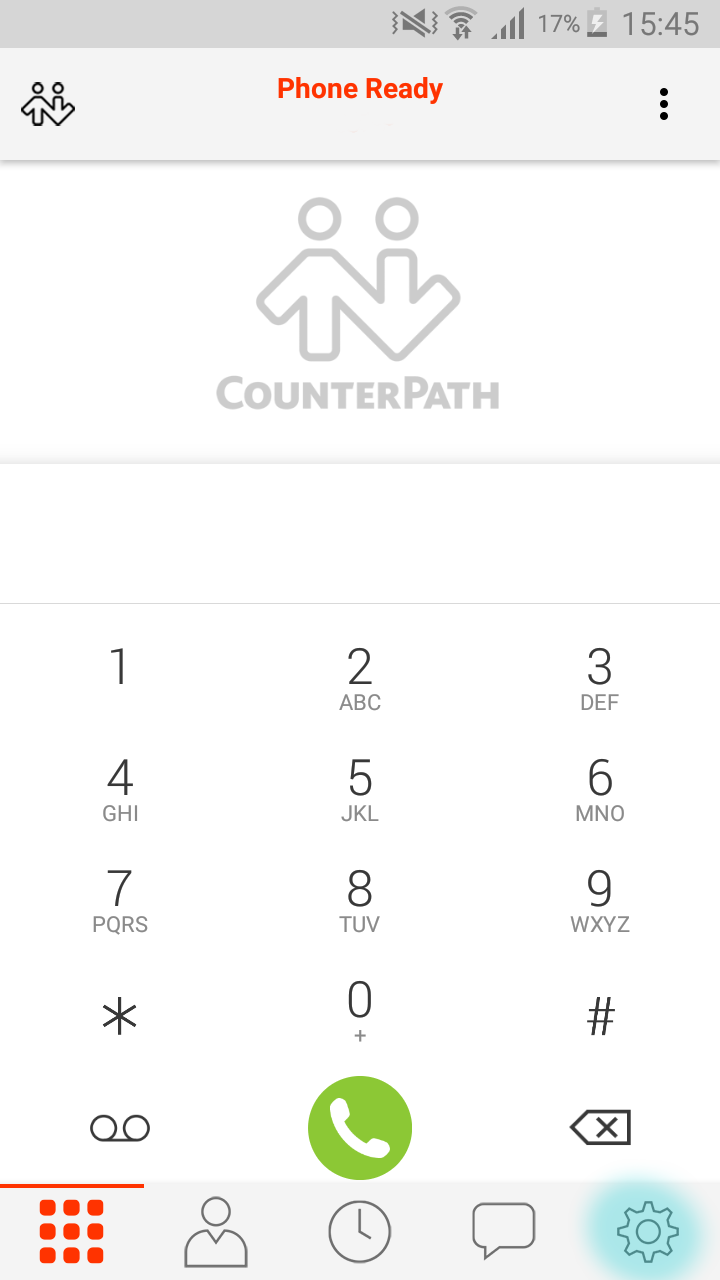
Step 2 – Once the fault has been replicated press the ‘Cog’ icon. (Highlighted in the image below)

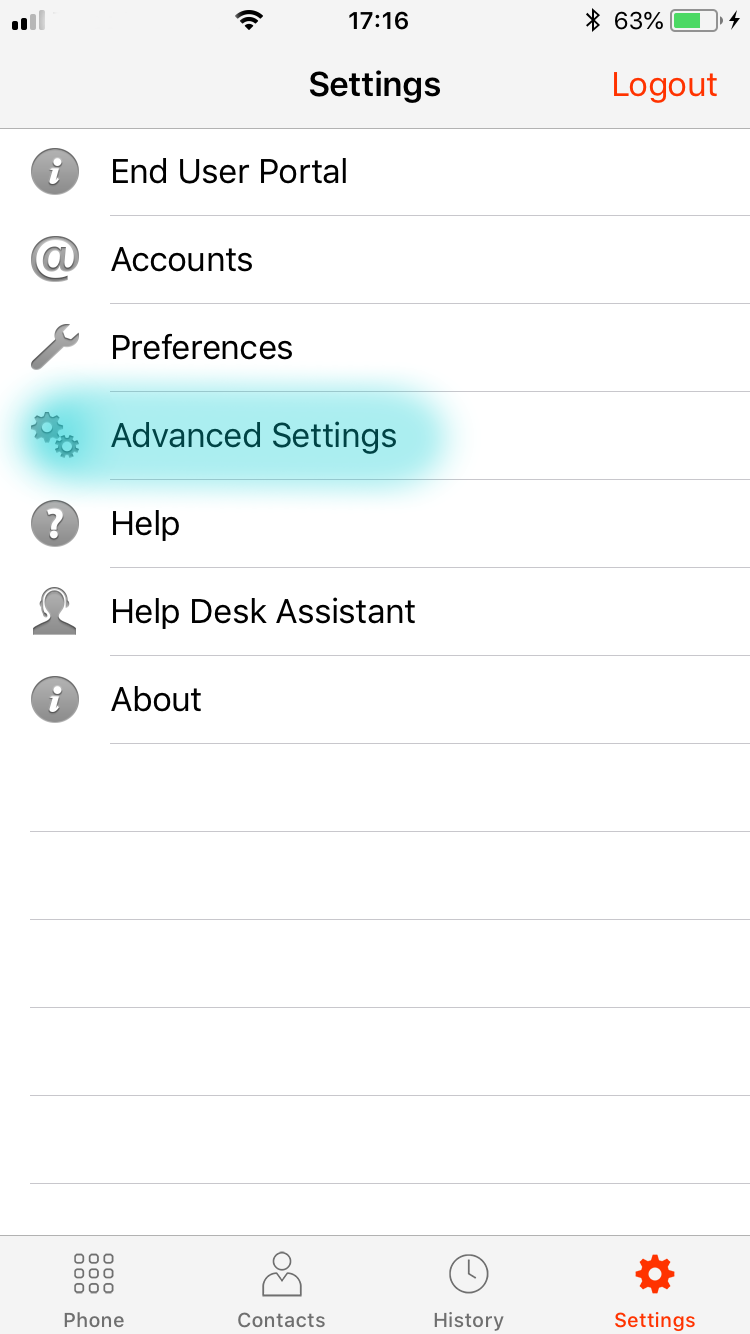
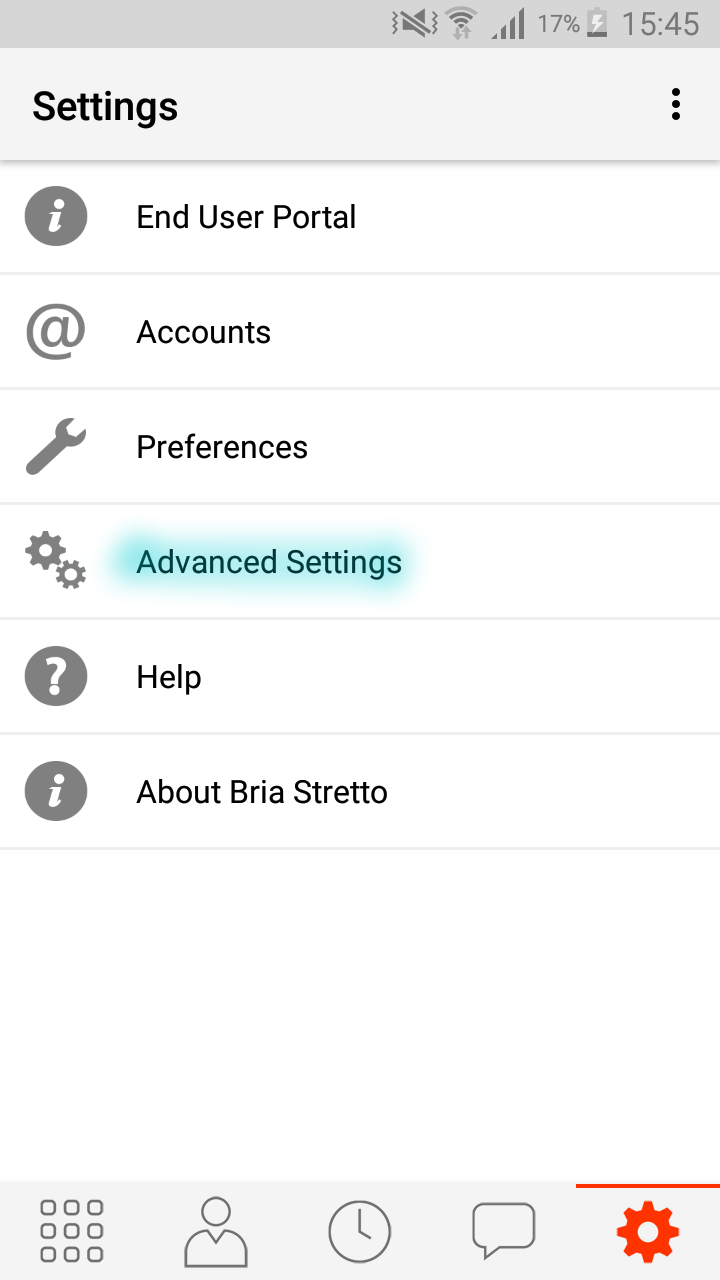
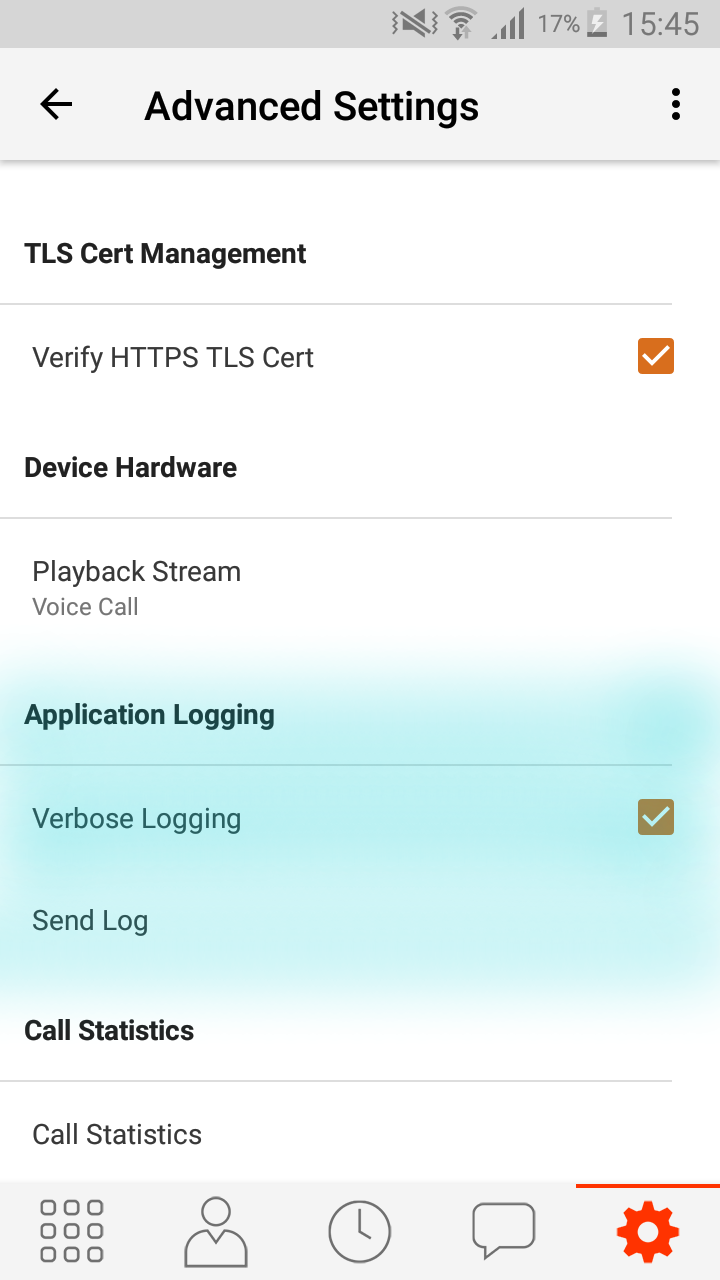
Step 3 – Once the new page loads, select ‘Advanced Settings’ (Highlighted in the image below)

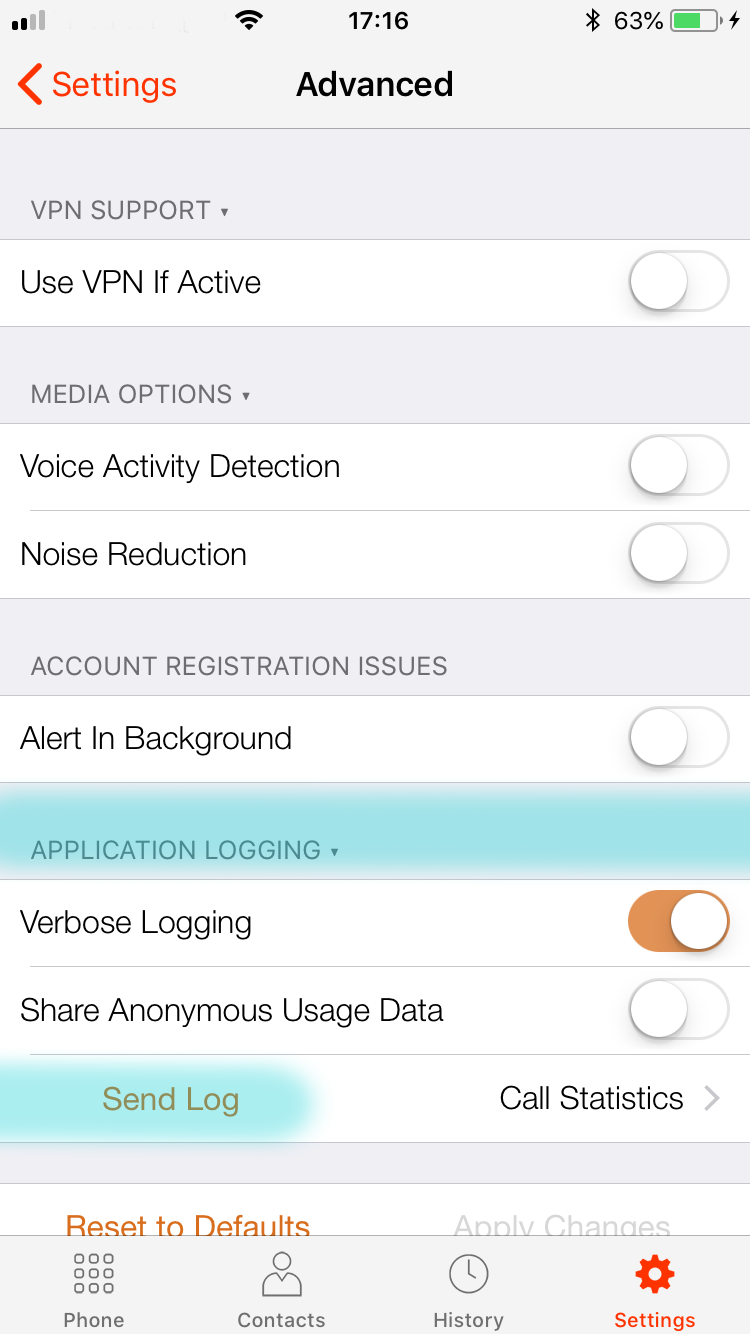
Step 4 – Once the next page loads, scroll down until you reach ‘Application Logging’ and press ‘Send Log’. Don’t press ‘Call Statistics’. (Highlighted in the image below)

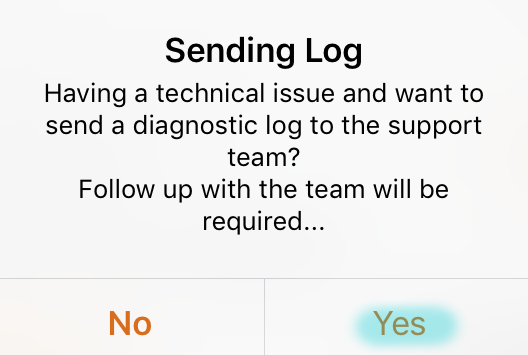
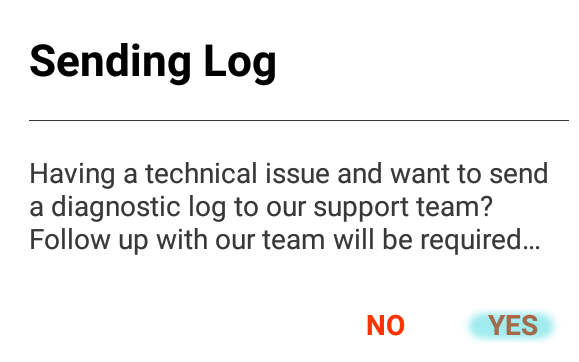
Step 5 – Once you press ‘Send Log’ it will display the image below. Once you are on this page press ‘Yes’ to generate the log

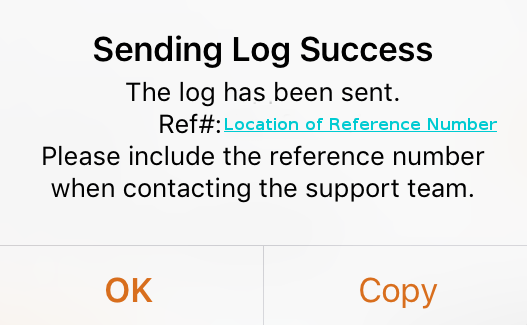
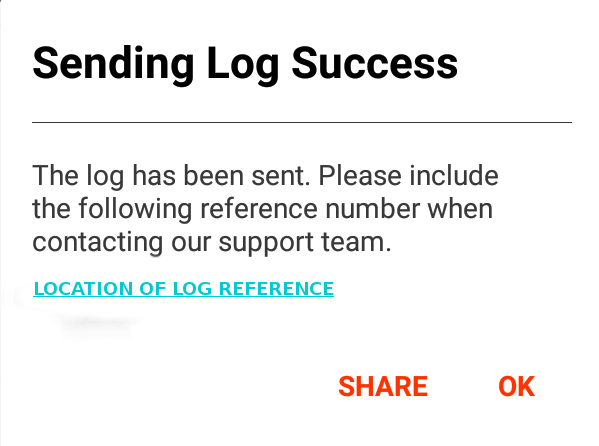
Step 6 – After the log has been generated and sent to CounterPath’s server it will display something similar to the image below with a ‘Log Reference’. (It is Important to make a note of this reference)

Step 7 – Contact us with the log reference and the user account this log belongs to so we can find it on the CounterPath Portal.

Important: You need to contact us once the log has been generated as they don’t stay on the portal for long.

Bria Stretto – Generating Support Logs for an Android Device

Note: Although this guide was created for Bria Stretto, it is still applicable to Bria Enterprise.

If you have contacted our support team regarding an issue with CounterPath’s Bria Stretto application we may require some logs from your application that you will need to generate.

This blog post should act as a rough guide on how to obtain them because it may vary slightly depending on the application version and also the make and model of your device.

Obtaining the logs from an Android device

Step 1 – Open the Bria Stretto application and replicate the fault

Step 2 – Once the fault has been replicated press the ‘Cog’ icon. (Highlighted in the image below)

Step 3 –  Once the new page loads, select ‘Advanced Settings’ (Highlighted in the image below)

Step 4 – Once the next page loads, scroll down until you reach ‘Application Logging’ and press ‘Send Log’. (Highlighted in the image below)

Step 5 – Once you press ‘Send Log’ it will display the image below. Once you are on this page press ‘Yes’ to generate the log

Step 6 – After the log has been generated and sent to CounterPath’s server it will display something similar to the image below with a ‘Log Reference’. (It is Important to make a note of this reference)

Step 7 – Contact us with the log reference and the user account this log belongs to so we can find it on the CounterPath Portal.

Important: You need to contact us once the log has been generated as they don’t stay on the portal for long.

Yealink – Obtaining Support Logs

If you contact the support team at ProVu regarding an issue with a Yealink device we might ask for some additional logs from the unit.

If you are asked to obtain these you can use the links below as a guide to obtain them.

For phones on firmware version 80 or lower use the link below:

http://support.yealink.com/faq/faqInfo?id=708

For phones on firmware version 80 or higher use the link below:

http://support.yealink.com/faq/faqInfo?id=707

For issues where it needs to be capture via wireshark please use the link below:

http://support.yealink.com/faq/faqInfo?id=709


Yealink USB Call Recording

Supported Yealink Models

SIP-T54S, T52S, T48G, T48S, T46G, T46S, T42S, T41S, T29G, T27G.

Enabling USB call recording

By default this feature is disabled, if you wish to use a USB stick to record calls you need to enable the following parameter:

features.usb_call_recording.enable
Valid Values: 0 or 1
1 = ON
0 = OFF

Note: this feature cannot be enabled via the web user interface or via the phone directly. It can only be done by a provisioning parameter.

If you are having your Yealink devices provisioned by ourselves and would like to use this feature just drop us an email and we can apply this to your template.

Uploading a CFG file

If you aren’t able to provision this setting to the device you can add the settings below to a plain-text file and upload it directly to the unit from a PC and it will enable the feature:

#!version:1.0.0.1
features.usb_call_recording.enable = 1
Remember to save the text file as “.cfg”

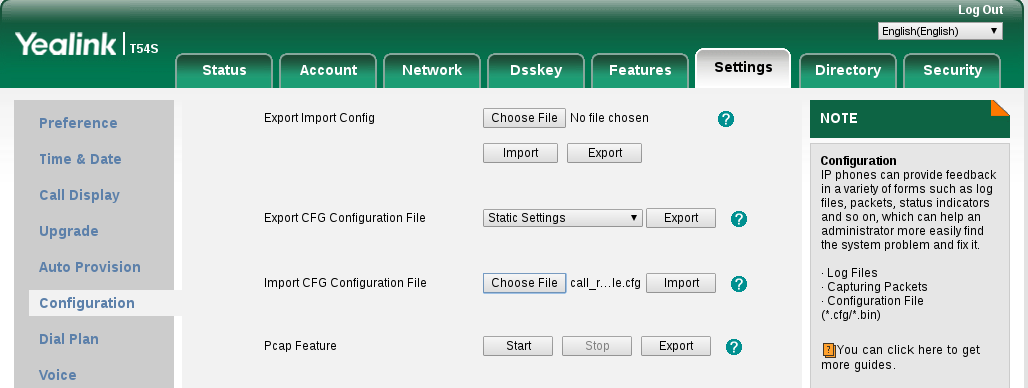
To upload the config file login to the web user interface of the phone and go to “Settings” > “Configuration” > Select the “Choose File” button next to “Import CFG Configuration File” and select the file on your PC > After selecting the file press the “Import” button for it to upload.
After the file has been uploaded the setting will be enabled.

Using USB call recording
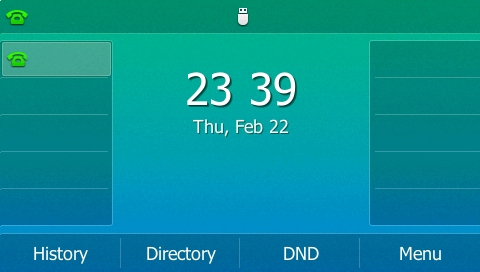
1) Connect the USB stick to the phone and it will display a message saying “USB Flash Drive Connected” and display a logo of a USB Stick in to middle of the screen like above. (This will appear even if the setting is not enabled)
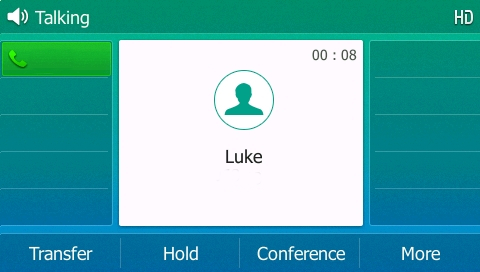
2) To use the feature during a call you will now notice a “More” soft-key appears. If you press this, you will get the option to start recording the call.
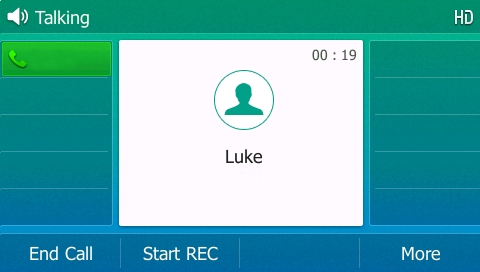
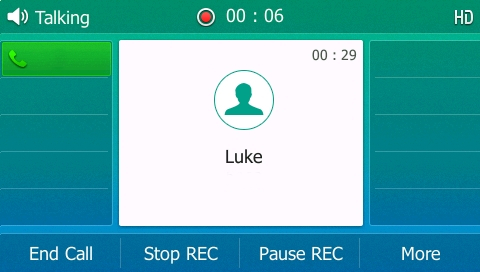
3) Press the “Start REC” button then you will have the option to pause or stop the recording. If you pause the recording you will have the option to start again or stop.
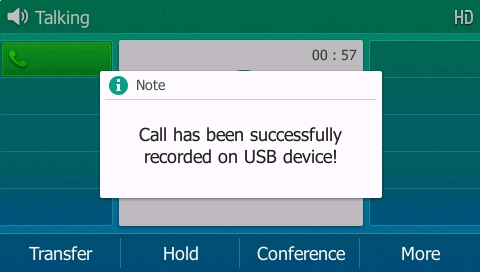
4) If you press the stop option you will see a notification saying the recording has successfully been saved.
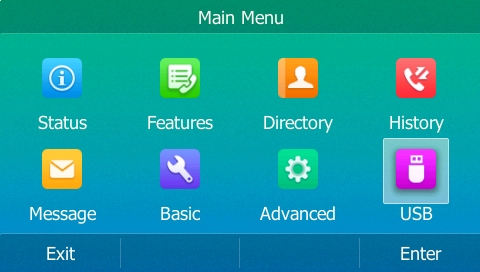
5) To listen to the recording either disconnect the USB and connect it to a computer or alternatively press  the “Menu” button whilst the phone is not on a call and press enter on the “USB” option.
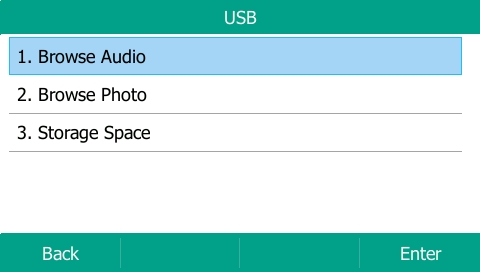
6) Then Select “Browse Audio”
7) Then select an audio file and press play:
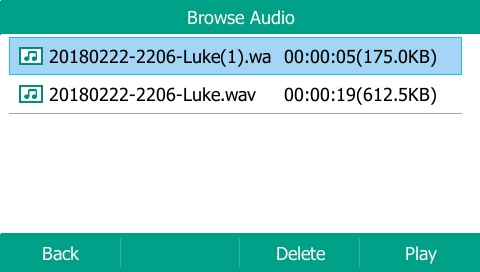
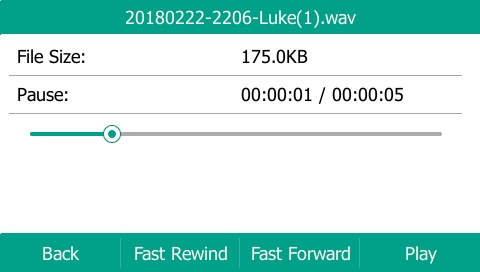
8) The recording will then automatically start playing. You can pause, rewind and fast forward the recording.
Recent change to CounterPath

Recently CounterPath have moved to PUSH to send incoming call notifications to their mobile applications. This has been done to improve battery life of devices.

Due to this change some users may be experiencing issues, where they are not notified of incoming calls when the application is closed or running in the background.

This is because the application does SIP registrations slightly different than before when the app is running in the background or closed.

Example of CounterPath application registering when app is open:

How this works is when the application is open the client registers directly to the PBX or SIP provider as normal.

Client <—–> PBX/SIP Provider

Example of CounterPath application registering when closed or in the background:

What happens when the app is running in the background or closed is it sends a PUSH registration to CounterPath’s servers, and this server then does the SIP registration to the PBX or SIP Provider. When a call is received on this account the PUSH server sends a notification to the mobile device and receives the incoming call.

Client <—-> CounterPath PUSH Server <—-> PBX/SIP Provider

Because the application registers to the PUSH servers when closed or in the background you need to make sure that your mobile devices can contact the following servers listed below:

Clients should automatically route to the correct nearest regional server, but we recommend ensuring that ALL addresses are accessible in case of travelling users, etc.

Domain Names IP Addresses
https://push.softphone.com 35.185.177.49
https://push-as.softphone.com 35.187.236.29
https://push-au.softphone.com 35.189.7.217
https://push-eu.softphone.com 35.189.10.177
https://push-ue.softphone.com 35.195.163.239
https://push-uw.softphone.com 35.195.65.27
wss://push1.softphone.com 35.197.16.246
wss://push2.softphone.com 35.197.115.127
wss://push-as1.softphone.com 216.93.246.120
wss://push-au1.softphone.com 216.93.246.121
wss://push-eu1.softphone.com 216.93.246.122
wss://push-uw1.softphone.com 216.93.246.167

Polycom Recovery (Resolve a Formatted File System)

If you’ve ever pressed the wrong button trying to perform a factory reset on a Polycom phone and accidentally pressed “Format File System” instead. You’ll most likely know it can be time consuming to recover the unit if you don’t have a provisioning server set up for this.

Well, you’re in luck! (Hopefully)

You should be able to use our server to download the application back on to the unit. Below is a list of all the units that can be recovered via our server.

Available for Polycom Models:

2345-12365-001.sip.ld = SoundPoint IP 331
2345-12450-001.sip.ld = SoundPoint IP 450
2345-12560-001.sip.ld = SoundPoint IP 560
3111-19000-001.sip.ld = SoundPoint IP 560
2345-12360-001.sip.ld = SoundPoint IP 321
2345-12375-001.sip.ld = SoundPoint IP 335
2345-12500-001.sip.ld = SoundPoint IP 550
2345-12600-001.sip.ld = SoundPoint IP 650
3111-30900-001.sip.ld = SoundStation IP 5000
3111-40250-001.sip.ld = VVX 101
3111-44600-001.sip.ld = VVX 600
3111-46161-001.sip.ld = VVX 310
3111-48350-001.sip.ld = VVX 311
3111-48500-001.sip.ld = VVX 501
3111-40450-001.sip.ld = VVX 201
3111-46135-002.sip.ld = VVX 300
3111-46162-001.sip.ld = VVX 410
3111-48400-001.sip.ld = VVX 401
3111-48600-001.sip.ld = VVX 601
3111-44500-001.sip.ld = VVX 500
3111-46157-002.sip.ld = VVX 400
3111-48300-001.sip.ld = VVX 301
3111-48450-001.sip.ld = VVX 411

Just follow these easy steps:

1) Connect the phone to the network (and power supply if required).

2) The phone will power up and display “starting application, press cancel to interrupt”. You need to press the “cancel” button.

3) It should then display a new screen that displays three options. “Start”, “Setup”, “About”. Press the button for “Setup” and enter the password. (by default it is 456)

4) Then it will display “provisioning server” > Press “Select” and set the “Server” type to “HTTP” > Scroll down to “Server Address” and press “Edit” and enter the following: polycom.provu.co.uk/fw/recovery/

5) Then Press “Exit” and then “Exit” again and select “Save and Reboot”.

6) Wait for the phone to reboot and contact our servers, if successful it should say something similar to “Updating XXXX-XXXXX-XXX.sip.ld, please wait”. Where X are numbers.

7) Leave the phone to download the application and wait until it boots up to the default Idle screen.

Important Note: Remember to upgrade the firmware version of the unit to the latest once the recovery has been completed. We can’t guarantee the firmware on the recovery server will be the latest.