Gigaset pro models now compatible with Broadsoft and Metaswitch

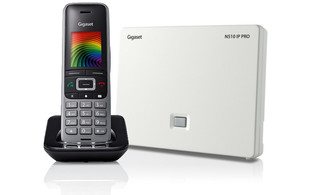
Gigaset have recently announced that the N510 IP and N720 IP PRO are now interoperable with the Broadsoft (BroadWorks software) and Metaswitch cloud-based unified communications platforms. The Gigaset N510 IP has passed the required test for both a Broadworks and a Metaswitch certificate and is suitable for auto provisioning deployment on the platforms. The N720 IP, which already had a Broadworks certificate has now received a certificate for auto provisioning deployment with Metaswitch.

Gigaset also plan to complete testing for the Maxwell device range, these are expected to be certified by the end of the first quarter of 2017.

Take a look at the Comms Business article here: http://commsbusiness.co.uk/news/gigaset-pro-models-compatible-with-broadsoft-and-metaswitch/

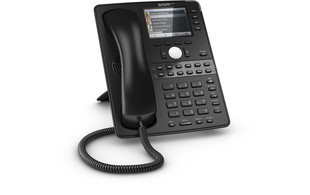
Provision Sangoma S700 IP Phone using Sangoma portal

You may or may not be aware that you can provision your Sangoma phones using the re-direction service which is available via the Sangoma portal. If you are interested in finding out how to provision your Sangoma phones, please follow the guide below:

Step 1:

You will need to start by navigating to the Sangoma portal which can be accessed by visiting the following link listed below:

https://portal.sangoma.com/

Please note, if you do not already have an account for the Sangoma portal, you will need to sign up for one. This can be done by accessing the following link listed below:

https://portal.sangoma.com/index.php/login/register

Please note that the registration link above will also list some important information regarding the Sangoma portal.

Step 2:

Once you have logged into the Sangoma portal, you should see the welcome page and also a navigation bar on the left hand side. Using the navigation bar, you will need to click onto ‘Products’ which should display a sub list with an option for ‘Sangoma Phones’. You will then need to click onto ‘Sangoma Phones’ which should display another sub list, where you can select ‘Register’.

Step 3:

You should now see a screen for registering a Sangoma phone. For this part you will need to find out the MAC address of the phone that you are wanting to register.

If you are able to web browse to the IP address of the Sangoma phone, this could be the easiest way as you can simply copy and paste the MAC address onto the Sangoma portal.

If you don’t know the IP address of the phone, you can obtain this by either web browsing to the IP address of the router and then looking for devices on the network, or, if you have the phone in front of you, you can obtain the IP address by pressing the tick button located at the centre of the arrow navigation keys, and then by pressing the tick button again on the ‘Information’ tab. You should then see the information page displaying the IP address under ‘IPV4’.

Step 4:

Once you have obtained the IP address, you will need to browse to that IP address using a web browser. By default, you will be prompted to enter a username and password before you can access the interface of the phone. The default username and password is ‘admin’. Please ensure that you change the default password for security reasons.

Once you have logged into the web interface, you should see the status page that displays a variety of information about the phone. You should see the MAC address under the ‘Network’ section. You will need to copy the MAC address, then navigate back to the Sangoma portal and paste it into the registration field.

Step 5:

Once you have pasted the MAC address into the registration field, you will need to press the submit button located next to the MAC address field. Providing the MAC address you have entered is valid and doesn’t already exist on the system already, you should see a message appear in green to show that your phone has been successfully registered.

Step 6:

You may see some phone details including the MAC address, manufacture date and more listed on the screen. You should see a ‘General Information’ section which will ask for the company name to assign the phone to. You will need to ensure that the correct company name is selected. You can then enter a description in the box below such as ‘Sangoma S700 IP Phone’ depending on the phone you are registering.

Step 7:

Below the description box, there should be a check box to ‘Enable Redirection’. You will need to check this box and some options should be displayed below. The ‘Redirection Type’ should be set to ‘IP/FQDN’. The ‘IP/FQDN protocol’ should be set to ‘http://’. The ‘IP/FQDN address should be blank by default. You will need to enter the IP address of the Sangoma PBXact UC system in this field followed by the provisioning port number e.g. ‘192.168.1.60:83’. Please ensure that you don’t include ‘http://’ at the beginning of the ‘IP/FQDN address’ field as the protocol option above should already be set.

Once the above options have been set correctly and the relevant information has been filled in, you can then go ahead and submit the changes using the ‘Submit’ button at the bottom of the page.

You page should then reload and display a green box stating that the changes have been updated. You will then need to reboot the phone in order for the provisioning process to start. You may want to factory reset your Sangoma phone if you want to overwrite the existing configuration.

Sangoma PBXact UC – Creating an extension

Are you interested in learning how to create an extension on a Sangoma PBXact UC system? We’ve put together a step-by-step guide below outlining how to do this. Please note that this guide doesn’t show you how to provision your Sangoma phone.

Step 1:

You will need to start by web browsing to the IP address of your Sangoma PBXact UC system. If you don’t already know the IP address of your PBXact system, you may be able to find this by web browsing to the IP address of the router and viewing a list of devices on the network.

Step 2:

Once you have web browsed to the IP address of your PBXact system, a menu screen should appear with a few different options to choose from. Please see the following screenshot that shows these options:

You will need to click onto ‘PBX Administration’ which is the first option on the left. You should then be prompted to enter a username and a password before you can access the administration page.

Step 3:

Once you have logged into the PBXact system, please ensure that ‘Advanced Mode’ is on. You can find out if this is enabled if the second tab on the top says ‘Basic Mode’.

Step 4:

You will need to hover over ‘Modules’ using the navigation bar at the top of the screen, then click on ‘Extensions’. Please note that it may be easier to use the search function using the magnifying glass on the top right hand side. You should now see a list of the extensions that have been created on the PBXact system if any extensions exist.

Step 5:

The next step is to click on ‘Add Extension’, then click on ‘Add New Chan_SIP Extension’. You should then be able to see a different screen asking for information for the extension you are creating.

Step 6:

Under ‘User Extension’ you will need to enter the extension number that you would like to create.

Step 7:

Under ‘Display Name’, you will enter the name that you would like to be displayed when that extensions calls another extension. You would ideally use the name of the person that the extension is going to be assigned to.

Step 8:

You should see a section for ‘User Manager Settings’ which lists some options for creating a user for the extension.

If the extension you are creating is to be linked to an already existing user, you can select the drop down list for the option ‘Link to a Default User’ and select the user from the list.

If you are creating a new extension for a new user, then you will need to leave the ‘Link to a Default User’ option as ‘Create New User’. By default, the user will be given a username automatically, but if you want to specify a username, you can select the check box ‘Use Custom Username’ under the option ‘Username’ and input a custom username.

You should also see the password listed below for the new user that is generated automatically. Again, you can change the password by deleting the one that has been generated and by typing in a new password.

Step 9:

You will need to navigate to the ‘Other’ tab and input more information to the fields under ‘Endpoint’. Providing it is a Sangoma phone that you are registering, you will need to select ‘Sangoma’ from the drop down list under ‘Brand’.

Step 10:

You will also need the MAC address of the phone which you will need to input under the ‘MAC’ field.

Step 11:

The ‘Template’ option should automatically select ‘sangoma_default’ after selecting the ‘Brand’ as ‘Sangoma’.

Step 12:

You will also need to ensure that the ‘Model’ is selected to the correct phone model e.g. ‘S700’.

Step 13:

Before you can proceed creating the new extension, you must ensure that you navigate to ‘Other’ using the tabs near the top of the page, then navigate to ‘User Password’ under ‘XactView Settings’ and input a password. You cannot create the new extension without inputting a user password first.

Step 14:

You can now go ahead and create the extension using the ‘Submit’ button located at the bottom of the page.

If you have followed the steps above, you should now have a new extension created and also configured to work with the phone that you are wanting to use providing you have entered the correct information in the ‘Endpoint’ section. Again, please note that your phone won’t call home to the PBXact system unless you re-direct the phone to do this. You can do this by using the Sangoma portal. Please see the following link below for the Sangoma portal:

https://portal.sangoma.com/

USB headsets ideal for use with CounterPath’s Bria Stretto licences

usb-headsets-for-counterpath

We have a number of wired and wireless USB headset solutions from Plantronics, Jabra, Sehnheiser and Eartec. These offer great cross-selling opportunities alongside your sales of ConterPath’s Bria Stretto Desk and User licences.

We have a great mix of headsets to suit any budget. From basic models all the way up to premium solutions offering maximum durability, comfort and noise-cancelling technology.

Take a look at our headset selector chart, designed to help you to choose the ideal headset for your customers based on their requirements and personal preferences. If there is a headset which you would like us to supply but we do not list, please let us know and we will explore the possibility of adding this to our portfolio.

3CX Announce Skype for Business Integration

3cx-sfb-integration-email-banner

Did you know 3CX can now be integrated with Skype for Business Windows clients? Thanks to 3CX’s new integration announcement, licenses can now be easily deployed for Skype for Business users.

What does this mean?

The new integration announcement means Skype for Business users can now dial out via 3CX from their Skype for Business Windows client. With a simple 3-step installation process, the new 3CX plugin is designed to work with the Windows client for both hosted or Office 365 users and comes free of charge with any Pro or Enterprise licenses.

For more information please see 3CX’s website.

Still to become a 3CX Partner?

To register to become a 3CX partner, simply complete their online registration form – don’t forget to select ProVu as your preferred distributor!

VTech, don’t they make Toys?

Undoubtedly, VTech are best known in the UK as leading manufacturers of Children’s electronic toys, but did you know they are actually the world’s largest manufacturer of DECT phones?

What makes VTech different?

VTech manufacture all of their own products, their telecoms factory alone employs 13,000 workers!

In 2016, VTech manufactured 33.5 million DECT handsets; chances are you will have used one of them

They have over 25 years of experience and currently operate in 76 countries worldwide

All SIP phones and accessories come with a 3 year warranty as standard

VTech recently acquired Snom, making them an even stronger player in the European VoIP Market

View the VTech Range here

Watch out for new products, coming very soon!

How to record calls using a Micro SD card on the VTECH Phones

If you have either VSP726A or VSP736A then you will have an SD card slot on the back of the phone, this is for call recordings.

Just in case you were wondering this is how to set it up:

First of all you need to go to Menu and then “Admin Settings” this requires your admin password, from there scroll down to “Call Recording” and “Enable” Call Recording.

3  5

Now that you have enabled call recording you can go ahead and record straight to your SD card, here is how:

When on a call, “End, Transfer and Conf” appear on the screen, press the right arrow key on the silver direction pad, this will show a”Record” option. Select this option and this will start and stop recording your call.

6  7

Once you have stopped the recording you can find this again by going to “Menu” > “Features” > “Local Call Recording”, in there will be all the calls you have recorded.

11  12

To listen to the recording you can either play them on loud speaker through the phone or through the handset or headset, you can even remove the SD card from the phone and listen to them on the PC.

If you are still having problems please contact our support team

Cisco Multiplatform Phone Launch – London

cisco78-88-series-london

Join us for the Cisco 7800 and 8800 Series Multiplatform phones launch on Thursday 26th January at Cisco’s London offices from 1:00 p.m. – where you can enjoy a complimentary lunch, with a chance to meet the ProVu and Cisco teams. The session will get under way at 2:00 p.m. where you will discover more about the new series of Multiplatform phones from Cisco’s guest speakers. This is a great opportunity to get up to speed with the latest range, plus learn more about Cisco’s upcoming plans.

Where: Cisco Offices – Finsbury Square, London
When: Thursday 26th January 13:00 – 16:30


Find out more & Register Here

Gigaset expand the Maxwell range

maxwell-samples

We are pleased to announce the arrival of the new Gigaset Maxwell 3 and Basic IP desktop phones. The two new models see the addition of an entry-level and a mid-level phone to the popular Maxwell 10 in the Gigaset Maxwell phone series.

Gigaset Maxwell 3 Gigaset Maxwell Basic

3.5″ high definition full colour display

4 SIP accounts

Gigabit

RJ9 and EHS headset support

8 self-labelling function keys

2.5″ high contrast display

4 SIP accounts

Gigabit

RJ9 headset support

Discover more about the Maxwell 3 Discover more about the Maxwell Basic

To mark the arrival of the new models, we are inviting our resellers to take a sample of each model in for testing and evaluation at a discounted price. If you are interested in getting your hands on a sample or would like to find out more information, please contact a member of our sales team.