Browse Author

Jordan Carr

How to Enable ZTP on Polycom Phones

Here is a step by step guide on how to enable ZTP on a range or polycom Phones:

  1. Plug the device in and wait for the screen to display “Loading Application” and then click cancel as soon as it appears.
  2. Wait for the screen to display “Welcome Auto Boot” and click on “Setup” and type in your password, by default this should be 456 unless it has been changed and then press “OK”
  3. Select “Provisioning Server” and then scroll down to the bottom to where it says “ZTP” to enable this setting by clicking select  and then use the down arrows to change the “ZTP” to “Enabled”
  4. Once this is done keep clicking “Exit” and then “Save & Reboot”, you have successfully enabled ZTP.

If you have any problems with this please contact our technical support team.

How to make the 2N unit sound an alarm when the tamper switch is triggered

When the tamper switch is triggered you can set it up to alert sound from the 2N unit, this would be useful for security purposes. Here is a step by step guide on how to set this up.

If you have a 2N tamper switch and want to know how to install it into your Verso, please click this link:

2N’s Helios IP Verso Tamper Switch

After the installation of the tamper switch you will need to configure it. Go on the 2N web-interface and go to Services (Purple tile) > Automation, from this page you will need to tick the box “Function Enabled” and fill in the “Object Type” and “Parameters” as seen below:

For this alarm I have used a dog barking which = *3 but there are other sounds to choose from here:

2N-Action-PlayUserSounds

Once you have chosen the sound you want the unit to play when the Tamper switch is triggered, click “Apply” at the bottom and you have finished. See me test this automation below:

If you have any problems with this please contact our support team.

How to receive an E-mail from a 2N Verso when button is pressed.

You are out of the office and only have access to E-mails but you still want to be notified when someone is at the front door. Creating this simple automation will allow you to receive an E-mail with the time and date of when someone presses the button on the 2N Verso. You can also get it to send you a picture of who it is that pressed the button.

Go on the 2N web-interface and go to Services (Purple tile) > Automation, from this page you will need to tick the box “Function Enabled” and fill in the “Object Type” and “Parameters” as seen below:

Event=1; Sender=2nVerso@frontdoor.com; Email=YourEmailAdress; Subject=Someone has tried calling you; (Subject can be changed to say what you want)

Go to the “E-Mail” tab, this is were you will need to put your smtp server address along with your email address and password. If you are using your gmail account then the smtp server and port are most likely going to be as follows:

screenshot-from-2016-11-14-113436

For more information about the smtp server settings go to this page: https://wiki.2n.cz/hip/conf/latest/en/5-konfigurace-interkomu/5-4-sluzby/5-4-4-e-mail

You have now finished, you can now test this feature by pressing the intercom button and watch your inbox for the email to come through, as shown below: 

If you have any issue please contact our support team.

How to make a 2N call a phone when the tamper switch is triggered

Did you know you can make your 2N tamper switch call a phone when it is triggered?

If you have a 2N tamper switch and want to know how to install it into your Verso, please click this link:

2N’s Helios IP Verso Tamper Switch

After the installation of the tamper switch you will need to configure it. Go on the 2N web-interface and go to Services (Purple tile) > Automation, from this page you will need to tick the box “Function Enabled” and fill in the “Object Type” and “Parameters” as seen below:

Please note: to change “Number=5070; Event=1″ to the extension you want the 2N to call when the tamper switch is triggered.
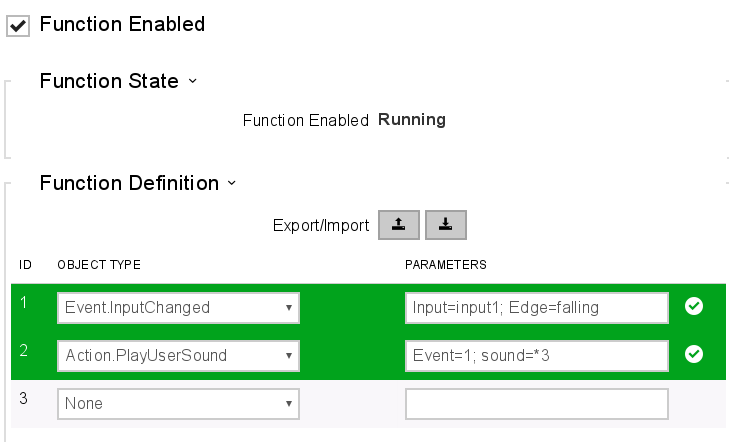
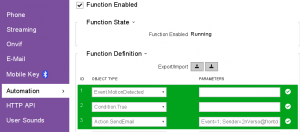
After you have filled these automation in you can run a test by taking the metal plate of the 2N and seeing if your phone rings as seen in the video below:

In addition to this you could have a second Event that sends an email to you when motion is detected. This would be for extra security purposes and would capture a picture of who ever triggered the tamper switch. If you want to know how to do this click the link below:

How to set up Email notification from 2N movement detection

If you have any problems with this please contact our support team.

How to record calls using a Micro SD card on the VTECH Phones

If you have either VSP726A or VSP736A then you will have an SD card slot on the back of the phone, this is for call recordings.

Just in case you were wondering this is how to set it up:

First of all you need to go to Menu and then “Admin Settings” this requires your admin password, from there scroll down to “Call Recording” and “Enable” Call Recording.

3  5

Now that you have enabled call recording you can go ahead and record straight to your SD card, here is how:

When on a call, “End, Transfer and Conf” appear on the screen, press the right arrow key on the silver direction pad, this will show a”Record” option. Select this option and this will start and stop recording your call.

6  7

Once you have stopped the recording you can find this again by going to “Menu” > “Features” > “Local Call Recording”, in there will be all the calls you have recorded.

11  12

To listen to the recording you can either play them on loud speaker through the phone or through the handset or headset, you can even remove the SD card from the phone and listen to them on the PC.

If you are still having problems please contact our support team

Compatible headsets for the new Cisco 7800 and 8800 series phones

We’ve recently done some testing between the new Cisco 7800 and 8800 series phones and the headsets that we supply.

Here is a table of all the headsets and cables that we’ve tested and work with these new Cisco phones:

Headset Cable / Adaptor
Eartec 308/510/710 Range EAR-QD002(C)
Plantronics SupraPlus Range Plantronics U10
Plantronics CS500 Range Plantronics APC-42
(For EHS, use switch settings: A/3/2)
Jabra BIZ Range Jabra GN1200
Jabra Pro 920/925 Jabra Link 14201-43 (For EHS, use switch setting “B” and EHS setting “Jabra IQ”)
Sennheiser SC230 & SC260 Sennheiser CSTD 08

Please note: The Cisco 7811 does not have a headset port and therefore does not work with the headsets listed in the table above.

To find out more go to our Headset Compatibility Guide here: https://www.provu.co.uk/headset-compatibility.html

If you have any other questions or problems please contact our technical support team.

How to set up Email notification from 2N movement detection

In case you didn’t know there is a feature on the 2N verso that allows you to receive an email notification that tells you when the camera has detected motion – This feature requires a gold or enhanced integration licence.

The camera on the verso will take screen shots of the object that has triggered the motion detection and attaches them to the email that the verso sends to you.

To do this, Go to “Services” (Purple Tile) > “Automation” and fill in the “Function Definition” with the following information below:

screenshot-from-2016-11-14-110450


Event.motionDetected and Condition.True you do not need a parameter (Condition.True is optional), the parameter for Action.SendEmail is: Event=1; Sender=2nVerso@frontdoor.com; Email=youremail@hotmail.co.uk; Subject=Motion has been detected; Body=Movement has been detected by the 2N Verso, see the following snapshot; Snapshots=1; Width=640; Height=480  (you can change the subject and the body to what you want your email to say)

Go to the “E-Mail” tab, this is were you will need to put your smtp server address along with your email address and password. If you are using your gmail account then the smtp server and port are most likely going to be as follows:

screenshot-from-2016-11-14-113436

For more information about the smtp server settings go to this page: https://wiki.2n.cz/hip/conf/latest/en/5-konfigurace-interkomu/5-4-sluzby/5-4-4-e-mail

The last step is to go to “Hardware” (Grey Tile) > “Camera” > Internal Camera tab at the top and then Enable “Motion Detection”

screenshot-from-2016-11-14-114438

You have now successfully set up Email notification from 2N movement detection, now when an object or a person passes in front of the camera you will get an email that looks like this:

screenshot-from-2016-11-14-114831

If you are still having problems please contact our support team.

How to firmware upgrade a Konftel 300Wx

Below is a step-by-step guide on upgrading a Konftel 300Wx using the SD card method. You will need to download the firmware file found here: http://www.konftel.com/Support/Upgrade and put it in the root of a Fat32 formatted SD card. Once you have done this, follow the steps below:

Power on the device, once it has booted up insert the SD card. Then go to > Settings > Upgrade Mode:

14964212_1151093798331458_1604429113_o

The phone will enter the Firmware upgrade mode and prompt you to run the PC Suite to start the upgrade:

14954390_1151093738331464_755233396_o

Instead, press the button on the bottom left corner of the phone, the device will then start reading from the SD card:

14958125_1151093711664800_1899115787_o

If the phone finds the upgrade file on the SD card, the screen will display the new firmware version. To start the upgrade, press OK. It will then start “Erasing” the firmware and upgrading to the new version. Do not power it off while the upgrade is in progress.

14907861_1151093694998135_117459166_o14971549_1151093691664802_1085066309_o

After it has finished “Erasing” the firmware upgrade is complete, click “Ok” at this message and you have completed the upgrade successfully. Once the unit has rebooted fully you can remove the SD card:

14959057_1151093668331471_1373214390_o

If you are still having problems please contact our support team.

Pairing the VTech VSP500A & 601A with the VTech VSP726A & VSP736A

In case you didn’t know, the VTech VSP726A and the VSP736A phones can be paired with both the VSP500A Cordless Headset and the VSP601A Handset, this Is how:

Pairing the VSP500A  Cordless Headset with both the VSP726A and the VSP736A Phones:

  1. On the Desk Phone click on Menu > User settings > DECT Headset, at this point lift the Cordless Headset off of its charging dock and place back down and then selected “Register” on the Desk Phone.
  2. This will search for the Cordless Headset and “Registration Successful” will appear on the screen of the Desk Phone. They are now registered and ready to go.

Pairing the VSP601A Handset with the VSP726A and the VSP736A Phones:

  1. (VSP726A and VSP736A has built In base station) Once both the DECT Handset and the Desk Phone are turned on, go to the DECT handset go to Menu > User Settings > Registration > Handset.
  2. “Which device do you want to register the handset to?” will come up on the screen select Desk phone, this will then tell you on screen what to do with the Desk phone.
  3. Once you follow the steps on the Desk phone you’ll get to a screen that says “Register” and “De-register”, Press “Next” on the Handset and “Register” on the Desk Phone.
  4. You need to press the “#” key on the handset, this I will then start searching for the base station, once found It will display “Registration Successful” on the screen. You have now registered the DECT hand set with you Desk phone

For a more detailed step by step use the user manual below:

http://ukbusinessphones.vtech.com/themes/md/downloads/VTech_VSP726A_User%20Guide_Rev-1.pdf

If you are still having problems please contact our support team.

How to pair the VVX D60 wireless handset with a VVX phone

Before following this guide you need to make sure that the firmware version is on 5.4.3 or later, otherwise it will not detect the wireless handset to pair to.

There are three different ways to register the handset with the VVX phone, there is manual pairing, auto pairing and a PC port pairing. But here is what we found easiest:

1) Start by plugging the Ethernet cable and power supply (if necessary) into the back of the D60 base > plug the VVX phone in like normal using Ethernet into the LAN port of the phone.

Before you can pair the two devices you need to make sure that the VVX-D60 feature is enabled to do this:

2) On your VVX phone go to Settings > Advanced (this will then ask you for the administrators password to access the menu) > Scroll down till you find VVX-D60 Configuration and select it > Select VVX-D60 Profile and then select Enable.

Now that the VVX-D60 feature is enable you will need to pair the base station with the VVX phone, there are three different ways to pair the two devices but the easiest way that we found was the “Auto-pairing” option, to do this:

3) On the VVX phone go to > Settings > Features > VVX-D60 Configuration, from this screen select > Base Station and then > Auto-pairing > Select a Base-Station and finally select > Pair.

The two devices should now be paired with one another, for a more detailed explanation use the link below. If you’ve followed the guide and still are having problems, contact our support team.

http://support.polycom.com/global/documents/support/user/products/voice/vvx_d60_ug.pdf