Browse Category

Technical Hints

Yealink “ghost” phone calls

Occasionally we get support calls from people reporting “ghost” calls on a Yealink phone.

Fortunately the problem is easier to fix than calling the Ghostbusters in.

It’s caused by potential hackers trying to gain access to public SIP phone systems by scanning IP addresses for anything that responds to SIP calls. Usually using a tool called sipvicious.

Whilst they can’t really do anything bad with your Yealink phone, these calls are a nuisance.

To stop them, make sure you are on a fairly recent firmware version. v73 from www.yealink.co.uk or newer is recommended.

Then change two settings in the web interface:

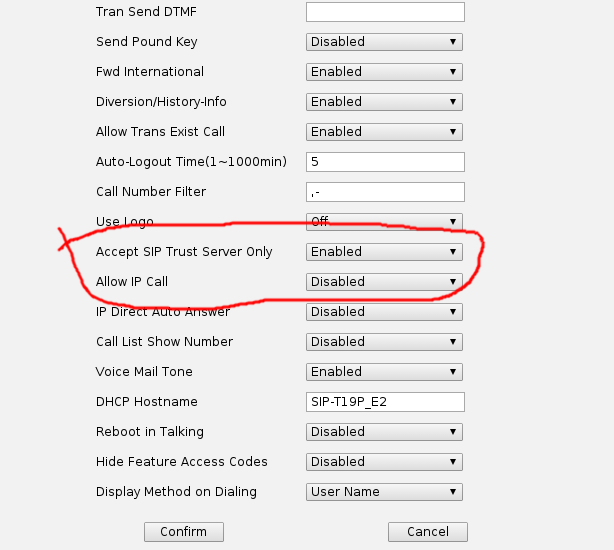
    • Allow Direct IP Call – this means the phone will respond to calls coming in to it from any IP address, to any number. Sometimes used for internal intercom systems or basic phone testing without using a PBX. Set it to disabled. This setting is found in the “Features” setting tab, “General Information” page.


    • Accept SIP Trust Server Only – this is whether the phone accepts calls to the correct phone number but from a different place than it is Registered to. Sometimes needed for certain SIP providers but you want to set this to enabled wherever possible so the phone only accepts calls from your service provider. This setting is found either in the “Features” tab, “General Information” page or the “Account” tab depending on the phone model or firmware version.


On v80 firmware these are both in the same place:

Features > General Information

Panasonic – TPA60/TGP600 How to transfer calls and switch between two simultaneous calls

This blog post will instruct you how to perform an attended transfer and switch between two calls on a TPA60 with the TGP600 base station.

What is an attended transfer? An attended transfer is where you speak to the person receiving the transfer before transferring the call.

To perform an attended transfer and switch between two calls follow the steps below:

    • Answer the call.


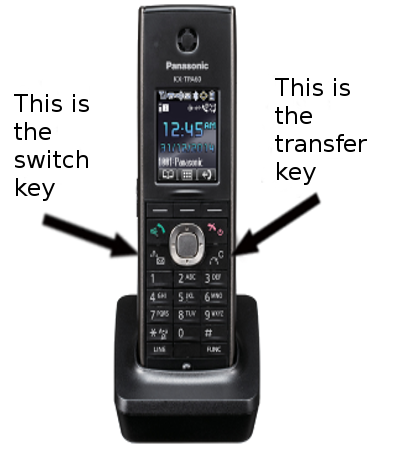
    • When you are ready to transfer the call press the transfer key, this will place the call on hold.


    • Enter the extension number of the person you want to transfer the call to and press the button labelled ‘call’ on the display.


    • When you want to switch between the two calls press the switch key.


    • When you are ready to connect the calls, hangup the DECT handset and the transfer will be completed.


Using secure SIP and RTP with SARK PBX and Snom or Yealink phones

This involves two levels of encryption. The first is SIPS/TLS which is encryption of SIP signalling between the SARK PBX and your IP phone. It works in much the same way as HTTPS certificates do.

You can either purchase a certificate from a trusted source or generate your own self signed certificates. I’ll use self-signed certificates here because they are free and do the job for what I wanted.

The second part of encrypting your phone calls is the actual audio stream itself, the RTP. We can use SRTP, this is simply a case of turning it on but there’s no real point to doing this without firstly configuring SIPS/TLS because the keys used in SRTP encryption are passed in the SIP messages.

For me, there’s two reasons for doing all this.

The most obvious one is security, encrypting your phone calls means that anyone who is able to sniff your network traffic cannot extract your phone calls. For most people this is pretty unlikely but could happen all the same.

Perhaps of much more use is for remote or home workers and this is what made me get this working with SARK. One of the biggest problems in the world of VoIP is SIP-ALGs on routers making incorrect alterations to SIP packets. If your SIP packets are encrypted then any router they pass through cannot possibly make any alterations to them!

The steps to getting this working are (basically the same process on a SARK PBX as on any Asterisk PBX).

1) Generate self-signed certificates (commands issued at the Linux command prompt on SARK):

  • cd /etc/asterisk
  • mkdir ssl
  • cd ssl
  • echo 00 > file.srl
  • openssl req -out ca.pem -new -x509 -days 365
  • openssl genrsa -out server.key 2048
  • openssl req -key server.key -new -out server.req -days 365
  • openssl x509 -req -in server.req -CA ca.pem -CAkey privkey.pem -CAserial file.srl -out server.pem -days 365

2) Configure Asterisk:

Edit the file ‘sark_sip_header.conf’ either from the command line or in Asterisk File Edit in the SARK web interface. Add the following:

tlsenable=yes
tlsbindaddr=xx.xx.xx.xx
tlscafile=/etc/asterisk/ssl/ca.pem
tlsprivatekey=/etc/asterisk/ssl/server.key
tlscertfile=/etc/asterisk/ssl/server.pem
tlsclientmethod=tlsv1
tlscipher=ALL
tlsdontverifyserver=yes

Replacing xx.xx.xx.xx with your system’s own IP address. The last line isn’t essential for us but means if Asterisk is connecting as a client to a TLS server (so you’d need a SIP service provider who does TLS), whether to verify their certificate or not. If you do verify their certificate then they cannot be using self-signed certificates.

3) Configure extensions:

You can specify which extensions will use TLS & SRTP (and any you don’t, stay using unencrypted SIP & RTP).

In the SARK web interface, edit the extension and go to the “asterisk” tab. Add these lines:

transport=tls
port=5061
encryption=yes

This will turn on both TLS and SRTP for that single extension.

It’s important to note that once you’ve applied this, the phone MUST use it and trying to Register without encryption will now fail.

4) Configure the firewall:

By default SARK PBX only allow in SIP over UDP but TLS uses TCP. You need to add a rule in the ‘firewall’ section of the SARK web interface to allow TCP port 5061 (SIPS/TLS uses 5061 by default). Note, you don’t need to allow RTP over TCP, SRTP still uses UDP normally.

5) Configure the phones:

This assumes you already have a phone configured and working using normal SIP, this is how to convert them to use SIPS/TLS & SRTP.

Snom phones (note, you’ll probably need a fairly recent firmware version)

  • In identity #, add an outbound proxy such as “sip.mydomain.com:5061;transport=tls”. Where sip.mydomain.com is your SARK PBX’s hostname or IP address. You could also set up the correct DNS-SRV records for this (hint, _sips._tcp) but I’ll not go in to that here.
  • In the RTP tab, turn on RTP Encryption, set SRTP Auth-tag to AES-80 and RTP/SAVP to Mandatory

Then when making or receiving a call, look out for the little “lock” symbol on the phone screen to signify SIPS/TLS & SRTP are both in use in the call in progress.

Yealink phones (I used v72 firmware, older may work too)

  • In Account #, Register tab, set Transport to TLS, set Server Host Port to 5061.
  • In the Advanced tab, set RTP Encryption(SRTP) to ‘Compulsory’

Much like Snom, the phone will also display a “lock” symbol on the screen during a call with SIPS/TLS & SRTP in use.

One last thing to note, both Snom and Yealink phones do not verify server certificates by default. This means that there is no protection against a man-in-the-middle attack (someone else pretending to be your SIP server). You can turn on certificate verification on either phone but you MUST also do one of the following in order for SIPS/TLS to continue to work:

  • Purchase a certificate from a trusted source, much like you would if setting up a HTTPS website. Please speak to us first so we can advise you on the best place to buy as the phones have a limited number of CAs built into them in comparison to a web browser.
  • Continue with your self-signed certificate but load the CA it was signed against into the phone. This is the “ca.pem” file generated earlier on. It is safe to distribute this to your phones, it cannot be used to be generate more certificates without the key (which you need to keep safe).

Any questions to paul@provu.co.uk
How to set-up JPEG stream on an IP bold door entry for a Snom 760

Here is a guide on how to set up a Snom 760 to be able to view the video stream from a Alphatech IP bold door entry unit.

1. Log in to the web user interface of the Snom 760

2. Go to Function keys

3. Select a key to active the video stream and set the fields to the following

Context —> Active
Type —–> Action URL
Number —-> http://IPADDRESSOFBOLD/snom01.xml ,
Short text —-> Description of button.

4. Once the following fields have been set click apply and then save.

5. To view the stream go to the Snom 760 and press the function key that has been assigned to active the stream of the video.

5b. To stop the stream press the X button on the Snom 760.

How to guide – Pairing Konftel 300Wx to an N300IP

The Konftel 300Wx can be paired with a Gigaset N300IP as a gap compatible device. This will allow the Konftel 300Wx to make and receive calls via the N300IP. Please note that the 300Wx does not bridge conference calls and it is unable to transfer calls. The N300IP allows the 300Wx to connect to VoIP and/or a fixed line. Below is a simple setup guide of how to pair the N300IP and 300Wx:

How to put the Konftel 300Wx in to registration (Pairing) mode

1) Power on the Konftel 300Wx

2) Once the device has booted press the settings key (it is a symbol of a cog)

3) Scroll down to “settings” and then press OK

4) Once in the settings section select “DECT”

(Before continuing to the next step, put the N300IP in to registration mode)

5) Once in “DECT” Select “Register” and then choose the base you would like to pair the Konftel 300Wx up to.

6) Once the base has been selected enter the “pin code” and then wait for the Konftel and the N300IP to pair.

(The pin code is what you enter to access the WUI of the base).

How to put the N300IP in to registration (pairing) mode using the WUI

Note – You can also pair the Konftel to the base by holding the pair button on the front of the N300 when the Konftel is in registration mode

1) Power on the N300IP

2) Log in to the web user interface for the N300IP

3) Click the “Settings” tab on the WUI of the N300IP and then select “Management”

4) Under “Management” select “Miscellaneous”

5) On the “Miscellaneous” page select “Start registration”

6) After selecting “Start registration” put the Konftel 300Wx in to register mode.

Number Assignment

1) Once the Konftel has paired to the base, log in to the web user interface of the N300IP

2) Once logged in to the WUI click the “Settings” tab and select “Telephony” and then “Number Assignment”

3) Once the “Number Assignment” page has loaded you can rename the INT slot that the Konftel has been assigned and you can also choose which connection (extension) the Konftel will use to make and receive calls.

IMPORTANT NOTE – In order for the N300IP and Konftel 300Wx to work properly you will need to turn “ECO Mode+” off. (If this setting is turned on, after a while the Konftel 300Wx loses connection to the base)

“Eco Mode+” can be found in “Miscellaneous” on the WUI of the N300IP

2N Wiring Diagrams

As we continue to sell more and more 2N Door Intercoms, we have had an increase in support calls from customers enquiring about the wiring aspect of these products.

To help with this, we have created wiring diagrams for some of the most popular setups that we have encountered, these can be found on our website:

Wiring Diagrams

Of course, we would always recommend hiring a qualified electrician to wire these units up, as doing so incorrectly could damage them or even stop them working completely.

If you have any questions about these wiring diagrams, or the 2N range in general, please contact our support team

Factory Reset RTX4002 Repeater

Below are some instructions on how to factory reset and RTX4002 repeater:

1. Power off RTX Repeater

2. Power on the RTX Repeater for between 1-5 secs (ie 2 secs) then power off

3. Power on RTX Repeater for between 25-35 secs (ie 30 secs) then power off

Now the RTX Repeater should be reset, power it back on and the light should be blinking slowly.

For more information on pairing the RTX with a Gigaset base station, please see our guide

Vega ISDN gateway Caller ID formatting using Type-Of-Number

Background

When you receive an inbound call from an ISDN line (BRI or PRI), the calling party number (caller ID) arrives in a non-country specific format and it is up to your phone system or gateway to format it correctly for the area it is located in.

In the UK this means caller IDs for national numbers will be missing the leading zero and caller IDs for international numbers will be missing a leading double zero.

E.G. where you expect: 07123456789 you’ll get 7123456789

Within the ISDN q.931 signalling when a call comes in, there is an element for passing information on the type of the number.


An ISDN PBX will generally put a zero onto the start of national numbers and double zero onto the start of international numbers in the UK.

The problem is, in SIP there is no such header as type-of-number. The caller-id will just be presented as passed. Meaning you’ll see caller-ids on phones with missing zeros.

Solution

To fix this problem, a Vega gateway can add in the national & international prefixes on to caller-ids.

The settings can be found in the web interface or from the command line.

At the command line interface, for the UK you’ll want to set:

_advanced.sip.international_prefix=00

_advanced.sip.national_prefix=0

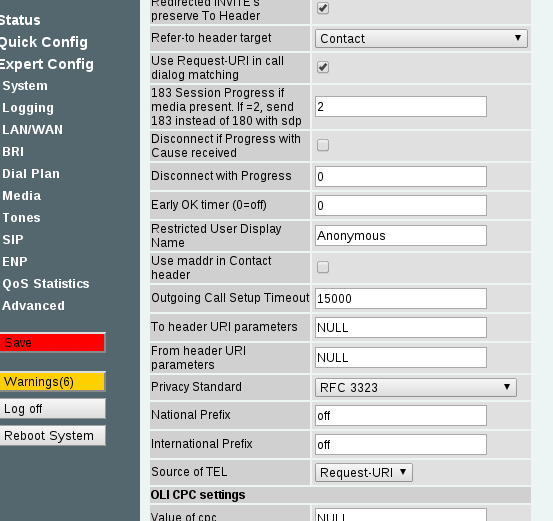
In the web interface, these settings are in the Expert section, SIP page and SIP-Advanced link near the bottom:

They are:

    • National Prefix – set to 0


    • International Prefix – set to 00


Then the Caller-ID presented on SIP calls should be correct.

Note, more information on this can be found on page 171 of the Sangoma Vega admin guide:

Vega Admin Guide R88 v1.1

Mitel 6865i and Plantronics EHS Headset

The following guide shows how to connect a Plantronics CS520 (This will also apply to the other headsets in the CS500 series) headset to the Mitel 6865i desk phone to allow EHS functionality (the making and hanging up of calls via the headset button).

As well as the CS520 headset and the 6865i phone you will also need a Plantronics APS-11 EHS Cable.

1) Connect the APS-11 cable to the back of the CS520 stand, using the end of the cable that has both an RJ45 connector and a 3.5mm jack connector. Both connectors should be plugged in to the respective ports on the back of the stand.

2) Plug the other end of the APS-11 cable into the RJ45 socket on the back of the Mitel phone, you will need to remove the plastic spacer clip from the socket on the phone in order for it to fit. Please refer to the user manual for help with this.

3) Finally, you need to change some settings on the Mitel phone to enable the EHS functionality. Make the following changes via the menu on the handset itself (press the button with the gear icon to open the menu):

i) Go to Preferences – Set Audio – Audio Mode. Select Headset from the list and press the tick button to confirm.

ii) Go to Preferences – Set Audio – DHSG. Select the “DHSG is On” option and press the tick button to confirm.

That’s it! The headset should now be able to make and receive calls using the EHS functionality.

If you have purchased these products from Provu, and can not get this to work, please contact our support team at support@provu.co.uk and we will be happy to help!

How to: 2N Video on Snom Screen

The 2N door intercoms have built in XML that allows you to stream the video feed from the camera directly onto the screen of a snom phone (760, 821, 870 models only).
This works by getting a static JPEG image and refreshing it frequently to make it appear as a video.

The URL you need to use is:

http://ip.addr.of.2n:80/enu/snom-video.xml

** Make sure to edit the URL so that it actually contains your 2N units IP address **

Now you need to browse to the web UI of your snom phone and add your 2N intercom to the directory. In the number field, enter the extension number of the 2N (the unit it presents as its Caller ID). Then in the Action URL field enter the URL shown above. Click the Add button to add the directory entry.

Now when you receive a call from your door intercom, the video stream will be shown on the display of your snom phone.

Please note, we recommend that you have the following firmware versions on each unit as a minimum:

Snom: 8.7.3.25
2N: 2.10

If you have any problems getting this to work, please email us at support@provu.co.uk.