Browse Category

Technical Hints

Using snom with Wireless Headsets

If you are using an EHS Advanced box to connect your wireless headset to your Snom phone, and are having difficulty getting it to work, you may find the answer to your problems below.

Snom have introduced a new setting in their latest firmware version 8.7.3.25 which relates to the use of headsets.

In the Advanced – Audio section of the Web UI you can now change the Headset Connection Method. If you are using an EHS box you will need to change this to Serial EHS Box in order to get the full functionality of the electronic hook switch.

For more information regarding headset compatibility head over to our website.

snom M9r Repeater Compatibility

After a few enquiries recently regarding repeater compatibility with the snom M9r, we thought it a good idea to test this for ourselves.

I can now confirm that the RTX 4002 DECT repeater IS compatible with the M9r, providing that the snom phone is on the latest firmware version (9.6.2-a)*.

Follow the steps below to get your repeater and M9R paired:

1). Set the repeater in registration mode. Insert
the repeaters power plug for 1-5 seconds then remove it. Insert it once more and leave it powered on. The LED on the repeater flashes slowly after the start.

2) Set the base station in registration mode. Log in to the Web UI by typing the IP address of the M9R into your web browser

3) The LED on the front of the repeater should now be flashing quickly. If the LED flashes very quickly without
interruptions go to step 5. If the LED flashes very quickly with brief interruptions go to step
4.

4) Registration of the handset:
If the base PIN has been changed, it must
be set to “0000”. You must repeat the registration procedure even if the mobile unit used was already registered at the base station, Now the LED should flash very quickly without interruptions.

5) Assign a repeater number:
You must now assign a repeater number to the repeater (selection: 2-7, for up to 6 repeaters). Please note that each number can only be assigned once, when using more than one repeater. These numbers are independent of
the DECT handset extension numbers.

Using the DECT handset, key in the repeater number followed by the * key – E.g. 2*. Press the green dial button, the repeater will flash the corresponding number of times to show its repeater number, then the LED will stay solid. Press the * key again to confirm and then the Red dial button to end the process.

The repeater will now be paired successfully with the M9R.

* More information on the firmware update procedure can be found on the snom wiki.

Connect the SARK 200 to analogue and ISDN2 lines

SARK 200 with Sangoma Vega 50 gateways

With the success of the SARK200 IP mini PBX for small business, we are pleased to announce two new bundle packages that enable the SARK 200 to be connected to analogue or ISDN2 lines.

By combining the brilliant SARK 200 together with the excellent Sangoma Vega 50 gateways we have created a complete VoIP solution with the flexibility to connect to PSTN lines for back-up and fail-over etc. Plus we firmly believe this bundle package is now the most cost effective and flexible VoIP solution available.

You can order the SARK 200 as a bundled package with either the Vega 50 4 port FXO analogue or 2 port ISDN2 gateway.

The following part codes have been added to the SARK trade price list:
SARK200-VS0114: SARK 200 +Vega 50 4 x FXO analogue gateway
SARK200-VS0117: SARK 200 + Vega 50 2 x ISDN2 gateway

These bundle packages are priced lower than when ordering the components separately and, in addition to that we will also throw in up to 1 hours free technical support to help get you up and running.

These bundled solutions are the ideal package for small businesses, providing all the benefits of a fully featured VoIP system combined with the security and back up of PSTN connections that are often of major importance to small businesses.

Pricing for the bundles are available on the SARK trade price list, if you do not have the latest copy just let us know at contact@provu.co.uk and we will email it to you.

Installing Sangoma cards with Asterisk and Dahdi on Debian Wheezy

My preferred method for installing Asterisk on Debian is by using standard Debian packages. I don’t want the hassle of re-compiling packages whenever there is an updated version or some security hole gets closed.

Step one is getting Asterisk & Dahdi installed and working.

Do this:

apt-get install asterisk libpri1.4 asterisk-dahdi

The country code for the UK is 44.

Now to get the dahdi kernel modules built, install dahdi-source and use module assistant to install the modules:

apt-get install dahdi-source

m-a a-i dahdi

Now you should have Asterisk & Dahdi installed.

Before installing the Sangoma Wanpipe drivers, you need to compile the Dahdi source (module assistant just compiles the kernel module parts):

cd /usr/src/modules/dahdi

make

The rest is the same as the standard installation instructions for Wanpipe which are here (scroll down to Sangoma Driver Installation):

http://wiki.sangoma.com/wanpipe-linux-asterisk-dahdi

In summary:

apt-get install automake autoconf libtool libncurses5-dev bison libxml2-dev cmake flex

wget ftp://ftp.sangoma.com/linux/current_wanpipe/wanpipe-current.tgz

tar xzf wanpipe-current.tgz

cd wanpipe-{version}/

./Setup install

and just follow the instructions.

Paul Hayes.

How to: 2N Door Entry and Cisco UC540

One of our customers recently had a problem with an analogue version of the 2N Helios Force door entry unit that they had connected up to a Cisco UC540 system.

Calls were initiated with no problems but the system was not sending disconnect tones to the door entry unit, meaning that the call wasn’t ended until the button was pressed for a second time.

The solution ended up being quite simple! You need to change the analogue port settings in the UC540 to a managed user extension rather than a standard analogue port. The system should now disconnect the call properly when the call is hung up.

For more information on the 2N range, please visit our website.
If you have already purchased a 2N unit from us and need some help please email the support team at support@provu.co.uk

RTX4002 DECT Repeater beeping

If you find that when using an RTX4002 DECT repeater (with any device such as Gigaset) and you are hearing beeps on the phone then you will have inadvertently turned on the “verification tone”.

The idea of this is so you know when the repeater is being used but the procedure to turn it on is very similar to putting the device into Registration mode so it’s easily done by mistake.

To turn it off (or on for that matter), do this:

– switch off the unit (disconnect the power supply)
– switch on for 1-5 seconds and switch it off again
– switch on again. When the LED of the unit starts to flash slowly, switch it off again
– switch it on again. The verification tone will then be turned on or off (depending on whether it was on or off before).

Customer NTP issues

What is the `ntpdate -q` alternative in Windows?

I was trying to remotely diagnose an issue with NTP on a customer VoIP device. Everything looked good on the phone but I didn’t have an easy way of checking on this.

Turns out there is a program called w32tm which helped out perfectly:

w32tm /stripchart /computer:ntp.provu.co.uk

I could ping the ntp server fine but after seeing connection timeouts on the above command, it looked like there was a firewall rule on the customer network which was causing the problems.

How to: Connect a Plantronics CS540 with a Yealink Phone

This is a step-by-step guide of how to successfully connect a Plantronics CS540 to a Yealink SIP phone (Compatible with T26P, T28P, T38G).

You should have:
– Plantronics CS540 Headset
– Yealink Handset with EHS capabilities
– Yealink EHS36 adapter.

(For a full list of headset and phone compatibility please view our headset compatibility chart)

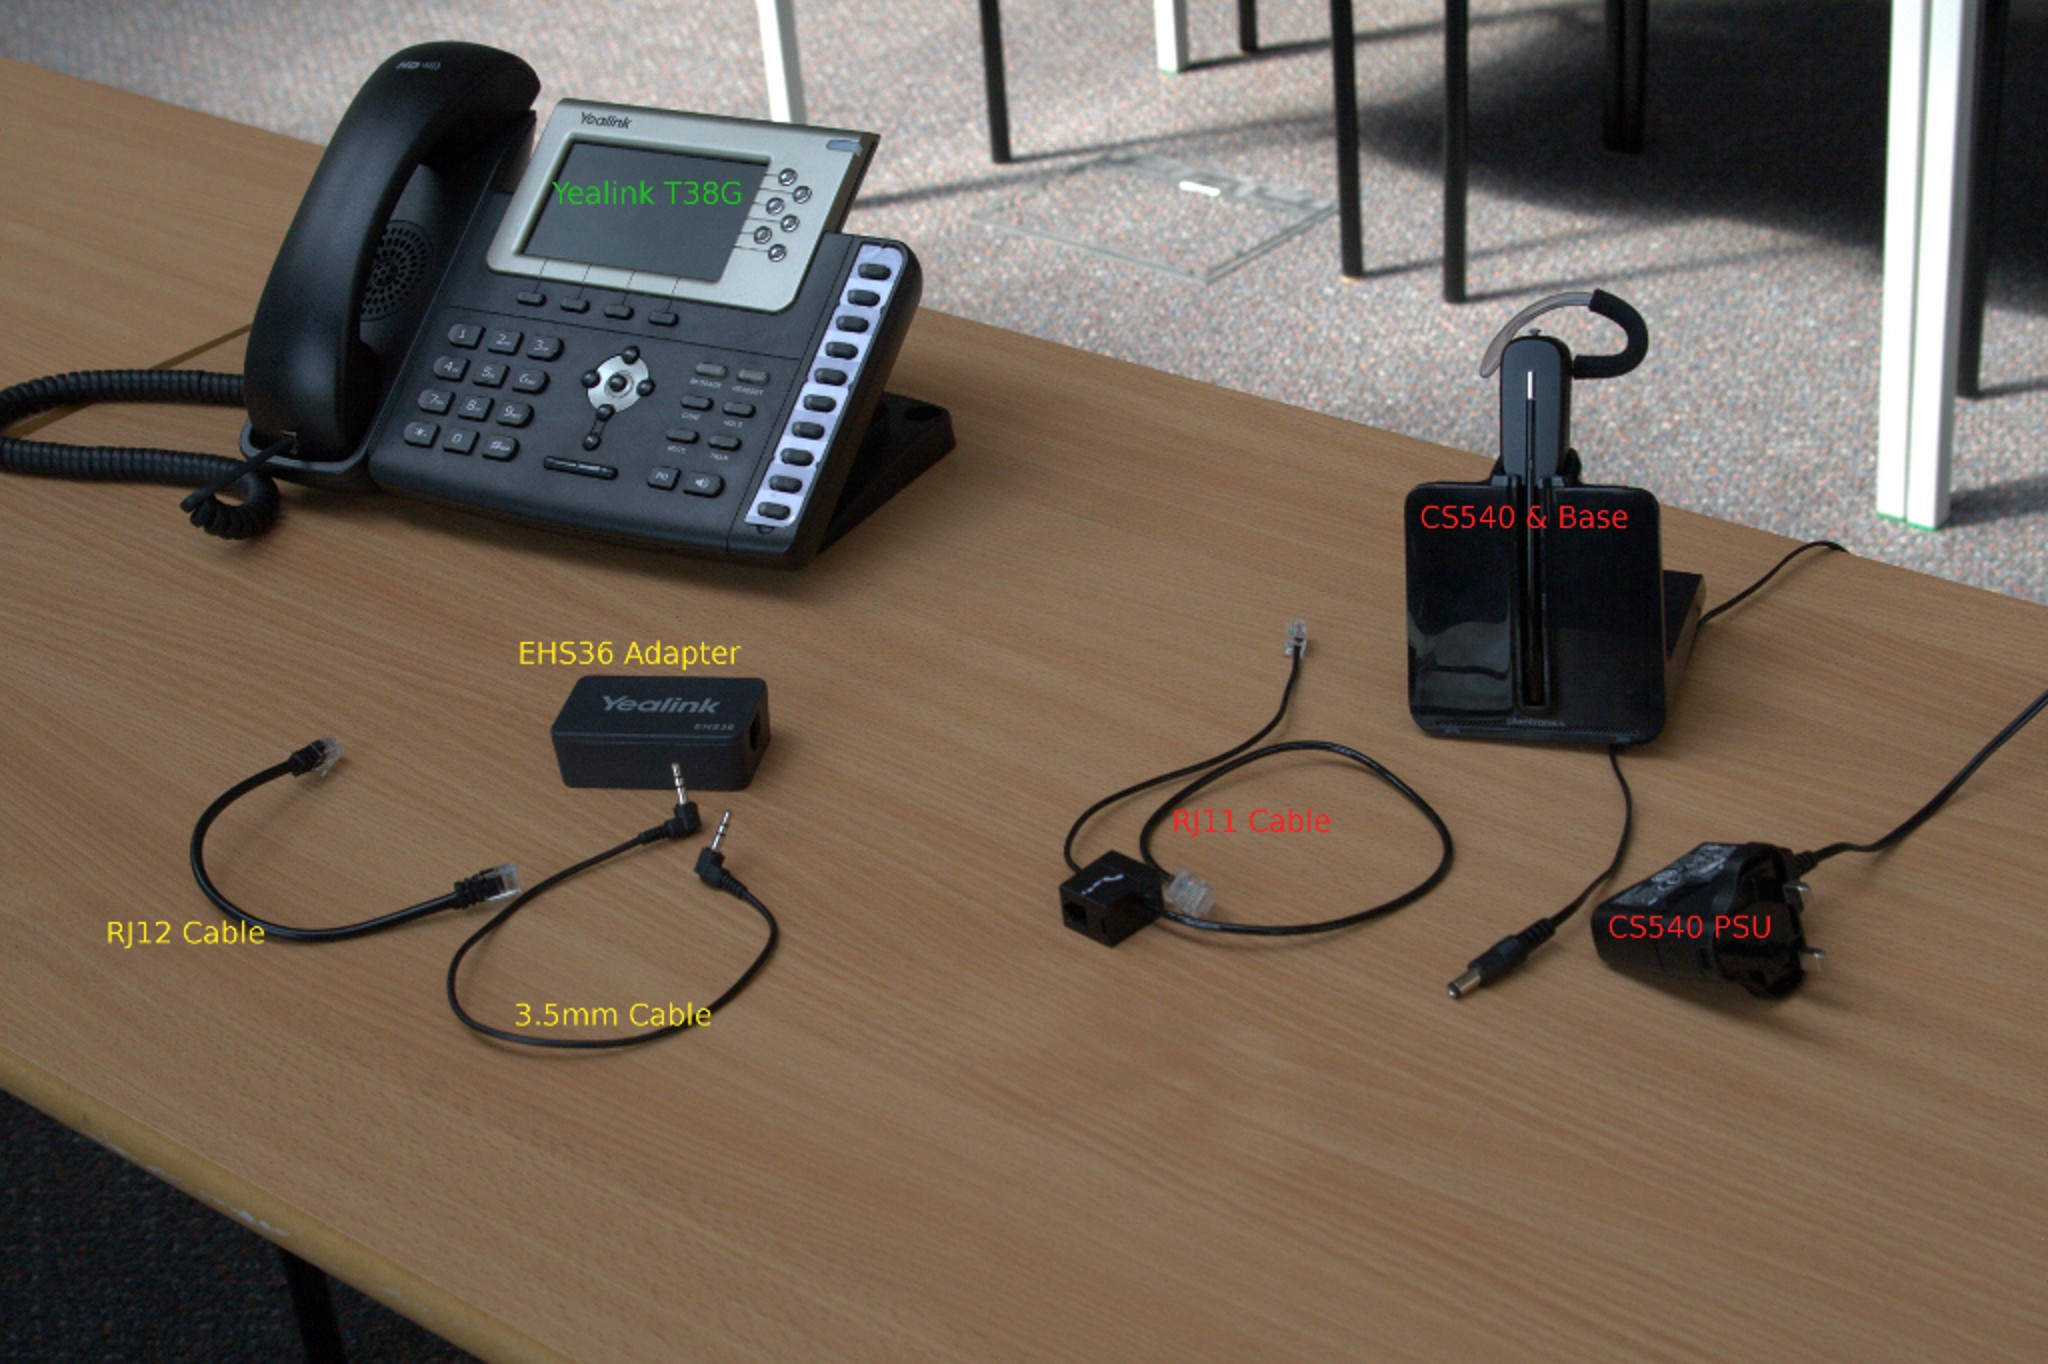
The image below shows the contents of each box that will be required for this setup. They have been labelled for ease of idenitification and grouped according to which box you will find them in -see the key below.

Green – Yealink T38G Box
Yellow – Yealink EHS36 Box
Red – Plantronics CS540 Box

Step 1:
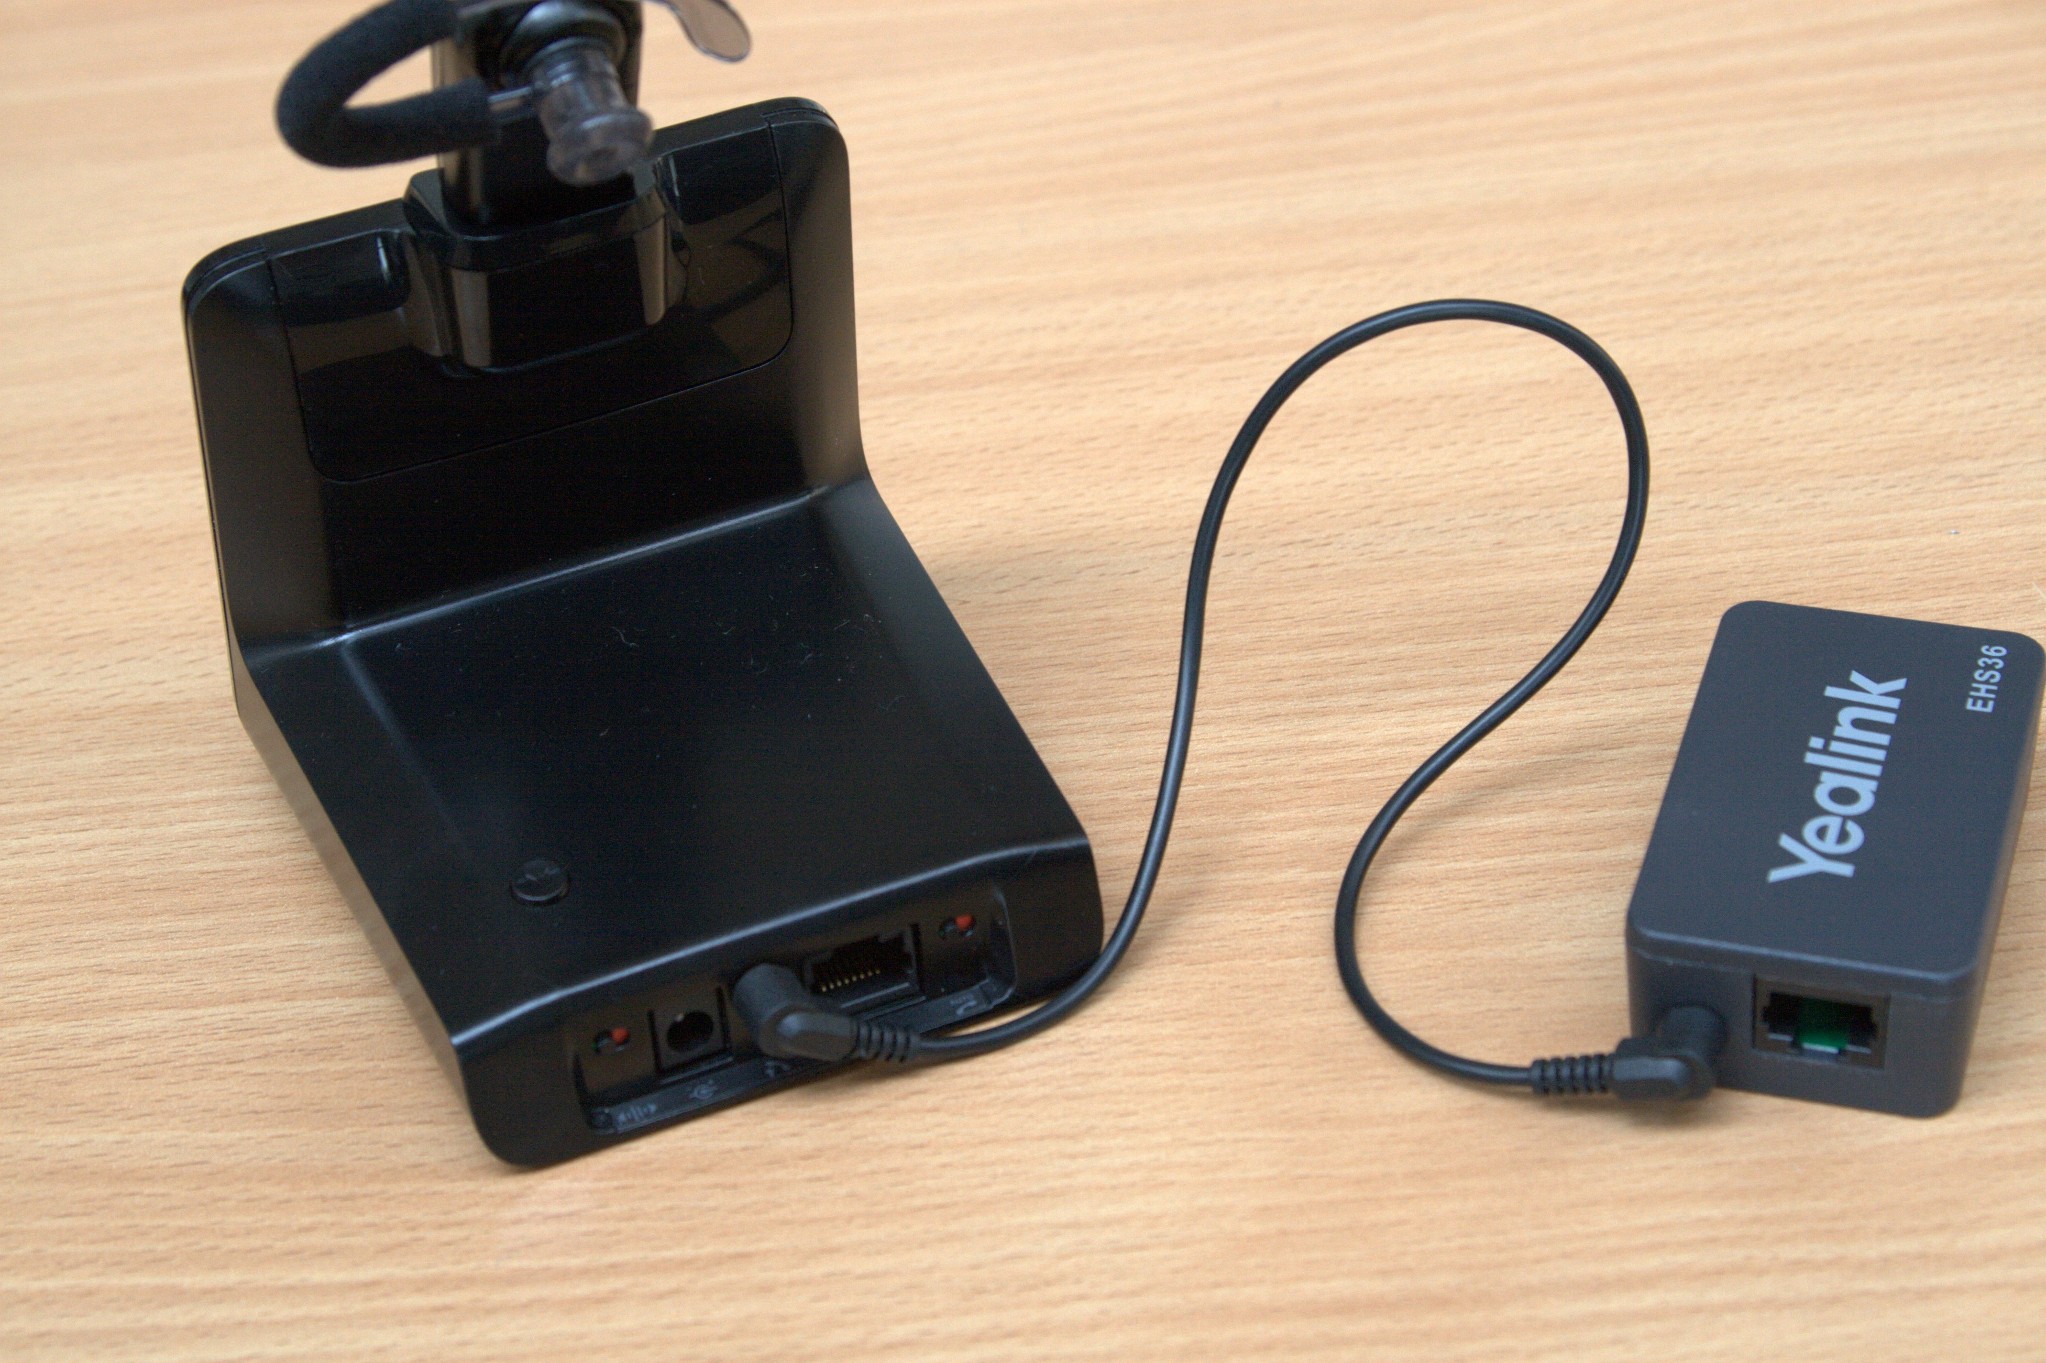
Once you have the correct parts ready, the next step is to connect the 3.5mm cable from the Plantronics base unit, to the EHS36 box. You can’t really go wrong here as they will only fit into one slot on each unit, but the picture below highlights where to connect them.

Step 2:
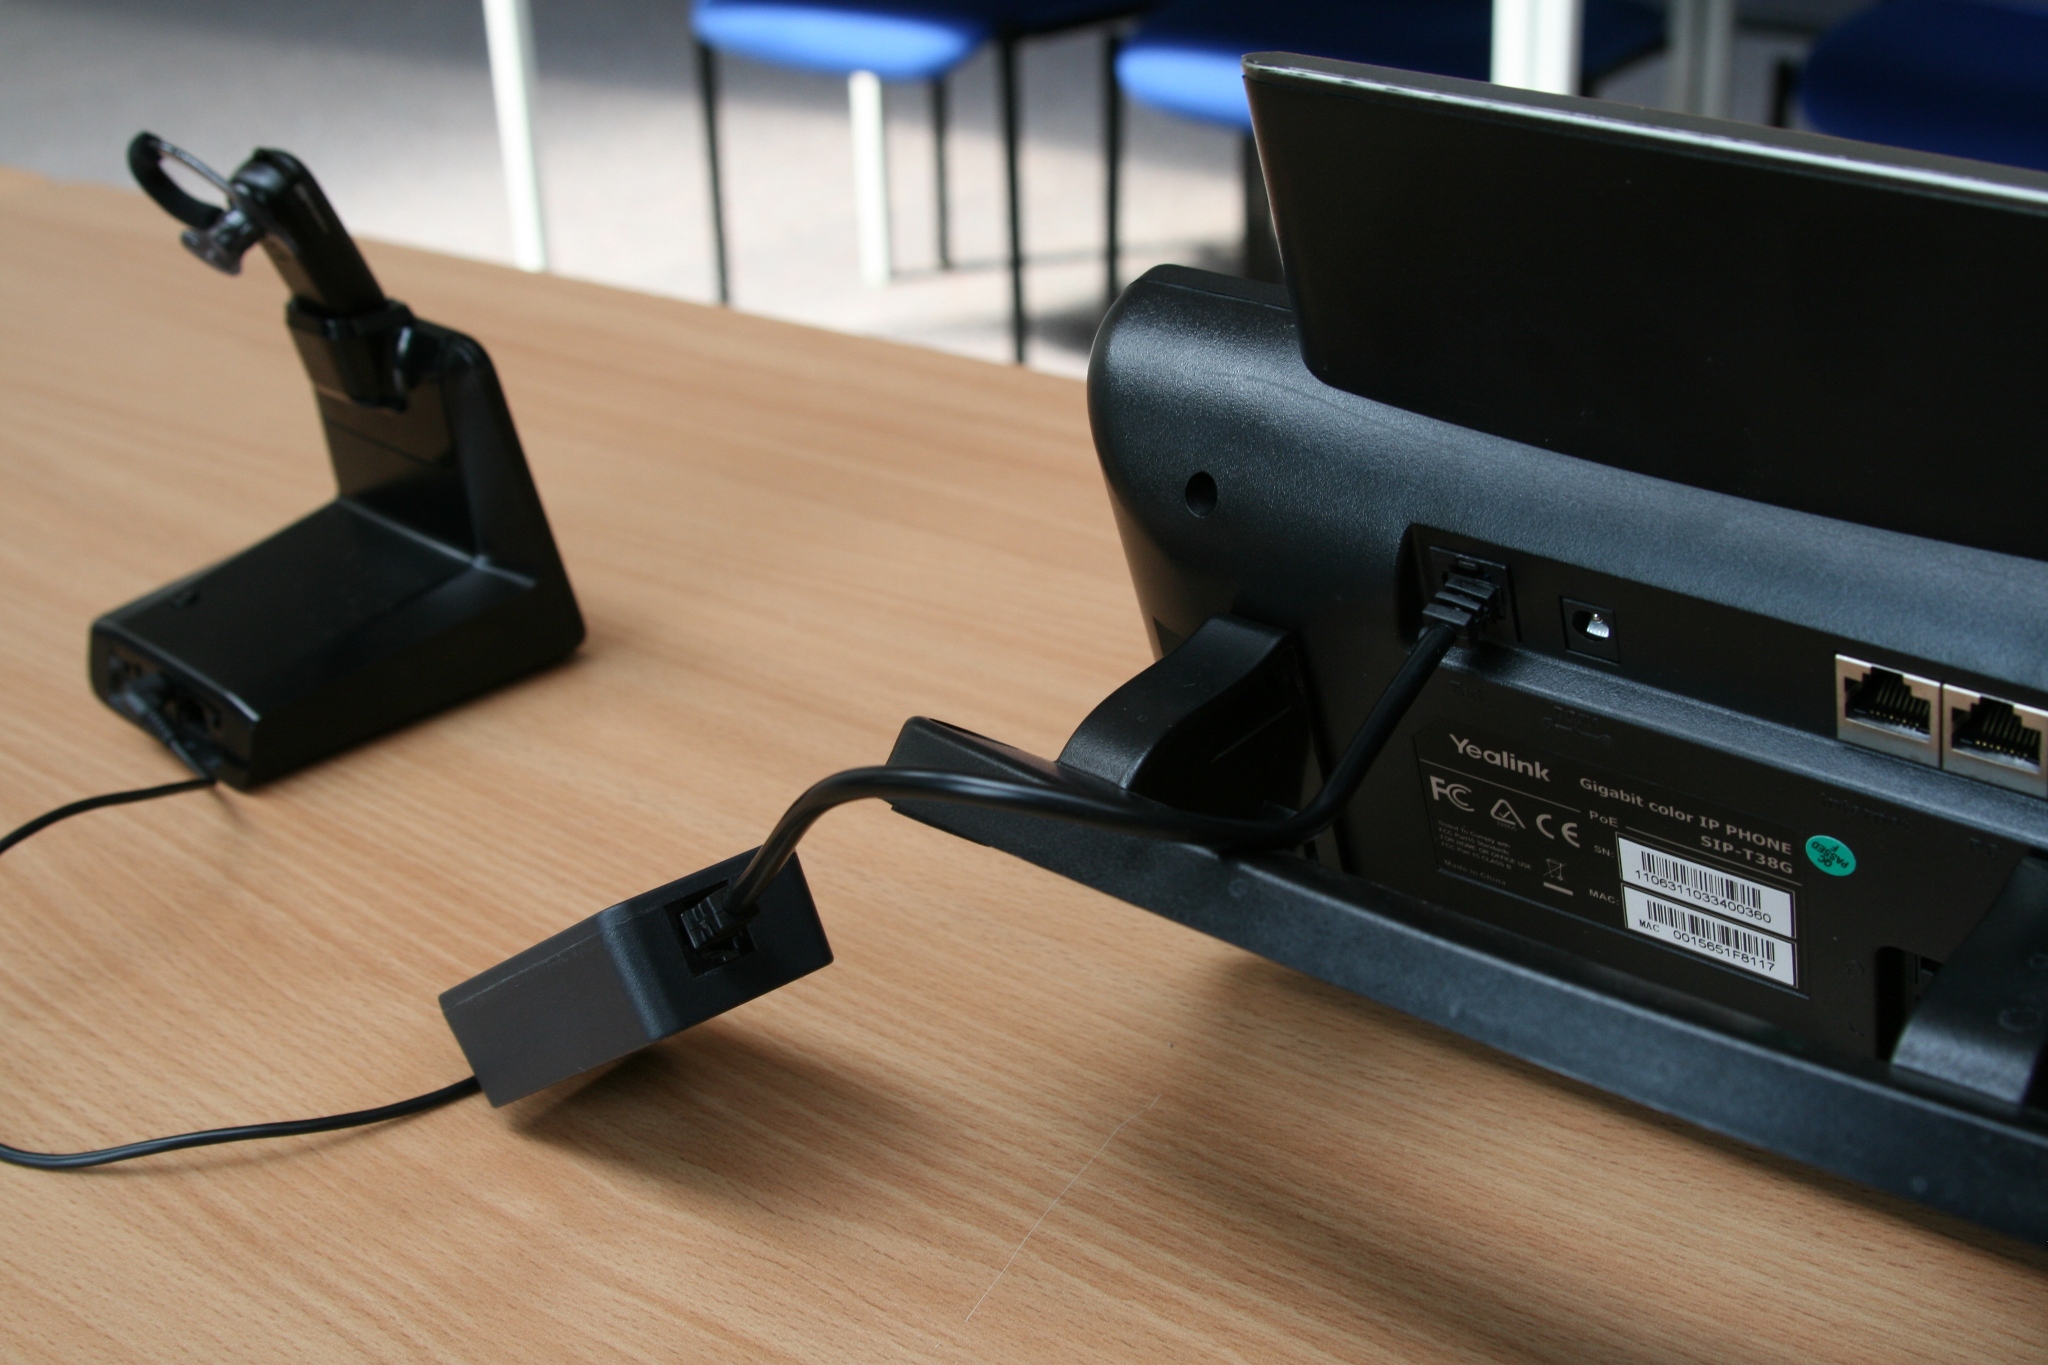
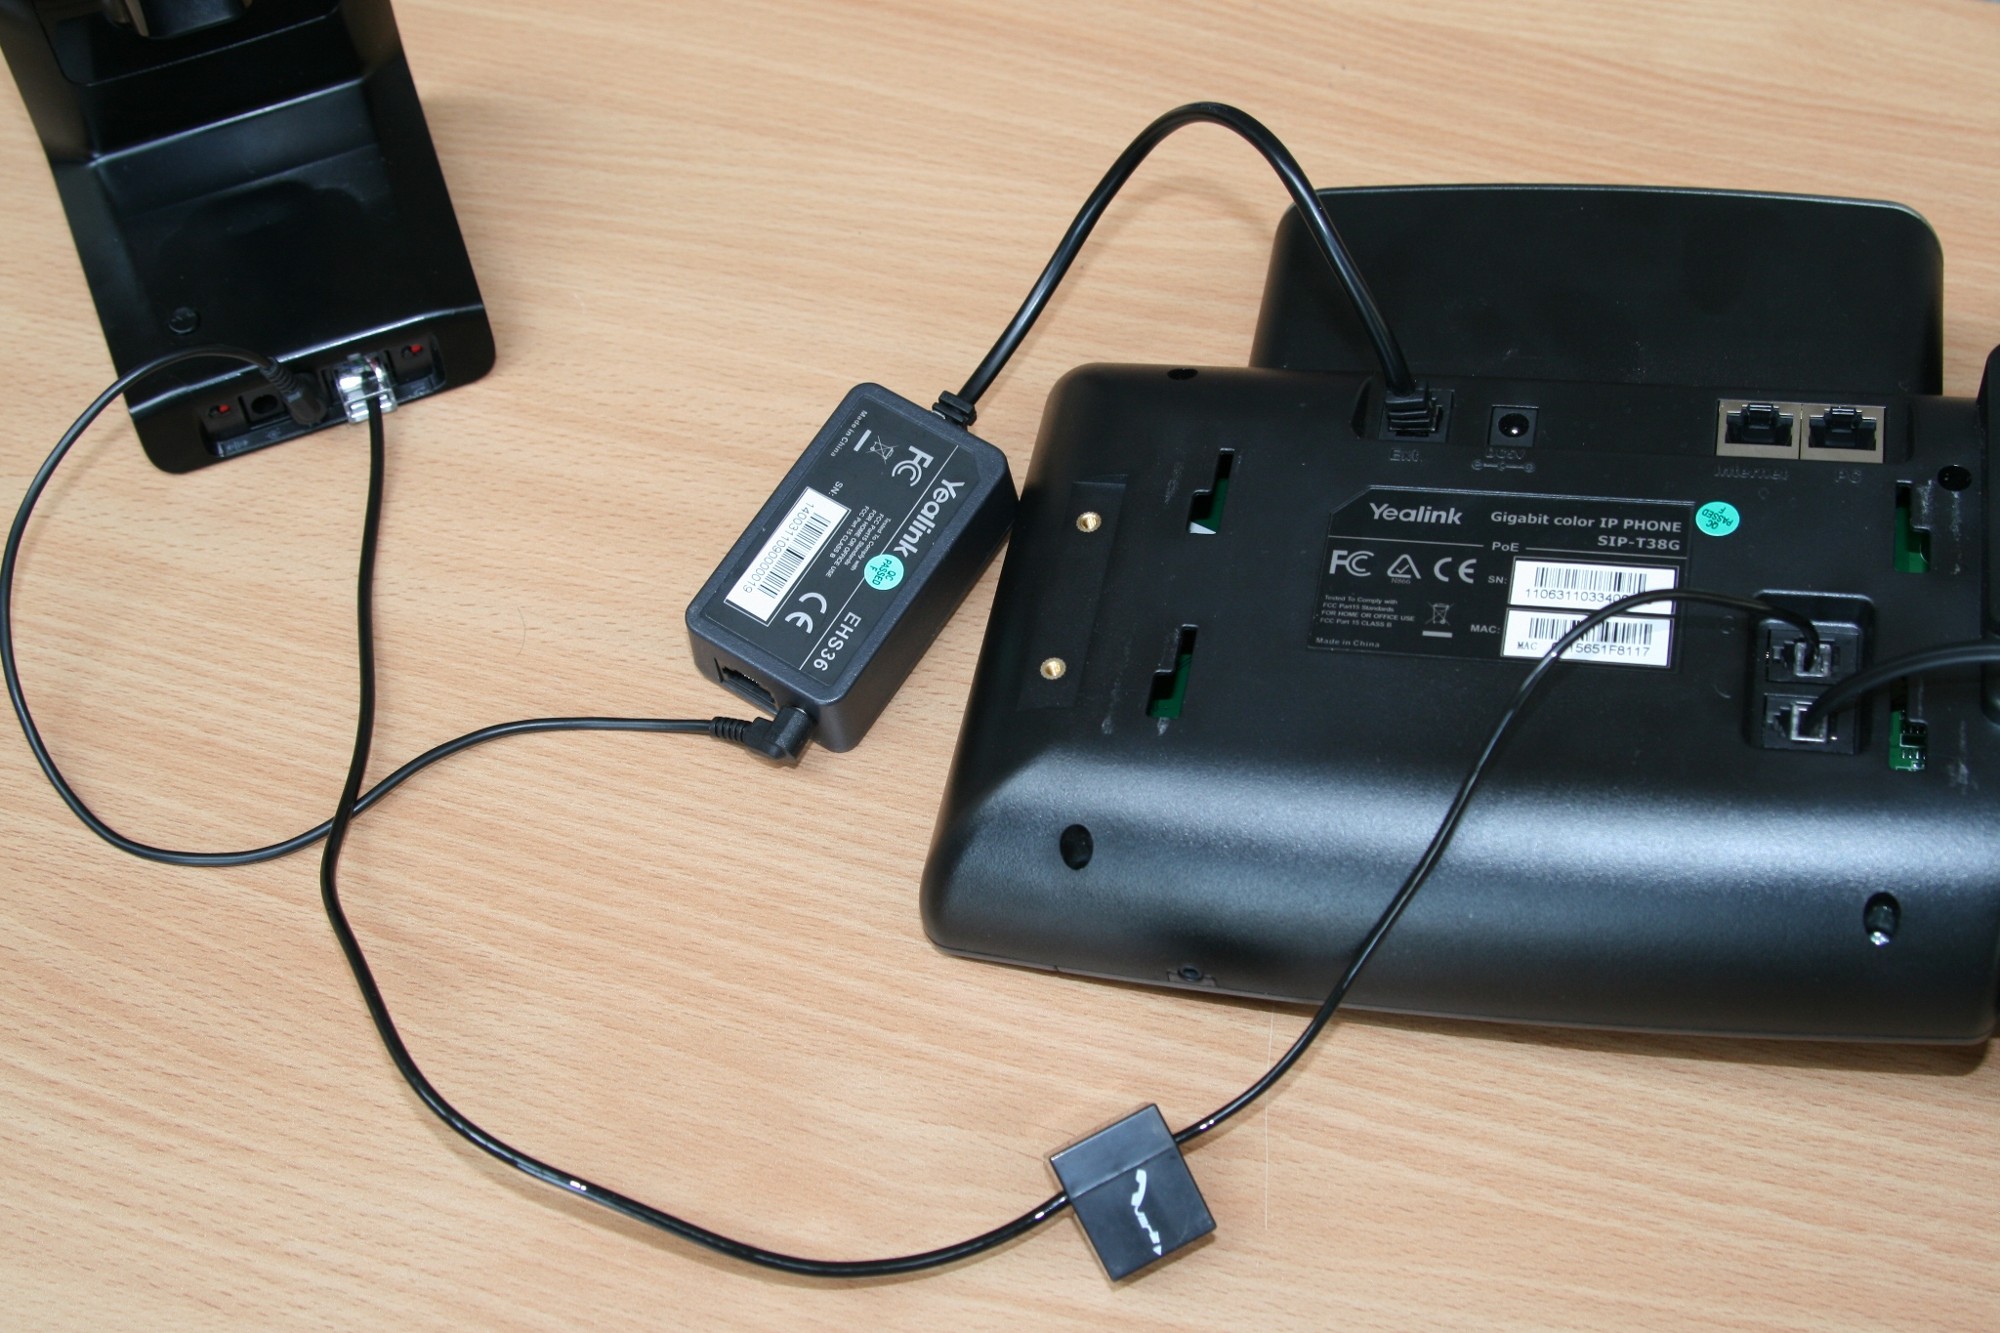
Connect the RJ12 cable from the EHS36 box to the EXT port on the back of the T38G. This port should be clearly labelled on the phone. See the picture below for illustration.

Step 3:
Connect the Plantronics RJ11 cable from the base unit to the Headset port on the back of the T38G. This port is labelled with a small headset icon, it is located next to the Receiver port, please make sure these are put into the correct slots. Again, the picture below shows how they should be connected.

That’s it! Power up the phone and the Plantronics base if you have not done so already. If this is a new purchase please allow a short time for the headset to charge before use. To charge simply place it onto the base in the very obvious slot.

If you have any problems after following this guide, please email support@provu.co.uk with details of your issue and a member of the technical team will be happy to advise.

Yealink Remote Control features

In an automated environment, it can be useful to control things without having to physically interact with them.

I refer, of course, to having to exert my energy on reaching to dial a number on my phone. You might well save yourself these exertions on a daily basis, so you can thank me later.

Here’s an example of dialling a couple of pleasant fellows:

http://user:pass@10.10.11.100/cgi-bin/ConfigMa
nApp.com?number=118118

If you try this on a more recent firmware, you may find that it doesn’t appear to do anything. Confusing at first but it seems there was a firmware change made for security purposes (can’t complain at that but it would be nice if the phone gave a 403 response when it does fail though!)

You now need to tell the phone what IP addresses to trust. If you web browse onto the Phone>Features page, you can find a text box labeled along the lines of “Trusted Action URI Server List”. You need to enter the IP addresses that the phone expects to receive requests from, as a comma-seperated list eg. 10.10.11.200,10.10.11.201

The first time the phone receives a remote request from one of these addresses, the phone does prompt you on screen to allow or reject the request (sorry.. you need to press the buttons this time!). I haven’t seen any subsequent prompts to confirm my consent.

If you want, you can also trigger key presses remotely:

/cgi-bin/ConfigManApp.com?key=OK
/cgi-bin/ConfigManApp.com?key=1
/cgi-bin/ConfigManApp.com?key=2
/cgi-bin/ConfigManApp.com?key=3
/cgi-bin/ConfigManApp.com?key=CANCEL

Isn’t that just great? You can build this into your CRMs or whatever else you can think of.

If you don’t have a Yealink phone to hand, you can browse the range: http://www.provu.co.uk/yealink.html

Now go and have some fun!