By the end of 2025, BT will have switched entirely to VoIP technology – migrating your customer’s intercom system from old analogue lines to a new IP infrastructure should be your number one priority.
We all know the switch-off doesn’t need to be feared – IP technology will open up a whole world of convenience and security for your customers. The first step in changing? Choose the right access control provider!
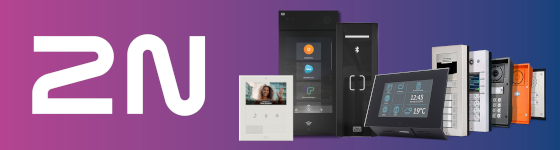
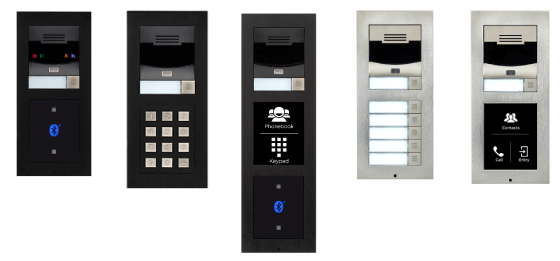
2N invented the world’s first IP intercom in 2008 – and they’ve kept setting industry standards for IP technology ever since: developing a range of versatile, premium IP devices such as luxury display intercoms, robust anti-vandal intercoms, and sleek single-button intercoms for residential homes.
Fully VoIP Compatible Forget proprietary solutions. All 2N intercoms and answering units support VoIP communication via the standardised SIP protocol. This makes the devices easy to register as an extension to any IP PBX or IP service provider – just like an IP phone.
Flexible and Integrated Create a fully integrated access solution – 2N products are built on open protocols, so they’re easily integrated with all leading cloud/IP PBX platforms and can also be connected to VMS and other security platforms.
Modern and Convenient 2N’s VoIP-based door entry solutions offer advanced features that improve security and convenience – including HD video calling, remote access control, integration with mobile apps, and remote site management via a cloud platform – that last one will save you time and money!
Scalable If you want to expand your new 2N IP intercom system in the future – it couldn’t be easier! Adding new devices, upgrading existing ones to add new features – all of this is made possible thanks to the power of 2N’s IP technology.
Retrofit Ready Working with listed buildings? 2N’s solutions are adaptable and ready to retrofit with listed buildings and those hard-to-reach areas where installing cat5 cabling could be troublesome. With 2N’s 2-Wire Converter, you can simply connect 2N’s IP products to the existing analogue cabling, allowing you to provide your customers with high-quality video, crystal-clear audio and many more advanced features.
Three ways to convert to IP
Whether your customers are looking to:
1.
Install new cabling
2.
Convert products to work alongside existing analogue cabling
3.
Remotely manage and connect systems with 2N’s Cloud-based service, the My2N Management Platform
2N offers a range of possibilities for integrating IP access control with your customer’s equipment.
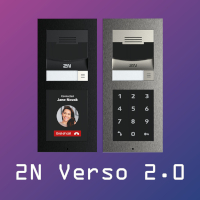
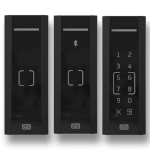
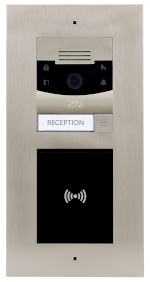
2N IP Verso 2.0 – Dubbed the Unicorn of intercoms, this powerful upgrade to a best-selling modular intercom really shows off the best of what IP technology can offer your projects.
A wide-angle full HD camera supporting WDR
Multi-access technology support (RFID, PIN, Fingerprint, Mobile access powered by WaveKey, and QR codes)
Modular design: build the exact intercom you need using up to 20 modules
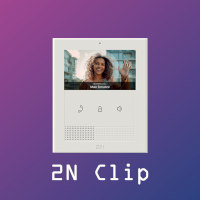
2N Clip – Perfect for midrange projects, this 4’’ answering unit puts the power of IP in every home. Offering the same quality as you’d expect from all 2N devices – including reliable IP video communication – at an affordable price point.
Get in touch today to discuss how you can maximise the opportunities the switch off can bring with 2N and ProVu. With a range of services designed to ease the installation and support of these devices, we can help ensure a smooth transition for you and your partners.
It’s estimated that around 33%* of businesses are still using ISDN as their underlying communications infrastructure. Collectively, the Channel has a big job to do. With our range of products and services, we’re here to ensure a smooth transition with minimal disruption for your customers, enabling you to maximise the opportunities that are available.
We’ve put together a switch off checklist to cover all bases when it comes to helping customers navigate the switch off.
Customer Types:
Budget Conscious/Committed to existing systems:
Eager to Upgrade:
Whether there’s a reluctance to upgrade, complex cabling or budget constraints, the following product lines could be the key to these customers:
The switch off poses the perfect opportunity to upgrade outdated systems. We offer a range of solutions for those looking to explore different options:
But that’s not all! For all types of customers, there are some crucial considerations that they may not have thought about when deciding how to proceed with the switch-off:
Have they considered the need for an IP alerting system to replace their existing one? Many overlook the connection between their phone lines and alerting systems.
If they haven’t updated these systems recently, they may soon find them becoming obsolete with the switch-off.
With our range of technical services and support, these items can become a simple cross-sell – we can even arrange the installation for you. Or why not let us train your team or provide remote installation support. We’ve got everything you need to seize the opportunities that the switch-off will bring, ensuring a smooth transition for both you and your customers.
Register today for your free place at our upcoming partner day on 29th November when we will be sharing more details of how we can support you in making the switch off a success for your business.Claim your free ticket today to enjoy a jam-packed day with:
Insightful Presentations
Vendor representatives on hand to answer your questions
A showcase of our sponsor’s latest devices
ProVu colleagues on hand to take you through our full range of services
Drinks reception and virtual clay pigeon shooting
All expertly crafted to prepare you for the biggest shake-up in the public phone network.
Whatever your requirements are, we’ve got your back. Call us on 01484 840048 or email contact@provu.co.uk to discuss how we can support you in maximising your opportunities in the lead up to the switch off and beyond.
We’re delighted to have 2N joining us at Channel Live this year. Find out more about what to expect from them at this year’s show and what’s to come from them in 2023.
What will 2N be showcasing at Channel Live 2023?
Discover the world’s first LTE intercom on stand 508. The 2N® LTE Verso combines minimum installation costs with a full feature set. Using LTE technology means no other cable apart from a power supply is needed. Enjoy all the same functionalities such as video communication with little disruption. What’s more, the main unit with HD camera can be customised to feature an RFID, Bluetooth or fingerprint reader by using the supported modules. Intercoms have never been this flexible!
Products Coming in 2023
2N® IP Verso 2.0 (Coming in June 2023)
The next generation of 2N’s best-seller: the world’s most modular IP intercom! But what’s new?
A full FD wide-angle camera
Powerful Axis ARTPEC-7 Processor which provides improved image quality & processing along with better security and functionalities
New advanced features such as QR code access
One thing 2N won’t be changing: the intercom’s genius modularity. Suitable for any project (residential and commercial alike), you can tailor the 2N® Verso 2.0 exactly to your customer’s needs by choosing from 16 different modules and combining them however you want.
2N® IP One (Coming in November 2023)
Something perfect for family homes: a one-button intercom in a compact, stylish design that boasts a full HD camera. Thanks to the powerful ARTPEC-7 processor developed by Axis, the 2N® IP One intercom provides excellent image quality, efficient compression, and enough power for new features such as QR code access or advanced motion detection.
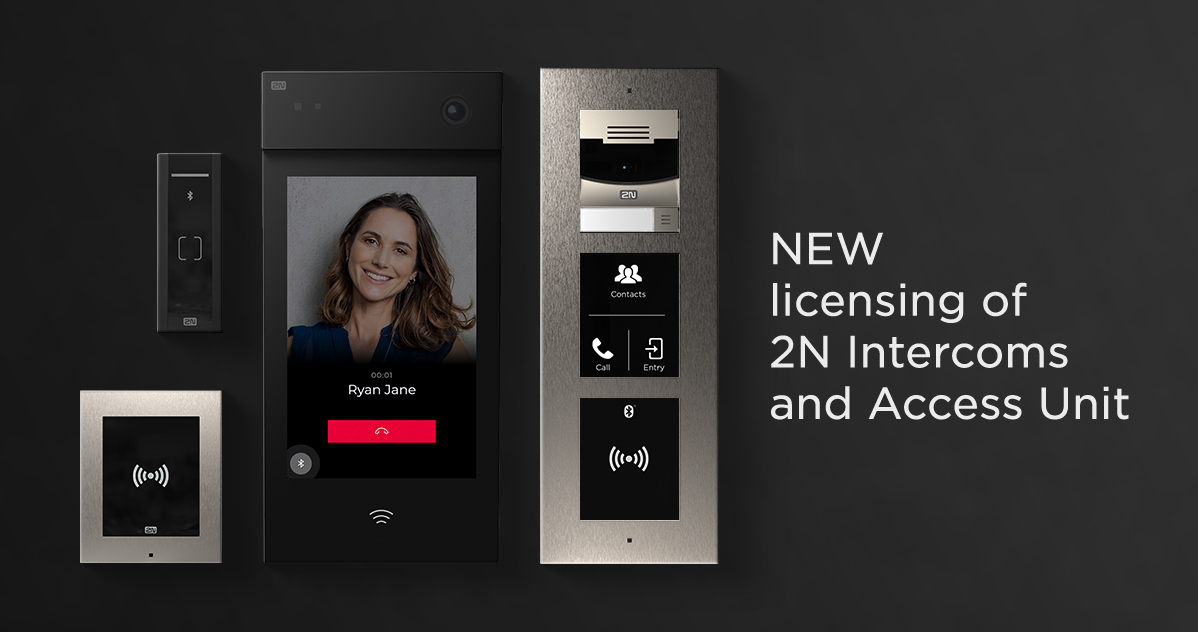
In an effort to make your life easier, 2N has simplified their licensing options for their intercoms and access control units. As of 1st August 2022 the licensing of 2N Intercoms and Access Units will be as follows:
All features from the former Enhanced Security and Enhanced Audio license plus NFC and HTTP API are included in the price of the intercom
Gold License (9137909) – To simplify the ordering process 2N have reduced the number of licenses available and replaced it with their Gold License. This will give you access to features including enhanced video and integration. To help with the migration, the price of the Gold License has now been reduced by 30%.
The 2N Access Unit is now supplied with the whole feature set, meaning there’s no need for any additional licenses
The following licenses will remain unchanged:
OnGuard (9137917)
CCure (9137918)
Informacast (9137910)
My2N (9137957 and 9137958)
The following licenses are now discontinued:
IP Intercoms
Access Unit
Enhanced Audio (9137905)
Enhanced Video (9137906)
Enhanced Integration (9137907)
Enhanced Security (9137908)
NFC (9137915)
Lift Module (9160401)
NFC (916012)
Lift Module (9160404)
What do these Changes mean to You & Your Customers?
Traditionally, we know 2N’s licensing options have been a tricky area to navigate and determine for the end user. We hope these changes will help to make your quotation and ordering process simpler. 2N greatly value the development, security and efficiency of their products and want you to benefit from all secuirty features by default.
If you’d like to discuss any of these changes with a member of our team or to find out how they may affect any ongoing projects you may be working on call 01484 840048.
*Please note; in order to benefit from these new features your Intercoms and Access Units will beed to be on the latest firmware version.
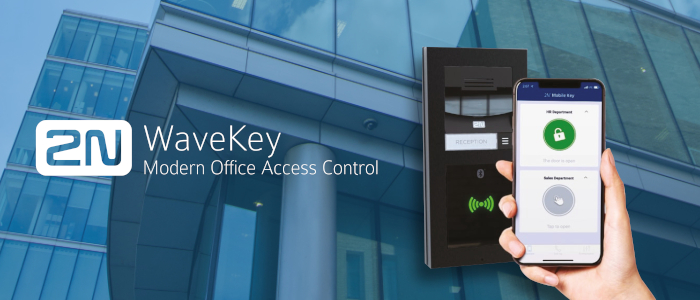
Liberate your customers from unnecessary costs with 2N’s WaveKey mobile access control. This simple to deploy method could prove invaluable to your partners with the ability to remotely distribute mobile credentials in just a few clicks.
What’s more, it’s also a more secure option for office environments – people are less likely to share their mobile devices with others to gain access to secure areas, not to mention the unique range of secure algorithms which are able to identify whether a device is being used to gain access or if it’s at rest, or simply passing by.
The 2N Wavekey is quicker and easier to set up than fobs and can be done remotely through the 2N Access Commander*. Once created, simply pair the users’ mobile devices and any 2N Bluetooth Intercom module. With support for 4 different access modes:
Card mode
Tap in app mode
Touch mode
Motion mode
We’ve broken down the key features & benefits of this ground-breaking solution for you.
What is it?
Rigorously tested, 2N WaveKey is a unique technology that pairs users personal mobiles to the access control system of a building via a unique pairing PIN and the 2N Mobile Key app. Users can then walk to any access controlled door that they have permission to, which is set by the admin with 2N Access Commander, and enter into the door with one of 4 access modes.
1.
Card Mode
Working on both Android and iOS devices, users can present their phone to the Bluetooth reader to gain access. Just like they would with a traditional card with no need to open the phone. The Card mode is best used in installations with a high flow of people passing by such as busy office locations and turnstiles.
2.
Tap in the App Mode
Users are able to open doors by tapping a virtual button in the 2N mobile Key app. With users having to open their phone to access the app, this mode is considered to be more secure. Two-factor authentication can be added to include an additional level of security. Ideal for entrances to office buildings and secured areas as well as garages & parking barriers. Anywhere you want to keep secure.
3.
Touch Mode
Users are able to simply touch the Bluetooth reader with their hand or elbow, if they are carrying something, without the need to take their phone out of their pocket or purse. If they have authorisation to enter, the door will open. This mode is best for apartment and office buildings but less suitable if there will be lots of people constantly moving or congregating nearby the door.
4.
Motion Mode
A fully contactless way to open door. Requiring a camera based intercom which will trigger the authentication process when it detects movement. Camera behaviour setup will be required to make use of this mode – When, how and what you want it to react to. Making passage through doors smooth and effortless. While the convenience of this mode is fantastic, it is not advisable to deploy this mode in busy areas as there is a risk of the door being opened unintentionally by a third party.
Who can set permissions?
The 2N Access Commander Admin can set up accounts so that receptionists, security guards or administrators can generate the unique pairing PIN for staff and guests, as well as set the appropriate permissions for the users. All of which can be done in under 30 seconds.
How does WaveKey work?
Making use of the users’ mobile phone Bluetooth functionality, 2N WaveKey allows users to link to a buildings access control. Once the connected device is in range of a listening 2N intercom that has a Bluetooth module, users can make use of 4 different modes to enter a door, with varying levels of convenience of use and the associated level of security. Users are free to choose the best mode for each door as well as multiple modes for the same door for users to choose their preferred method. Users can rest assured that the smart algorithms used for the 2N WaveKey identify when the pair device that is being used for access is at rest, moving to, past or away from the area they are wanting to access to ensure full security of their restricted areas.
There’s been a lot of talk about upgrading phone systems in preparation of the ISDN switch off, but what about your customers’ access control systems? With many door entry solutions utilising analogue lines, there’s a huge opportunity out there to upgrade these devices.
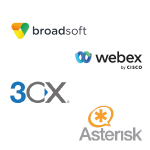
Compatible with some of the world’s leading platforms including Broadsoft, Cisco Webex, 3CX, Asterisk and Skype for Business. 2N devices can be integrated with existing systems, helping to create a seamless solution.
What’s more, we have a range of services available to help simplify your 2N fulfilments. Whether you’re looking for assistance in designing an access control solution, white labelled installation or simply finding our more about where to start get in touch with our team today.
2N on Air
Register today to join 2N on Air; an intuitive online session designed to provide you with the latest information on access control products, trends and tips for 2022.
Reserve your free space on this hands-on edition of 2N on Air.
The aim of this blog post is to provide a guide on configuring the software side of the 2N IP intercom’s to be in a state where they can make and receive calls. It will also detail how to change the door release code and other switch related settings.
This blog post was created with a 2N IP intercom using firmware version ‘2.30.2.39.7’. Previous or future releases may vary slightly.
Prerequisite:
It is advisable to read and fully understand the installation manual for your intercom before proceeding with this guide. The installation manual can be found on the 2N wiki by selecting your model from the listed devices.
Step 1 – Obtaining the IP Address
By default 2N IP Intercom units obtain an IP address via DHCP. There are a few ways to obtain the IP address of 2N intercoms such as the DHCP table on the networks router, alternatively you can use the 2N network scanner, or by pressing certain calling buttons on the intercom just after bootup.
More information can be read about the network scanner, or button sequence on the following 2N FAQ page.
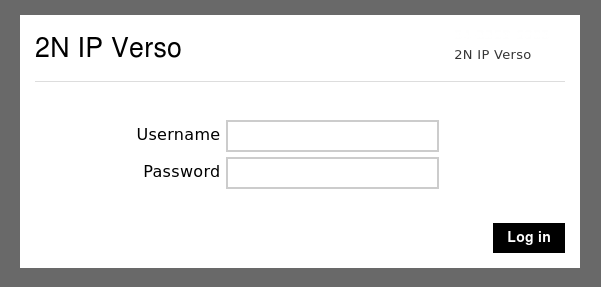
Step 2 – Accessing the web user interface
Once you have the IP address of the intercom open your web browser and type the IP address in to the top search bar. Once you press enter it should load the login page as shown in the image below.
The default username is ‘admin‘ and the password is ‘2n‘. If successful it will force you to change your password before proceeding.
Note: Some browsers work better than others, if you have issues with Chrome or Edge, try firefox. You may also see a certificate warning. This is expected behaviour and clicking advanced or proceed should take you to the login page above.
Step 3 – Checking & downloading the latest firmware version
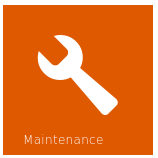
Once you have changed the admin password of the intercom it is advisable to make sure the unit is on the latest firmware version. You can do this easily by going to the ‘Maintenance’ section of the intercom.
To get to the maintenance section of the intercom you can use the ‘Maintenance’ button from the dashboard page
Dashboard Icon
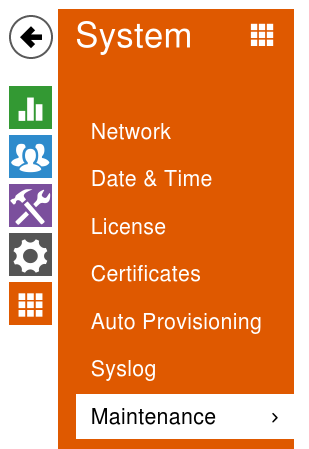
Alternatively click the ‘orange icon’ with 9 squares in it and choose ‘Maintenance’ from the list.
Sub-menu navigation
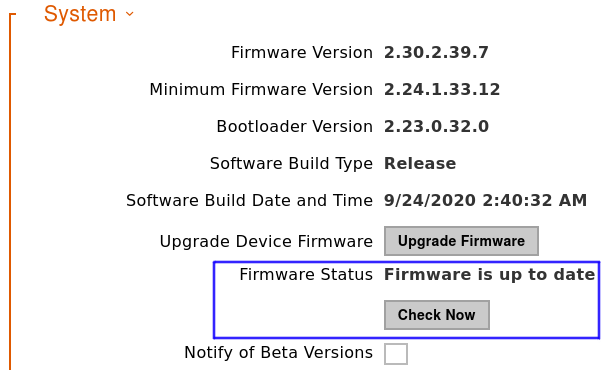
Once on the Maintenance page look for the ‘System‘ section shown in the image below. On this section it may already be reporting that there’s a new firmware version available next to ‘Firmware Status‘. If it doesn’t click the ‘Check Now‘ button.
If it reports a new firmware is available, read the ‘release notes’ carefully and if you are happy click proceed. The intercom will reboot during the upgrade. Once the upgrade is done this section should say the firmware is up to date.
Note: During the firmware upgrade do not remove the device from the network or interrupt the power to the intercom.
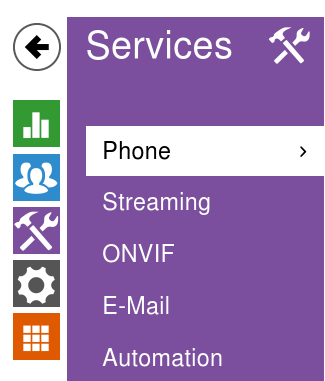
Step 4 – Configuring the SIP account & Call behaviour
Now the intercom is on the latest firmware version we can proceed to configure the SIP account on to the device. This is done via the ‘Services‘ section and from within here the ‘phone‘ page as shown in the image below.
Sub-menu navigation
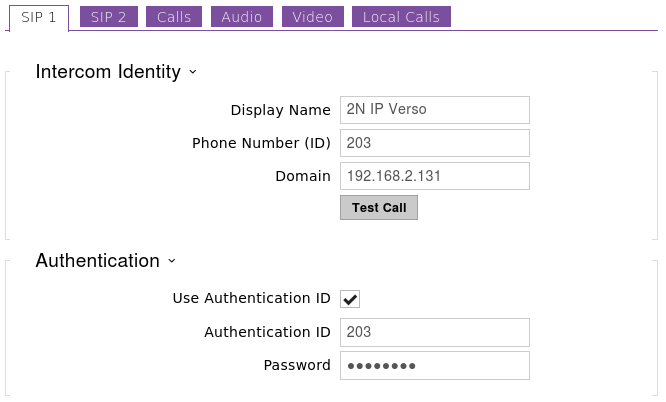
On the phone page it automatically takes you to the tab to configure ‘SIP Account 1‘ but the same applies if you are adding two SIP accounts.
Hopefully you are familiar with applying SIP accounts to VoIP devices and the fields on this page already make sense. If they do, feel free to populate this page and get the SIP account Registered.
If you don’t have much experience and you have taken a hosted seat with an ITSP, and they have provided you with some account settings similar to the ones in the table below, you may not know where they need to go. The right column in the table shows where they would likely go on the 2N intercom.
Details from ITSP
Suggested 2N IP Intercom Fields
SIP Number/Account: 203
Phone Number (ID) field
SIP Password: Password
Password field
SIP Server: 192.168.2.131
Domain, Proxy address and Registrar field.
SIP Port: 5060
Proxy port & Registrar port
SIP Auth: WCXfg453SA
Authentication ID
Note: The SIP Server can be an IP address, but most likely it’s the ITSP domain name.
The SIP Auth is not always provided. If you didn’t get one sent the SIP Auth is usually the same as the SIP Number/Account.
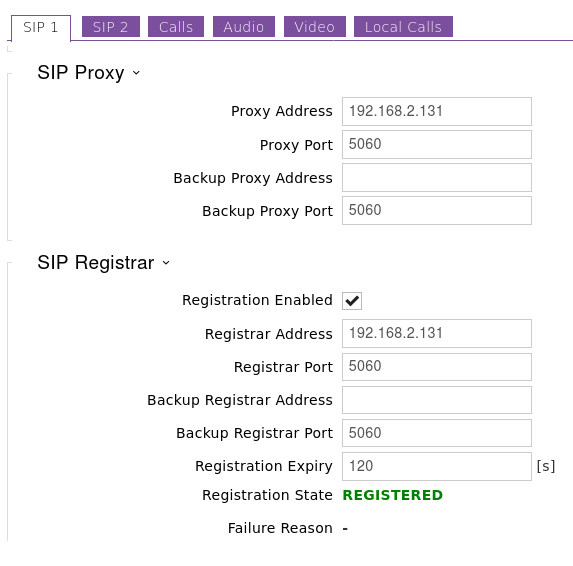
The images below show an example intercom being configured with a SIP account and the Registration status going to REGISTERED. If your Registration status goes to failed and you are sure the details are correct send an email to support@provu.co.uk and we’ll be able to help.
Now hopefully the SIP account is registered successfully with your ITSP or PBX. If it is we can continue with configuring the intercom’s call related settings.
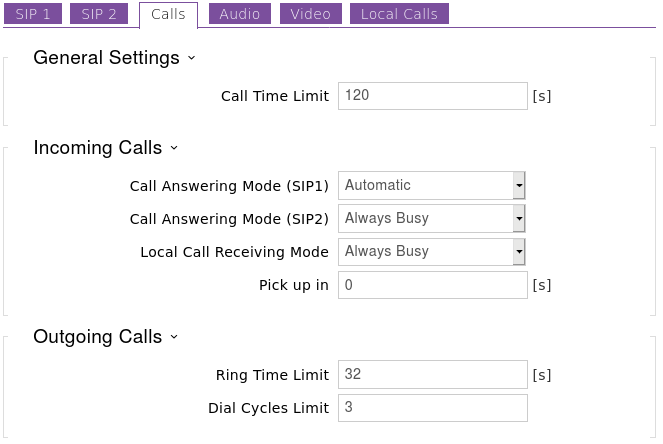
You may want to configure the intercom to automatically answer incoming calls. This is useful for situations where someone maybe stood at the intercom and you want to talk to them without them having to press the calling button. Or this maybe beneficial if you was on a call with someone at the intercom and the call time limit was reached so the intercom disconnected the call.
This behaviour is achieved by changing ‘Call Answering Mode (SIP1)‘ to ‘Automatic‘. When set to ‘always busy‘ the intercom will always decline incoming calls.
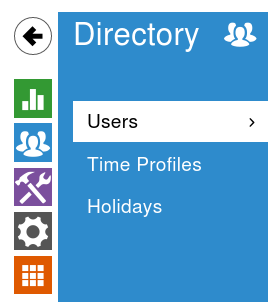
Step 5 – Creating users for the Directory, a.k.a – Phonebook
The Directory is where we add users to the intercom and also configure unique/personal details for them such as an RFID keyfob or a Name and number which is what we are going to look at.
From the main dashboard click the icon below to get to the directory.
Dashboard Icon
Or alternatively from the sub-menu navigation go to the section shown in the image below.
Sub-menu Navigation
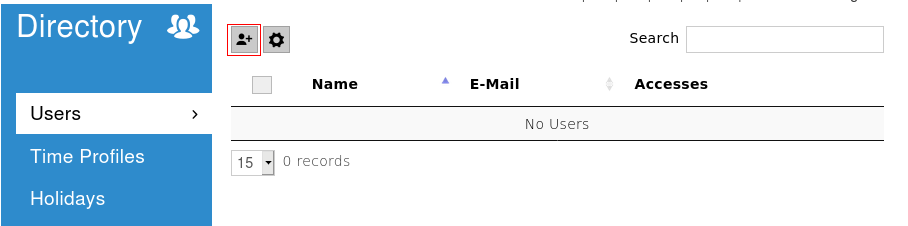
Once your on this page, to add a new user entry click the icon of a person as shown in the image below highlighted by the red box.
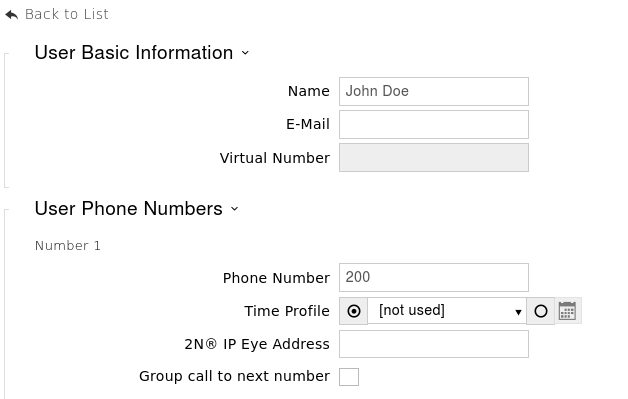
Once you click that button it will take you to a page asking for the Name, Email address, User phone numbers and user specific access settings. In this guide we’re just going to do the Name and Numbers. If this person has more than one number, add them in to the available number fields. If you want all three numbers to ring at the same time select the ‘group call to next number‘ and click ‘save‘ at the bottom of the page.
Example below:
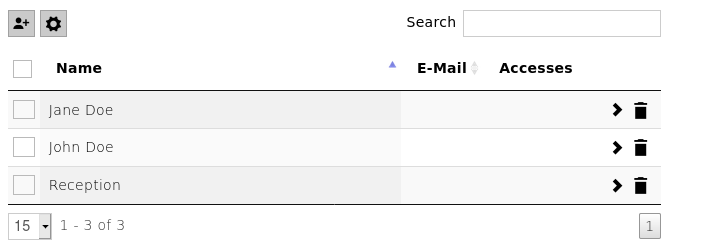
Repeat the above step for the desired amount of users. Once you’ve added some more users you should end up with a list when you go to the directory page.
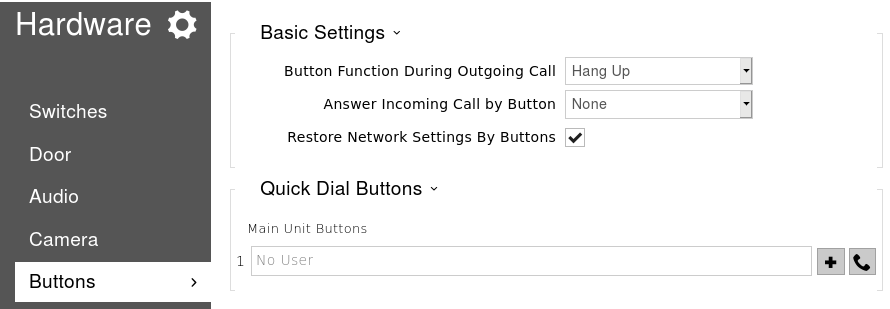
Step 6 – Configuring the dialling buttons
This is the step where we program the calling button with the users to call. The system doesn’t automatically add the users because it may not be desirable to call every user.
You can get to this section by pressing the Hardware icon on the dashboard.
Dashboard Icon
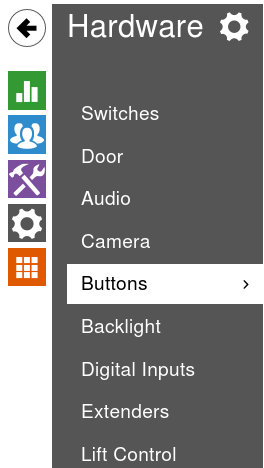
Or you can use the sub-menu navigation as shown in the image below:
Sub-menu Navigation
Once you are on the ‘Buttons’ page you will see that there are no users added to the main button. To add a user you need to click the ‘+‘ symbol next to the empty field.
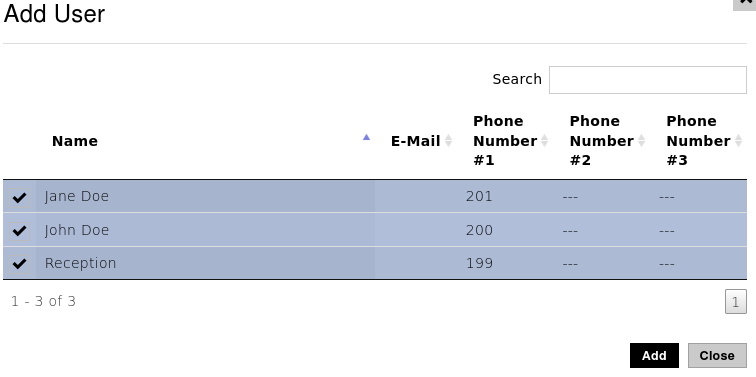
Once you click the ‘+‘ symbol it should bring up a new page with a list of the users from the directory, find the users you want to call, select them and click the add button. Example Image Below:
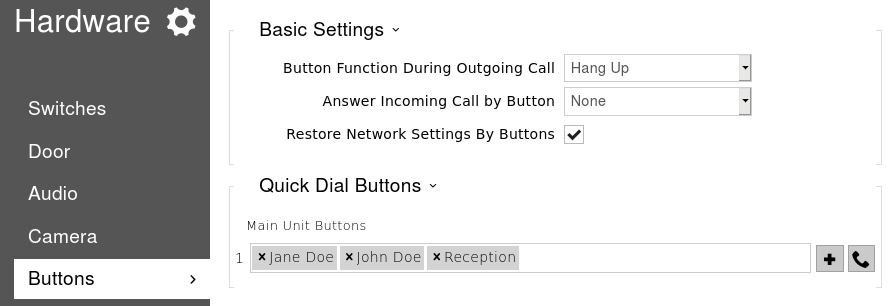
Once you’ve clicked add you should see the users appear against the main unit button. If you are happy with this click the ‘Save‘ button at the bottom of the page.
Now when the button on the intercom is pressed it should dial the programmed numbers via the SIP account configured in step 4.
A Handy tip, if the intercom isn’t nearby, to save yourself a walk you can click the ‘handset’ icon next to the assign user button to simulate a button press. (hopefully your near the phones to answer or hear them ringing).
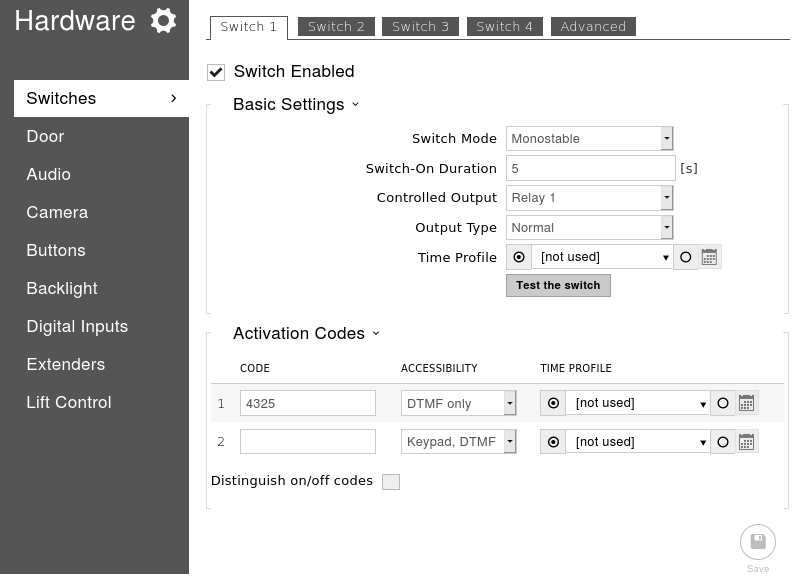
Step 7 – Configuring the switch & activation code
The final step in this configuration guide is to edit the switch activation code and change some other settings that maybe relevant to your deployment. The default activation code is ’00*’ but it’s highly recommended to change this to something else.
To do this we need to get to the ‘Switches‘ page and we can do this straight from the ‘Button’ page by clicking ‘Switches‘ at the top. Once on this page we can change the switch code under ‘Activation Codes‘.
As the image shows above you can apply two switch codes to each switch but usually one is enough. In the image above I have changed the switch code to 4325. Notice that I didn’t defined the ‘*’ which is be required when entering the code via DTMF (During a phone call).
If desired you can set it so the intercom doesn’t require the ‘*’ to be entered for confirmation by clicking the ‘Advanced’ tab at the top of the page and enabling legacy switch code.
Legacy switch code is only applicable for switch code 1.
Depending on your installation you may also need to change the settings in the table below:
Switch Setting
Description of Setting
Switch-on duration
Defines how long the switch will remain active in monostable mode. i.e – How long will the lock be released.
Controlled Output
Defines which output is used for this switch when activated.
If you’ve connected a lock to the ‘relay‘ on the PCB, select this.
If you’ve connected the lock to the ‘output‘ on the PCB use this.
Output Type
The type of lock being used will change which value needs to be applied.
‘Normal‘ is usually for a fail-secure lock, ‘Inverted‘ is usually for a fail-safe lock. ‘Security‘ is only applicable if the 2N security relay is being used.
To test your switch is working, you can click the ‘Test the switch‘ button on this page. If that works the setup is done. All you need to do now is make sure the intercom is working as expected.
Of course this is just a very basic guide covering the first steps on every intercom, if there are some additional requirements for the customer, or if your having issues with one of the stages above just send an email to: support@provu.co.uk
Also a very good place for 2N resources is the 2N Wiki and FAQ.
If you have contacted Support regarding a technical issue that you are having with your 2N door intercom then we may have asked you to capture a trace replicating the fault.
This guide will show you how to capture a PCAP trace from a 2N Door Intercom.
Step 1:
Web browse to the IP address of the intercom. If you don’t have a DHCP table or network scanner to find the IP address reboot the intercom and wait for the second beep tone, after this press the main button 5 times. The intercom should then read the IP address out to you.
More information on this can be found on 2N’s Wiki.
Step 2:
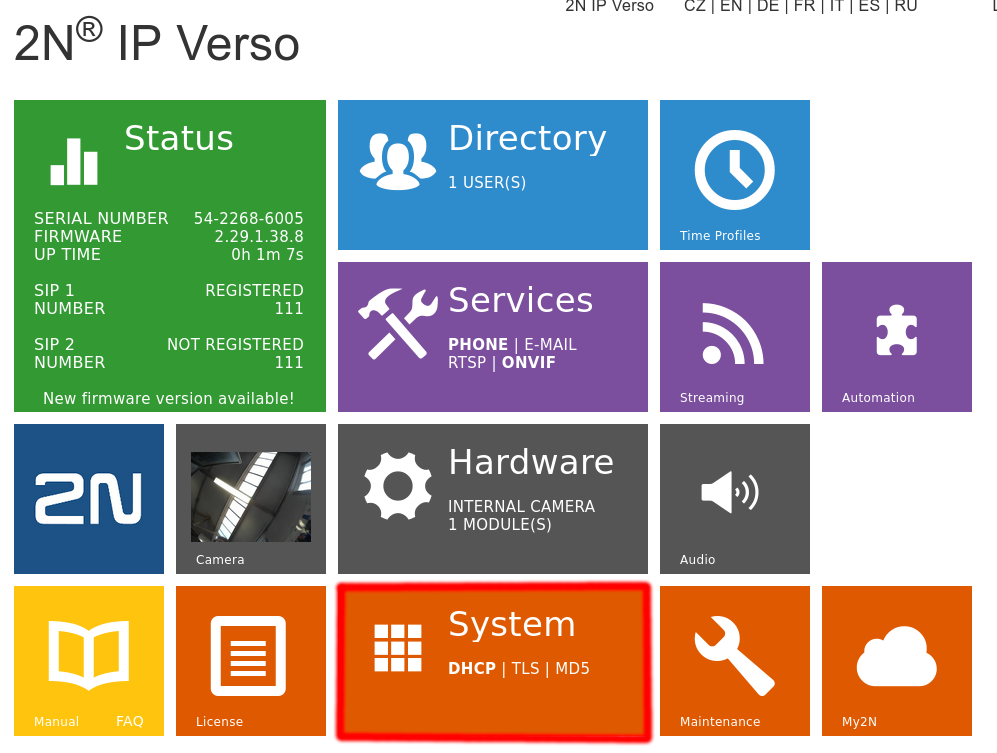
Once you have logged into the web interface go to System highlighted below:
Step 3:
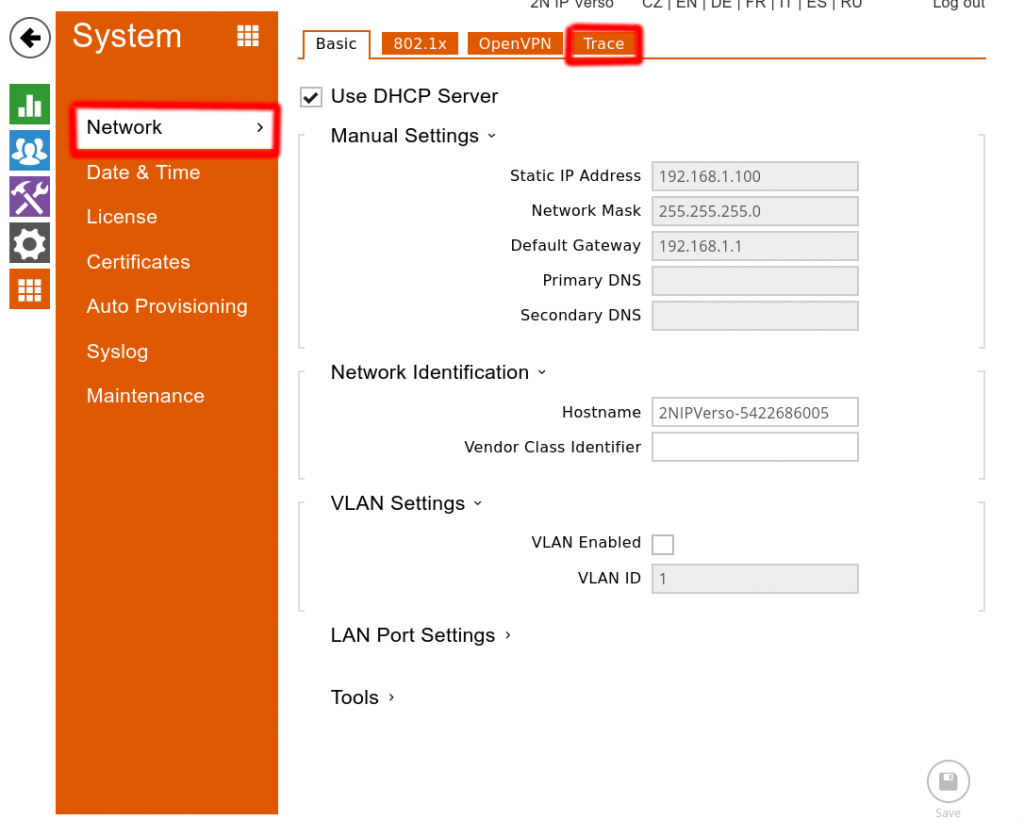
Go to Network > Trace as highlighted below:
Step 4:
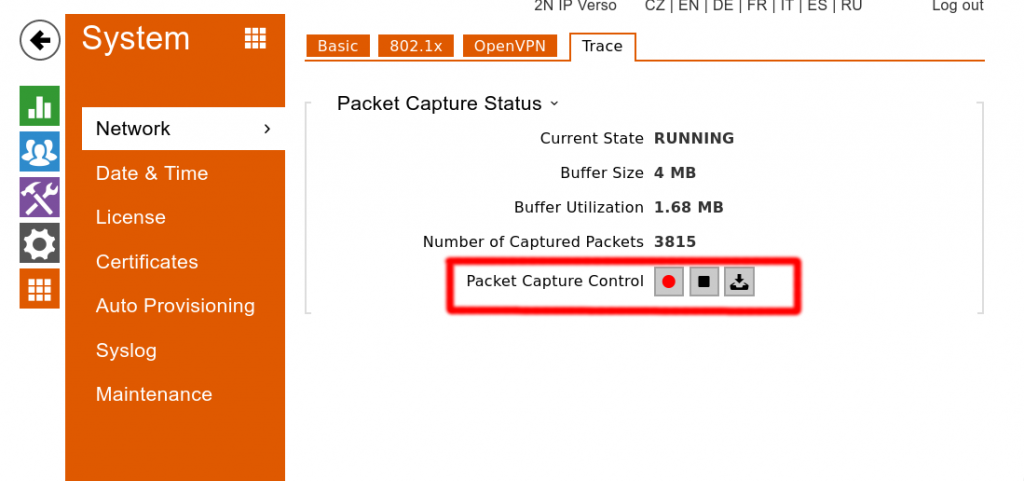
Once you are on the Trace page, press the red record button to start the trace > This is now the time to replicate the fault the customer is experiencing.
Step 5:
Once the fault has been replicated press the Stop button > then press Export > Finally send this to support@provu.co.uk
If you have any problems with this please contact support on 01484840048 option 2 or email support@provu.co.uk.
As we all look for new ways to adapt to the ‘new normal’, cleanliness is going to remain at the forefront of our minds for some time to come. 2N have put together some new videos to illustrate how users can continue to benefit from their products while maintaining optimal safety.
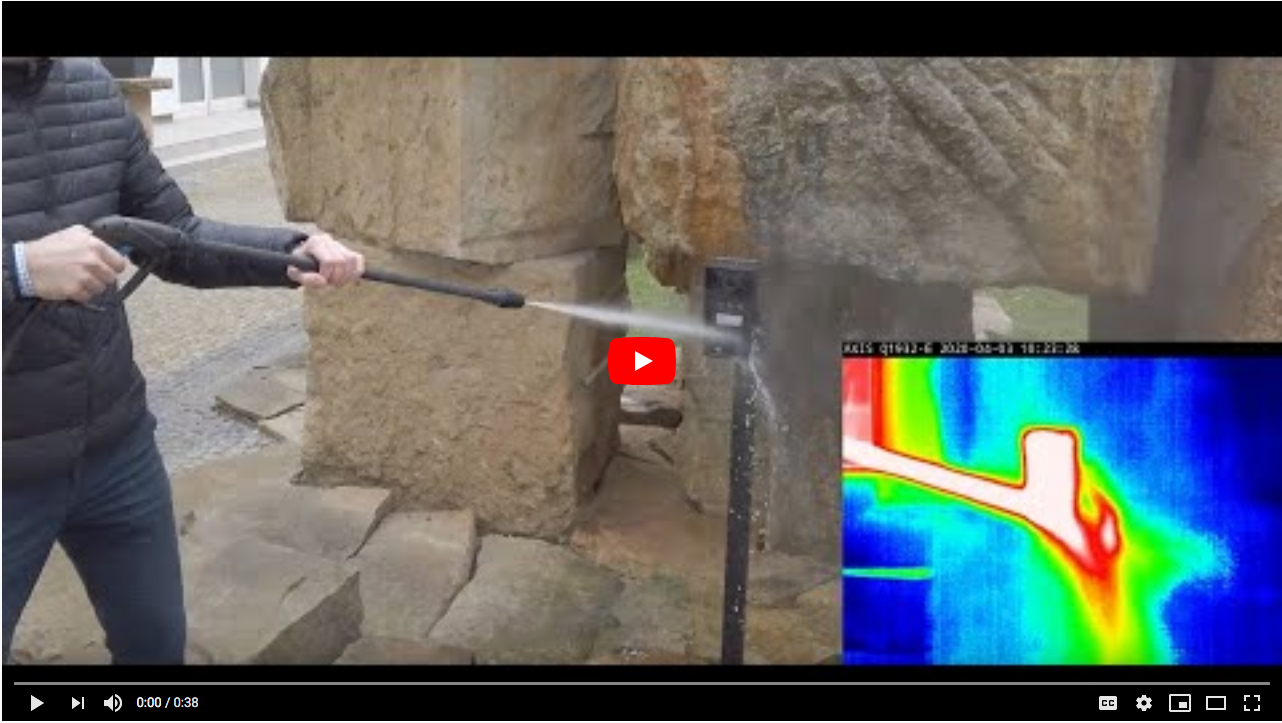
With a protection rating of IP69K 2N’s IP Force intercom can be exposed to even the harshest environments and cleaning products. See their latest video to see how this robust intercom can be thoroughly cleansed.
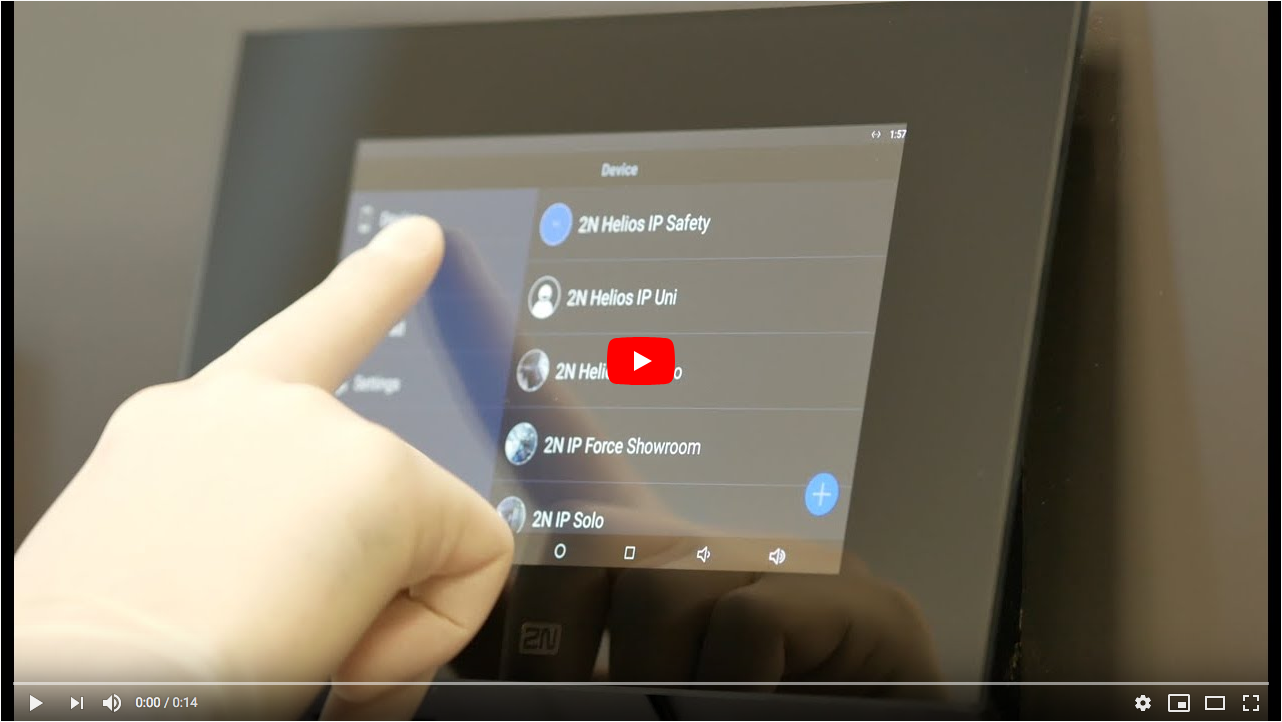
A pain point for many touchscreens is the difficulty using them when wearing gloves. 2N’s IP Verso and Indoor Touch can be easily used when wearing gloves. See the incredible responsiveness in 2N’s short video clip.
2N also offer a contactless solution with their Bluetooth module. Both the IP Verso and the Access units can be adapted to create a contactless solution. Simply add in the Bluetooth module to enable staff to access your buildings through their smart phones or tables with the 2N® Mobile Key application.
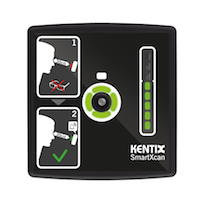
Thermal cameras have become a hot topic over the past few months, but the reliability of these have been deemed unreliable by the MHRA. Our sister company, Alliot Technologies is the UK’s exclusive distributor of the Kentix SmartXcan body temperature sensor. Unlike other devices on the market, this smart device uses sensors to provide a core temperature reading via the eyes as well as the forehead. Compliant with the IEC80601-2-59 regulation for medical use, this sensor can be simply integrated with 2N systems to enable/restrict access based on the temperature reading.
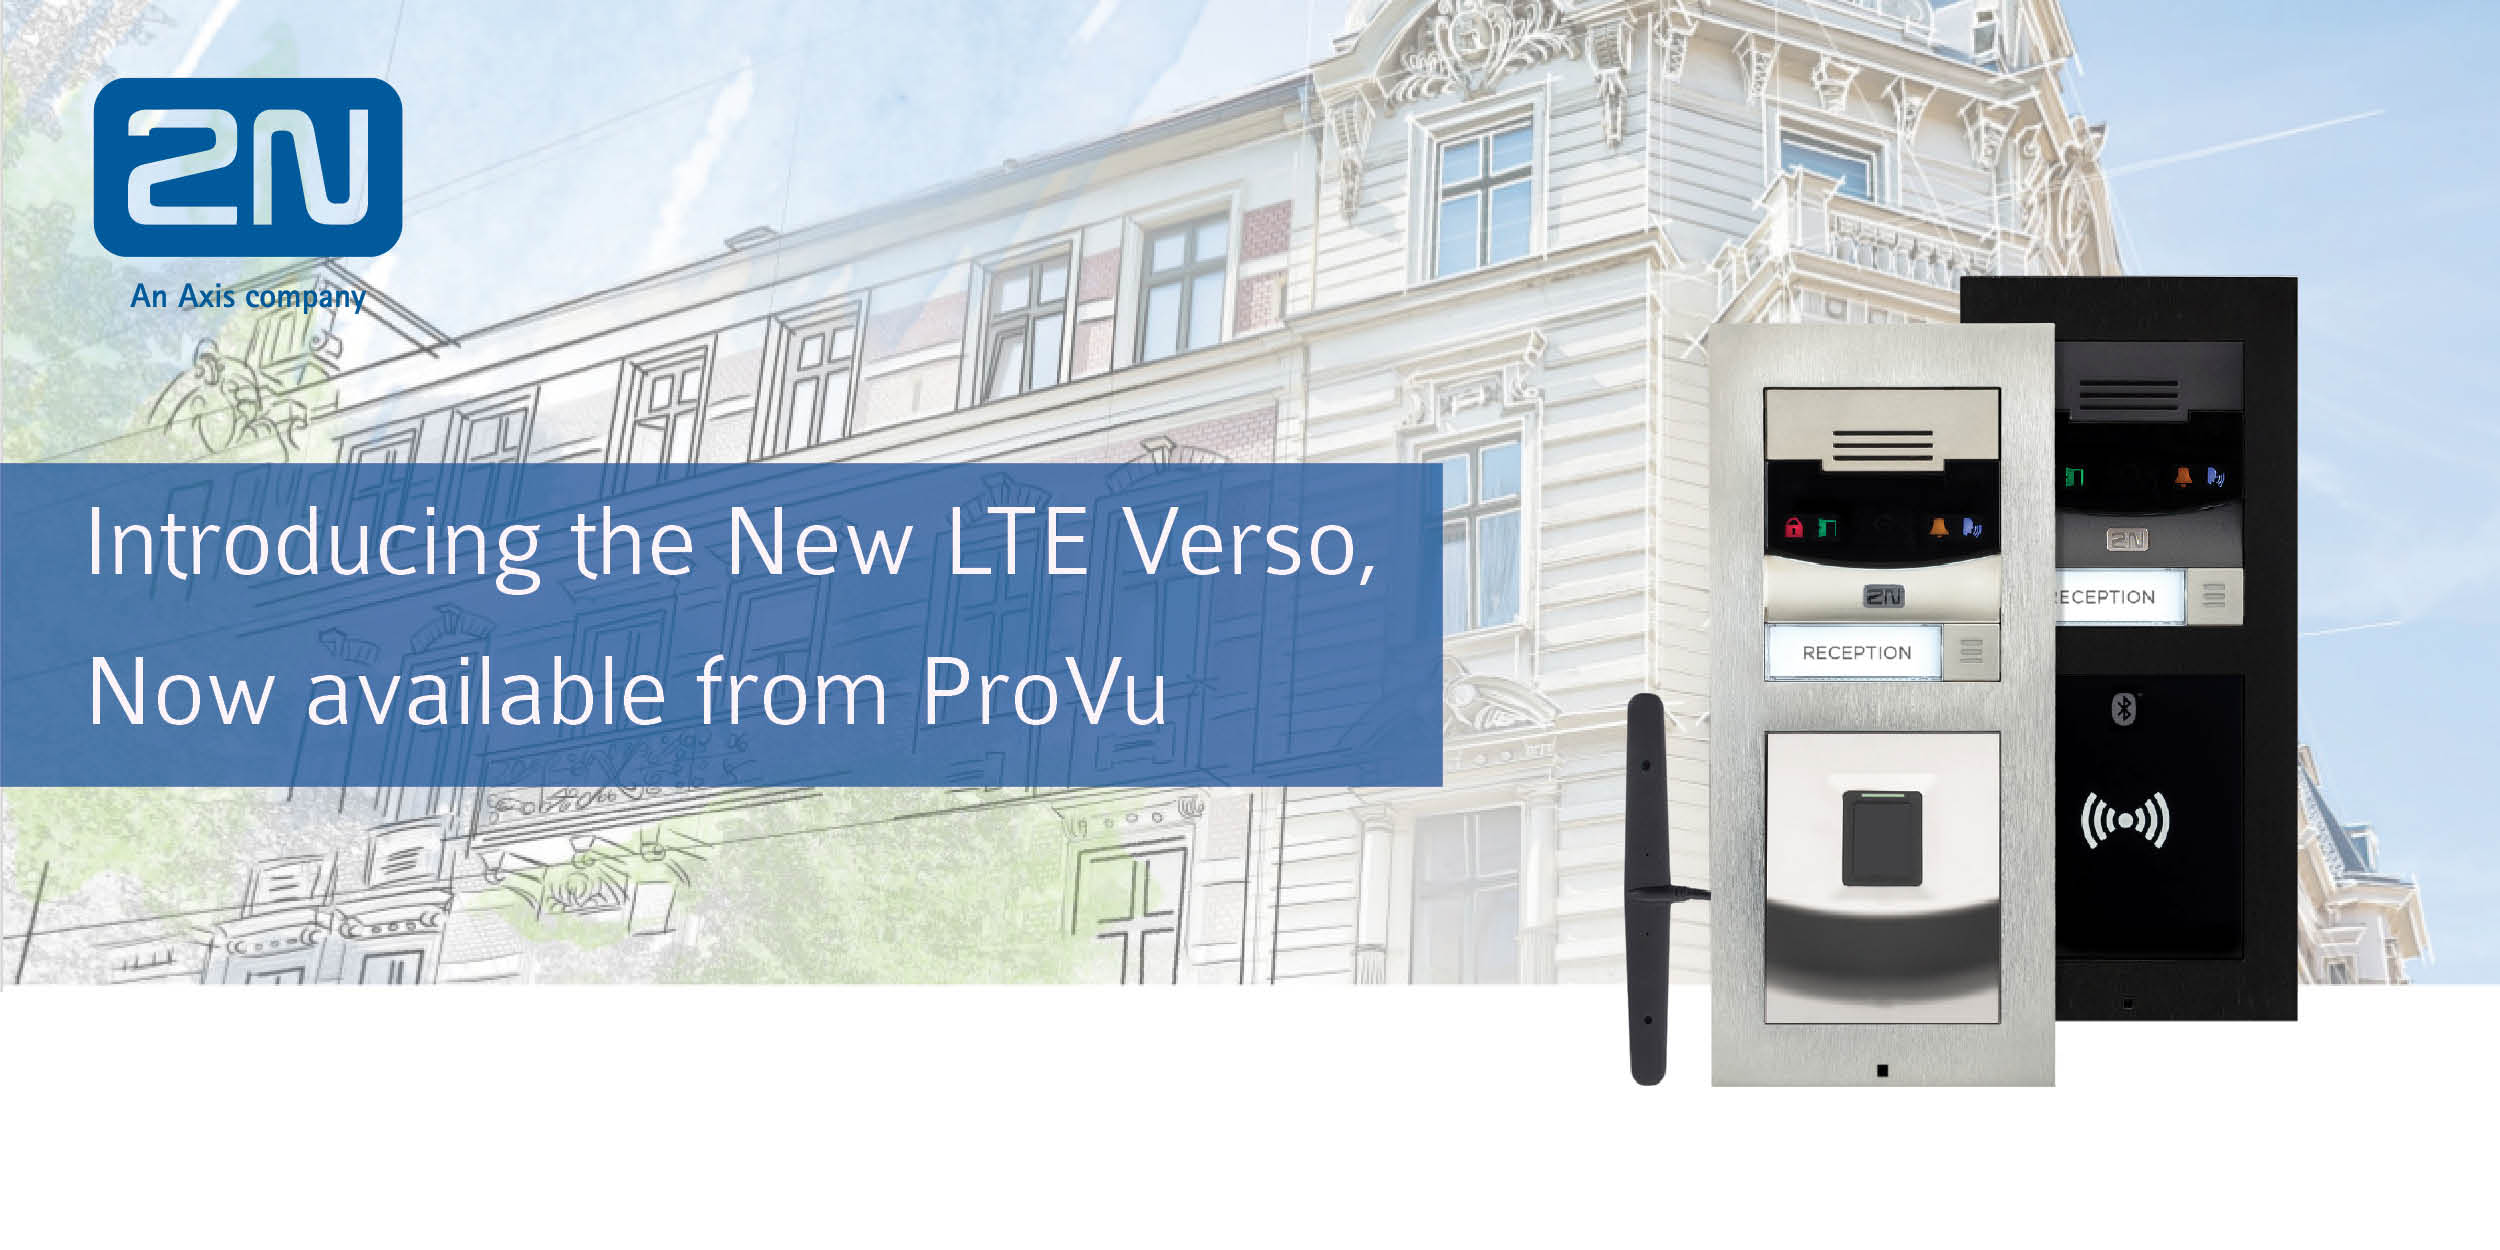
The new 2N LTE Verso is now available to order from ProVu. Featuring the same elegant design and compatible modules as the popular IP Verso, this new model offers a HD camera to provide a unique LTE door entry solution with video.
Compatible with SIM cards across a variety of networks, the LTE Verso utilises a 4G mobile communications standard for delivering high-speed wireless communication to either your PBX or the My2N hosted system. Without the need for any expensive cabling this solution can be easily installed – simply connect to power and it’s ready to go!
Key Advantages include:
Ideal solution for older buildings or remote locations where cabling may not be feasible.
Features a HD camera to offer an LTE video intercom
Can be remotely and securely configured via 2N’s cloud portal.
Pricing and stock information can be seen on our reseller portal, ProSys.
*Please note: The LTE Verso base unit requires the use of 2N’s external antenna when used with additional modules and is compatible with a variety of mobile networks in the UK. Video Preview is available on smart phones and the Indoor Touch via the My2N app, but is not compatible with third party PBX’s or third party VoIP phones.