Browse Category

Technical Hints

Distinctive ringing with Cisco phones

Both the older Cisco SPA range and the new CP range support distinctive ringing through the use of Alert-Info SIP headers.

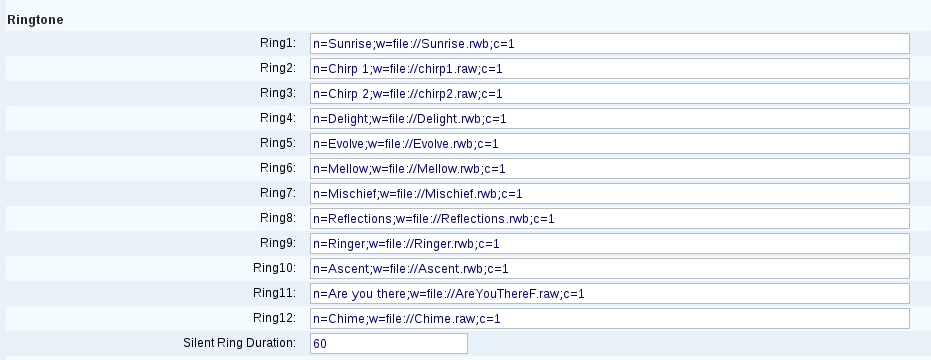
The names to use can be found in the web interface for both phone types.  In the web interface, the settings are in the Voice section, phone tab, Ringtone heading.

On CP phones:

On SPA phones:

The important part for Alert-Info is the name part after “n=”.  The Alert-Info header must look like these examples:

Alert-Info:Mellow

Alert-Info:Simple-2

So simply put the name of the ringtone in the header and nothing else.  This is different to most phones (and actually not as specified in the SIP RFC) as they need to have a dummy URI inside them.

As an example, if you wanted to add this header in Asterisk, use the SIPAddHeader application:

SIPAddHeader(“Alert-Info:Mellow”)

How to make a 2N call a phone when the tamper switch is triggered

Did you know you can make your 2N tamper switch call a phone when it is triggered?

If you have a 2N tamper switch and want to know how to install it into your Verso, please click this link:

2N’s Helios IP Verso Tamper Switch

After the installation of the tamper switch you will need to configure it. Go on the 2N web-interface and go to Services (Purple tile) > Automation, from this page you will need to tick the box “Function Enabled” and fill in the “Object Type” and “Parameters” as seen below:

Please note: to change “Number=5070; Event=1″ to the extension you want the 2N to call when the tamper switch is triggered.After you have filled these automation in you can run a test by taking the metal plate of the 2N and seeing if your phone rings as seen in the video below:

In addition to this you could have a second Event that sends an email to you when motion is detected. This would be for extra security purposes and would capture a picture of who ever triggered the tamper switch. If you want to know how to do this click the link below:

How to set up Email notification from 2N movement detection

If you have any problems with this please contact our support team.

Algo 8301 Multicast Line IN Audio

This guide is designed to show how to make an Algo 8301 multicast the audio it receives on the Line IN or AUX IN ports.

In this guide we will use two Algo 8301 units, the first as the Multicast sender and the second as the multicast receiver.

Configuring the Multicast Sender

Log in to the Algo 8301 Web GUI and change the following settings:

  • Basic Settings > Multicast
    • Multicast Mode = Master/Sender
    • Multicast Type = Regular (RTP)
    • Master Single Zone = Music
  • Additional Features > Input/Output
    • Audio Always On = Enabled
    • Audio Input Port = Aux IN or Line IN (depending on what port you are wiring your audio source to)

Configuring the Multicast Receiver

Log in to the second Algo 8301 Web GUI and change the following settings:

  • Basic Settings > Multicast
    • Multicast Mode = Slave/Receiver
    • Multicast Type = Regular (RTP
    • Basic Slave Zones = Tick “Music” box.

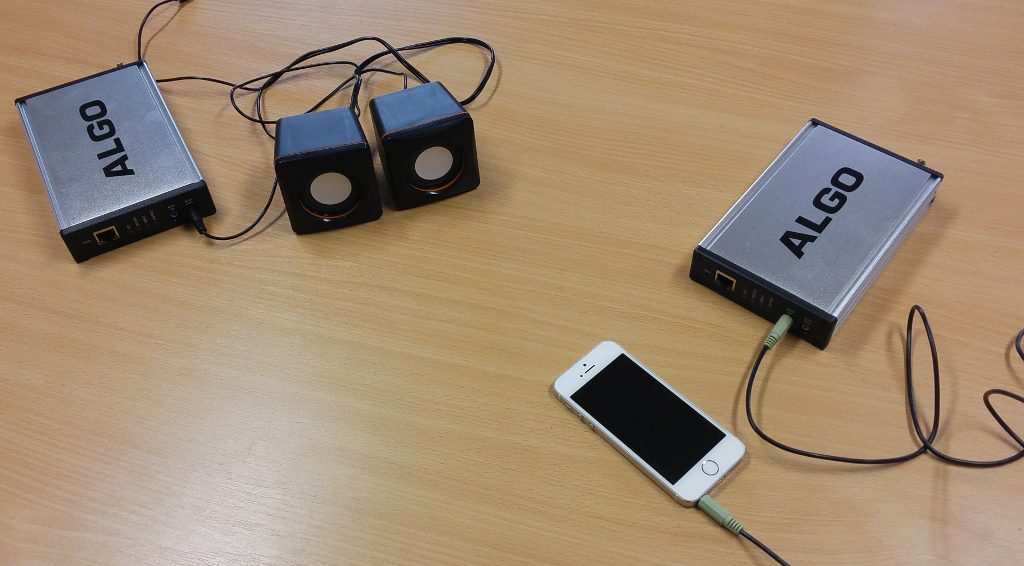
Thats It! Couldn’t be simpler. In my test, I chose the Audio Input Port as the Aux IN port, then connected my mobile phone using a normal AUX cable. I then connected some PC speakers to the Aux OUT port on the second Algo 8301.


When I played the music on my phone, it was played out over the speakers plugged in to the second Algo, which was receiving the audio over multicast.

This would be a great way to take an audio input source in one location, and broadcast the message across a large site with multiple speaker groups.

Provision Sangoma S700 IP Phone using Sangoma portal

You may or may not be aware that you can provision your Sangoma phones using the re-direction service which is available via the Sangoma portal. If you are interested in finding out how to provision your Sangoma phones, please follow the guide below:

Step 1:

You will need to start by navigating to the Sangoma portal which can be accessed by visiting the following link listed below:

https://portal.sangoma.com/

Please note, if you do not already have an account for the Sangoma portal, you will need to sign up for one. This can be done by accessing the following link listed below:

https://portal.sangoma.com/index.php/login/register

Please note that the registration link above will also list some important information regarding the Sangoma portal.

Step 2:

Once you have logged into the Sangoma portal, you should see the welcome page and also a navigation bar on the left hand side. Using the navigation bar, you will need to click onto ‘Products’ which should display a sub list with an option for ‘Sangoma Phones’. You will then need to click onto ‘Sangoma Phones’ which should display another sub list, where you can select ‘Register’.

Step 3:

You should now see a screen for registering a Sangoma phone. For this part you will need to find out the MAC address of the phone that you are wanting to register.

If you are able to web browse to the IP address of the Sangoma phone, this could be the easiest way as you can simply copy and paste the MAC address onto the Sangoma portal.

If you don’t know the IP address of the phone, you can obtain this by either web browsing to the IP address of the router and then looking for devices on the network, or, if you have the phone in front of you, you can obtain the IP address by pressing the tick button located at the centre of the arrow navigation keys, and then by pressing the tick button again on the ‘Information’ tab. You should then see the information page displaying the IP address under ‘IPV4’.

Step 4:

Once you have obtained the IP address, you will need to browse to that IP address using a web browser. By default, you will be prompted to enter a username and password before you can access the interface of the phone. The default username and password is ‘admin’. Please ensure that you change the default password for security reasons.

Once you have logged into the web interface, you should see the status page that displays a variety of information about the phone. You should see the MAC address under the ‘Network’ section. You will need to copy the MAC address, then navigate back to the Sangoma portal and paste it into the registration field.

Step 5:

Once you have pasted the MAC address into the registration field, you will need to press the submit button located next to the MAC address field. Providing the MAC address you have entered is valid and doesn’t already exist on the system already, you should see a message appear in green to show that your phone has been successfully registered.

Step 6:

You may see some phone details including the MAC address, manufacture date and more listed on the screen. You should see a ‘General Information’ section which will ask for the company name to assign the phone to. You will need to ensure that the correct company name is selected. You can then enter a description in the box below such as ‘Sangoma S700 IP Phone’ depending on the phone you are registering.

Step 7:

Below the description box, there should be a check box to ‘Enable Redirection’. You will need to check this box and some options should be displayed below. The ‘Redirection Type’ should be set to ‘IP/FQDN’. The ‘IP/FQDN protocol’ should be set to ‘http://’. The ‘IP/FQDN address should be blank by default. You will need to enter the IP address of the Sangoma PBXact UC system in this field followed by the provisioning port number e.g. ‘192.168.1.60:83’. Please ensure that you don’t include ‘http://’ at the beginning of the ‘IP/FQDN address’ field as the protocol option above should already be set.

Once the above options have been set correctly and the relevant information has been filled in, you can then go ahead and submit the changes using the ‘Submit’ button at the bottom of the page.

You page should then reload and display a green box stating that the changes have been updated. You will then need to reboot the phone in order for the provisioning process to start. You may want to factory reset your Sangoma phone if you want to overwrite the existing configuration.

Sangoma PBXact UC – Creating an extension

Are you interested in learning how to create an extension on a Sangoma PBXact UC system? We’ve put together a step-by-step guide below outlining how to do this. Please note that this guide doesn’t show you how to provision your Sangoma phone.

Step 1:

You will need to start by web browsing to the IP address of your Sangoma PBXact UC system. If you don’t already know the IP address of your PBXact system, you may be able to find this by web browsing to the IP address of the router and viewing a list of devices on the network.

Step 2:

Once you have web browsed to the IP address of your PBXact system, a menu screen should appear with a few different options to choose from. Please see the following screenshot that shows these options:

You will need to click onto ‘PBX Administration’ which is the first option on the left. You should then be prompted to enter a username and a password before you can access the administration page.

Step 3:

Once you have logged into the PBXact system, please ensure that ‘Advanced Mode’ is on. You can find out if this is enabled if the second tab on the top says ‘Basic Mode’.

Step 4:

You will need to hover over ‘Modules’ using the navigation bar at the top of the screen, then click on ‘Extensions’. Please note that it may be easier to use the search function using the magnifying glass on the top right hand side. You should now see a list of the extensions that have been created on the PBXact system if any extensions exist.

Step 5:

The next step is to click on ‘Add Extension’, then click on ‘Add New Chan_SIP Extension’. You should then be able to see a different screen asking for information for the extension you are creating.

Step 6:

Under ‘User Extension’ you will need to enter the extension number that you would like to create.

Step 7:

Under ‘Display Name’, you will enter the name that you would like to be displayed when that extensions calls another extension. You would ideally use the name of the person that the extension is going to be assigned to.

Step 8:

You should see a section for ‘User Manager Settings’ which lists some options for creating a user for the extension.

If the extension you are creating is to be linked to an already existing user, you can select the drop down list for the option ‘Link to a Default User’ and select the user from the list.

If you are creating a new extension for a new user, then you will need to leave the ‘Link to a Default User’ option as ‘Create New User’. By default, the user will be given a username automatically, but if you want to specify a username, you can select the check box ‘Use Custom Username’ under the option ‘Username’ and input a custom username.

You should also see the password listed below for the new user that is generated automatically. Again, you can change the password by deleting the one that has been generated and by typing in a new password.

Step 9:

You will need to navigate to the ‘Other’ tab and input more information to the fields under ‘Endpoint’. Providing it is a Sangoma phone that you are registering, you will need to select ‘Sangoma’ from the drop down list under ‘Brand’.

Step 10:

You will also need the MAC address of the phone which you will need to input under the ‘MAC’ field.

Step 11:

The ‘Template’ option should automatically select ‘sangoma_default’ after selecting the ‘Brand’ as ‘Sangoma’.

Step 12:

You will also need to ensure that the ‘Model’ is selected to the correct phone model e.g. ‘S700’.

Step 13:

Before you can proceed creating the new extension, you must ensure that you navigate to ‘Other’ using the tabs near the top of the page, then navigate to ‘User Password’ under ‘XactView Settings’ and input a password. You cannot create the new extension without inputting a user password first.

Step 14:

You can now go ahead and create the extension using the ‘Submit’ button located at the bottom of the page.

If you have followed the steps above, you should now have a new extension created and also configured to work with the phone that you are wanting to use providing you have entered the correct information in the ‘Endpoint’ section. Again, please note that your phone won’t call home to the PBXact system unless you re-direct the phone to do this. You can do this by using the Sangoma portal. Please see the following link below for the Sangoma portal:

https://portal.sangoma.com/
How to record calls using a Micro SD card on the VTECH Phones

If you have either VSP726A or VSP736A then you will have an SD card slot on the back of the phone, this is for call recordings.

Just in case you were wondering this is how to set it up:

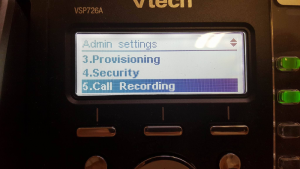
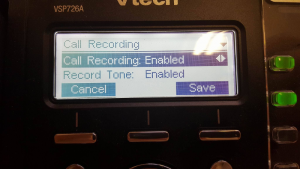
First of all you need to go to Menu and then “Admin Settings” this requires your admin password, from there scroll down to “Call Recording” and “Enable” Call Recording.

3  5

Now that you have enabled call recording you can go ahead and record straight to your SD card, here is how:

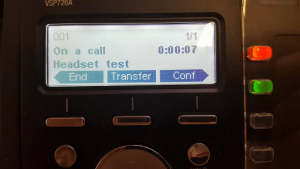
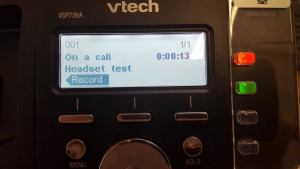
When on a call, “End, Transfer and Conf” appear on the screen, press the right arrow key on the silver direction pad, this will show a”Record” option. Select this option and this will start and stop recording your call.

6  7

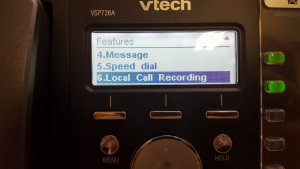
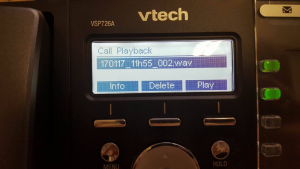
Once you have stopped the recording you can find this again by going to “Menu” > “Features” > “Local Call Recording”, in there will be all the calls you have recorded.

11  12

To listen to the recording you can either play them on loud speaker through the phone or through the handset or headset, you can even remove the SD card from the phone and listen to them on the PC.

If you are still having problems please contact our support team

Compatible headsets for the new Cisco 7800 and 8800 series phones

We’ve recently done some testing between the new Cisco 7800 and 8800 series phones and the headsets that we supply.

Here is a table of all the headsets and cables that we’ve tested and work with these new Cisco phones:

Headset Cable / Adaptor
Eartec 308/510/710 Range EAR-QD002(C)
Plantronics SupraPlus Range Plantronics U10
Plantronics CS500 Range Plantronics APC-42
(For EHS, use switch settings: A/3/2)
Jabra BIZ Range Jabra GN1200
Jabra Pro 920/925 Jabra Link 14201-43 (For EHS, use switch setting “B” and EHS setting “Jabra IQ”)
Sennheiser SC230 & SC260 Sennheiser CSTD 08

Please note: The Cisco 7811 does not have a headset port and therefore does not work with the headsets listed in the table above.

To find out more go to our Headset Compatibility Guide here: https://www.provu.co.uk/headset-compatibility.html

If you have any other questions or problems please contact our technical support team.

Direct IP Call Between 2N Helios IP and Gigaset N510IP

Here is a short guide on configuring direct IP calling between a 2N Helios IP intercom, and a Gigaset N510IP. The same process will work with a Gigaset N300IP.

Both units need to be plugged in, and connected to the same network. You need to connect to the web interface of each device to configure them.

Step 1: Configure the Intercom

Go to Services > Phone and edit the Domain setting. You need to set this to the IP of the intercom itself, in our example this is 192.168.2.64

path3416


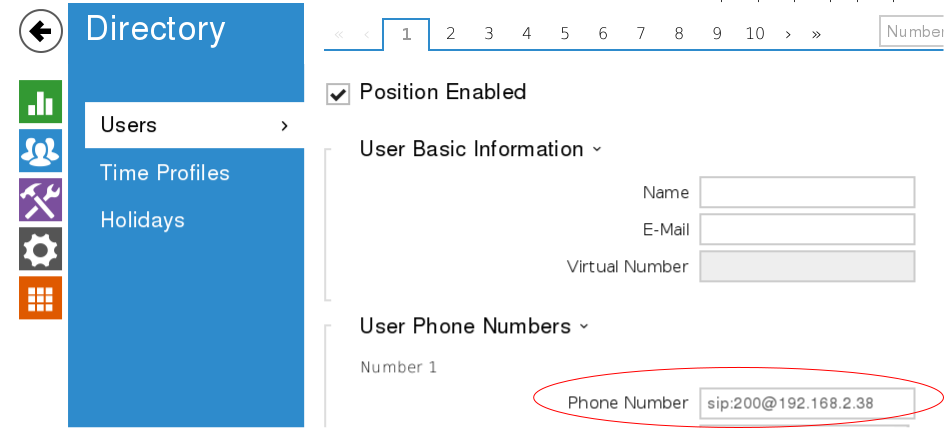
Then you need to add an entry to the directory, to call the N510

path3381

Here I have used 200 but you can choose any number, you will need to use this number later when configuring the N510. The IP address part must be the IP address of the N510 unit, in our example this is 192.168.2.38

Step 2: Configure the N510

Go to Settings > Telephony > Connections and Edit one of the Connections.

N510-Connection

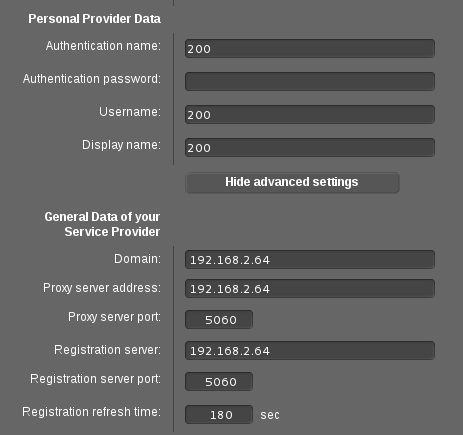
Here you add the number that you chose earlier, and the IP address of the 2N intercom in the 3 boxes shown – Domain, Proxy Server and Registration Server. You do not need to enter a password as the N510 does not actually register to the 2N intercom.

Settings > Telephony > Advanced VoIP settings.

N510-SIP-Port

Here you set Use random ports for SIP to ‘No’, and set the SIP port to 5060.

Finally, you need to go to Settings > Telephony > Number Assignment and make sure that your handsets are set to accept incoming calls from the account/connection that you just created.

You should now be able to call to the Gigaset by pressing the button on the front of your intercom. If you are still having problems, please contact our technical support team.

Yealink Provisioning: Common file mapping

This is perhaps more of a reminder to me for future reference, however, it may be useful for others too!

When a Yealink phone provisions, it requests a common provisioning file and a MAC specific one. The common one is referred to as such because each model requests a file which is unique to it.

Here are the Yealink models alongside the requested common files:

Model Common file Firmware code
CP860 CP860 y000000000037.cfg 37
T18P T18 y000000000009.cfg 18
T19P T19 y000000000031.cfg 31
T19P_E2 T19_E2 y000000000053.cfg 53
T20P T20 y000000000007.cfg 9
T21P T21 y000000000034.cfg 34
T21P_E2 T21_E2 y000000000052.cfg 52
T22P T22 y000000000005.cfg 7
T23G T23 y000000000044.cfg 44
T26P T26 y000000000004.cfg 6
T27P T27 y000000000045.cfg 45
T28P T28 y000000000000.cfg 2
T29G T29 y000000000046.cfg 46
T32G T32 y000000000032.cfg 32
T38G T38 y000000000038.cfg 38
T40P T40 y000000000054.cfg 54
T41P T41 y000000000036.cfg 36
T42G T42 y000000000029.cfg 29
T46G T46 y000000000028.cfg 28
T48G T48 y000000000035.cfg 35
VP530 VP530 y000000000023.cfg 23
VP530 VP-T49 y000000000051.cfg 51
W52P W52 y000000000025.cfg 25
W56P W56 y000000000025.cfg 25

Phew.. that should just about do it!

Snom Phone Security

We remind all snom phone customers about the security advice at http://wiki.snom.com/FAQ/How_do_I_secure_my_phone

In particular the advice to set an admin mode password on the phone. The web interface of the phone can be accessed using the admin mode password. The default of `0000` is not secure.

A http password alone is not enough to protect the web interface of the phone.

If an attacker can access the web interface of your phone, they can dial a call, which might result in fraudulent calls being made.